background image

6.2

 Cable Clips and Cable Stops can be 

installed to further manage cables. 

Please See Over.

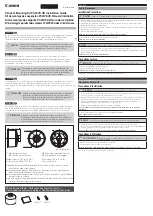
Step 4. Mount Displays

Step 5. Adjust Height

M4 Phillips Head 
Mounting Screws

Option 1:

 75x75mm Hole Pattern

Option 2:

 100x100mm Hole Pattern

Note:

 Extend Arms to 

achieve 100x100mm 
hole pattern. 

5.1

 Unlock Handgrip ensuring both the 

screen and arm assembly are supported.

5.2

 Lift/Lower the Screen to the desired height. 

Move both Screen and Arm assembly together.

Step 6. Cable Management

6.1

 After plugging in your cables, install the Cable Covers.

A.

 Insert Cable Covers up 

into Lock Slots.

B.

 Push Cable Covers away 

from Elbow Joint to secure 
in place.  

Elbow Joint

‘click’

‘click’

Lock Slot

Cable Stop

Cable Clip

5.3

 Lock Handgrip firmly.

Note:

 Ensure enough cable 

slack is given to allow for 
movement.

Summary of Contents for VF-AT

Page 1: ... you have received against the component checklist and hardware above Step 2 Mount Pole Assembly Option 1 Bolt Through Option 2 Mount using Desk Clamp Pole Assembly Pressure Plate 2 1 Remove both the Pressure plate and M10 Desk Clamp Screw 2 2 Fasten the Desk Clamp to the Bolt Through Base Pole Assembly using the M8 x 30mm Screw and Tighten Firmly M10 Desk Clamp Screw M8 x 30mm Screw Bolt Through ...

Page 2: ...in desired location If you need to reposition the desk clamp bracket or you have no access to the rear of your table continue to Step 2 4 If you DO NOT need to reposition the desk clamp bracket and you have access to the rear of your table skip to Step 2 7 2 6 Reattach Desk Clamp Bracket 2 7 After positioning your Pole Assembly screw Pressure Plate in and Tighten Firmly 3 1 Unlock Handgrip and rai...

Page 3: ...ock Handgrip ensuring both the screen and arm assembly are supported 5 2 Lift Lower the Screen to the desired height Move both Screen and Arm assembly together Step 6 Cable Management 6 1 After plugging in your cables install the Cable Covers A Insert Cable Covers up into Lock Slots B Push Cable Covers away from Elbow Joint to secure in place Elbow Joint click click Lock Slot Cable Stop Cable Clip...

Page 4: ...s the rear profile to flex in place Many experts believe that the extended use of any computer screen has the potential to cause serious injury to your eyes neck and back This can be largely avoided by correctly positioning your display Viewing angle Ergonomists recommend that the optimal position of your display should be slightly below eye level When looking at the display s centre the user shou...

Reviews: