background image


Viscount Maestro – Grande - Sinfonia 


40 


 1.2. LET'S TAKE A LOOK AT THE INSTRUMENT 

 
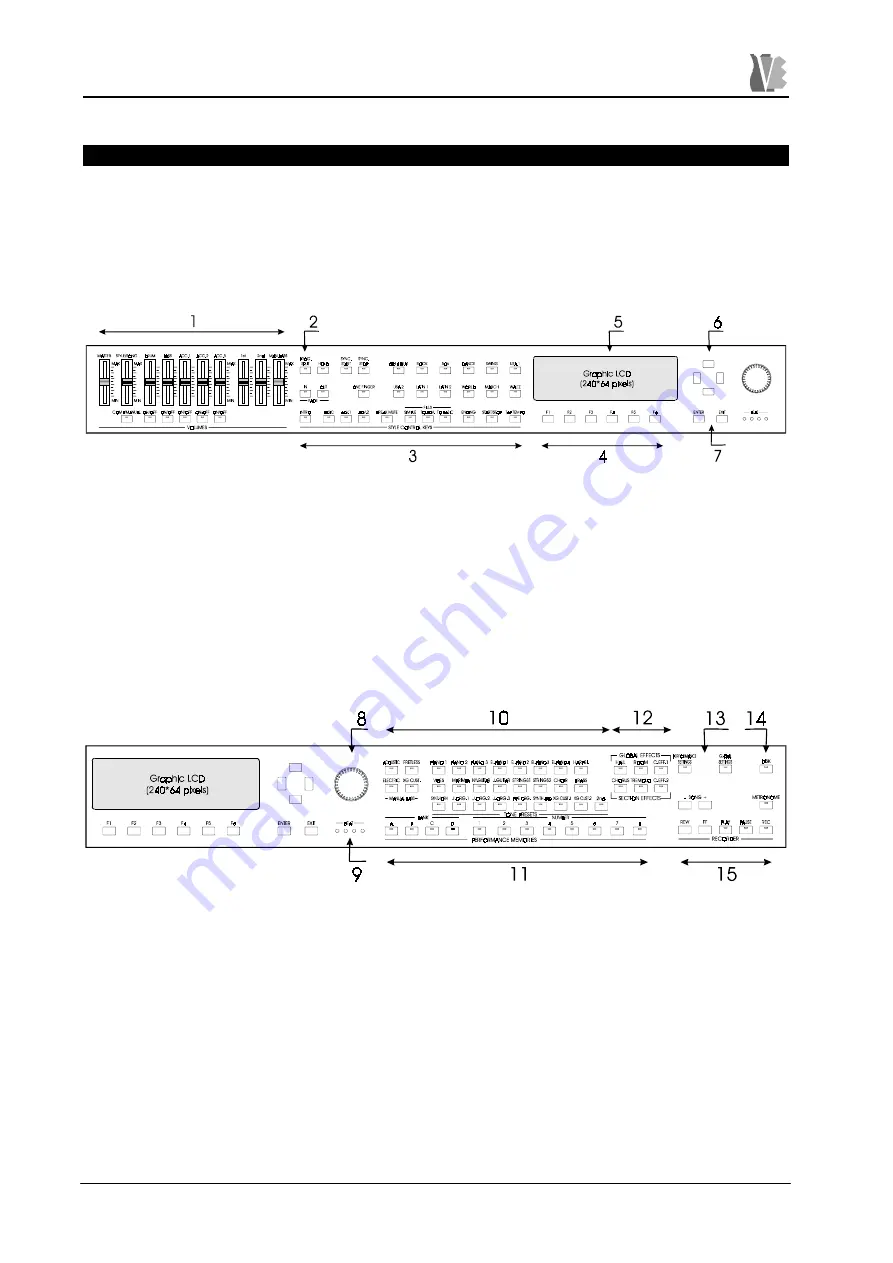
Here below you can find the front panel of the instrument, split in two parts for 

sake of clarity. On the panel you can recognize different zones associated to the 
instrument functions; the explanations refer to the chapters of the guide, illustrating all 
the functions associated to each zone. 


1.  Volumes Section (Chapter 5) 
2.  PROG. SPLIT button: keyboard mode selection (Chapter 3) 
3.  Automatic accompaniment (Chapter 4) 
4.  Function buttons (Paragraph 1.4) 
5.  Graphic LCD screen (Paragraph 1.4) 
6.  Cursor buttons (Paragraph 1.4) 
7.  ENTER/EXIT buttons (Paragraph 1.4) 


8.  Rotational encoder (Paragraph 1.4) 
9.  Beat LEDs (Paragraph 7.3) 
10. Timbre selection (Chapter 4) 
11. Performance buttons (Chapter 8) 
12. Effects Section (Chapter 5) 
13. Global and performance settings (Chapter 8) 
14. Floppy commands (Paragraph 7.4) 
15. Recorder (Chapter 7) 

Summary of Contents for Grande

Page 1: ...0DHVWUR UDQGH 6LQIRQLD Manuale operativo Operating manual ...

Page 2: ... all warnings 4 Follow all instructions 5 Do not use this apparatus near water 6 Clean only with dry cloth 7 Do not block any ventilation openings Install in accordance with the manufacturer s instructions 8 Do not install near any heat sources such as radiators heat registers stoves or other apparatus including amplifiers that produce heat 9 Do not defeat the safety purpose of the polarized or gr...

Page 3: ...THE PROGRAMMED MODE 48 4 THE AUTOMATIC ACCOMPANIMENT SECTION 49 4 1 DESCRIPTION 49 4 2 THE ACCOMPANIMENT STYLES 49 4 3 THE METRONOME 50 4 4 THE CHORDS RECOGNITION 50 4 5 LIST OF THE AUTOMATIC ACCOMPANIMENT STYLES 51 5 THE VOLUMES SECTION 53 5 1 DESCRIPTION 53 5 2 HOW DOES THE VOLUMES SECTION WORK 53 6 THE EFFECTS SECTION 55 6 1 DESCRIPTION 55 6 2 USER EFFECTS FOR 1ST AND 2ND PARTS 56 6 3 USER AMBI...

Page 4: ...Viscount Maestro Grande Sinfonia 36 TECHNICAL DRAWINGS ASSEMBLY SCHEME OF MAESTRO ...

Page 5: ...Viscount Maestro Grande Sinfonia 37 ASSEMBLY SCHEME OF GRANDE ...

Page 6: ...OUNT MAESTRO GRANDE e SINFONIA can turn into a real orchestra you can choose among 48 accompaniment styles each one complete of variations and divided into 12 families covering a complete spectrum of musical genres both classical and modern A complex chord recognition technique allows the style to follow the harmonic evolution of the song played on the keyboard 9 DIGITAL EFFECTS DSP They enrich th...

Page 7: ...ke the instrument very simple to use the complex front panel divided into sections allows to reach the most sophisticated programming functions by just pressing a key 9 CARE IN THE DESIGN The elegant and refined wood chassis makes VISCOUNT MAESTRO GRANDE and SINFONIA enjoyable from an aesthetic point of view this aspect too contributes to the realistic emulation of the acoustic piano ...

Page 8: ...nctions associated to each zone 1 Volumes Section Chapter 5 2 PROG SPLIT button keyboard mode selection Chapter 3 3 Automatic accompaniment Chapter 4 4 Function buttons Paragraph 1 4 5 Graphic LCD screen Paragraph 1 4 6 Cursor buttons Paragraph 1 4 7 ENTER EXIT buttons Paragraph 1 4 8 Rotational encoder Paragraph 1 4 9 Beat LEDs Paragraph 7 3 10 Timbre selection Chapter 4 11 Performance buttons Ch...

Page 9: ...for receiving MIDI messages coming from an external source Plug here the input MIDI cable when needed 4 INPUT connectors L MONO R TS Jack sockets for connecting audio sources to the internal amplification Use the L MONO connector for a monophonic source 5 OUTPUT connectors L MONO R TS Jack sockets carrying the instrument audio output with the standard LINE OUT level Use the L MONO connector to get...

Page 10: ...rts together with the volume VOL and effect send SEND values the currently recognized chord CHORD TYPE the current MIDI track name SONG the current position on the MIDI track MEASURE In this mode you can modify only the metronome value acting on the rotative encoder on the right of the screen For what concerns programming the other parameters you have to press the related button and a pop up windo...

Page 11: ...can use the rotative encoder to change the parameters it allows you to increase or decrease the selected value just turning the encoder clockwise or counter clockwise more or less quickly according to how far is the desired value Using the instrument you will see some fields on the screen displayed in a button shaped box starting with a number ranging from 1 to 6 In this case you can activate them...

Page 12: ...w As already said the 1ST and 2ND parts are able to play one of the 22 timbres each one associated to a button or a YAMAHA XG timbre which you can activate with XG1 or XG2 buttons The button LED will light up showing which is the selected timbre The 2ND button allows to toggle between the 1ST and 2ND part selection in the second case the button LED will be on You have to press and hold one of the ...

Page 13: ...VISCOUNT timbres and an XG timbre You can follow the same procedure shown for the 1ST and 2ND parts to select these timbres The selection buttons are grouped under the name MANUAL BASS immediately on the left of the TONE PRESETS section In this situation too you can set the output and effects send level of each timbre in the same way as the 1ST and 2ND parts case 2 3 A LIST AND A DESCRIPTION OF VI...

Page 14: ... A typical brass timbre Synth Horn Typical synthesized sound of brass instruments Jazz Organ 1 Drawbar organ with standard settings Jazz Organ 2 Variation of Jazz Organ 1 timbre Jazz Organ 3 Variation of Jazz Organ 1 timbre Pipe Organ Church organ set to the TUTTI register Synth Pad A pad of synthesized bowed instruments ...

Page 15: ...es The first voice Split Sections sets the split point between the 1ST and 2ND parts the former associated to the right zone the latter to the left zone of the keyboard The second voice Split Bass sets the MANUAL BASS part split point which is obviously associated to the left zone Through the Read Keyboard option it is possible to perform this setting directly pressing the key defining the keyboar...

Page 16: ...2ND part will be normally associated to the two splits This setting obviously has no effect if the keyboard is in LAYER Mode in this case the two parts will play overlaid even below the split point As the keyboard mode is stored in the performances it is possible to recall a setting even a complex one by just pressing a button For further information on that please refer to Chapter 8 3 3 HOW TO RE...

Page 17: ...t them off one by one pressing the button underneath the related volume slider You can set and control the accompaniment using the buttons group called STYLE CONTROL KEYS displayed below 4 2 THE ACCOMPANIMENT STYLES The instrument has 48 different accompaniment styles divided into 12 families you can find a table at the end of this chapter with the complete list of the styles You can select the st...

Page 18: ...sition phase then it will turn off when the instrument has computed and displayed the new value for the metronome Each accompaniment style has a related metronome speed which is set automatically when selecting the style however if the automatic accompaniment is enabled and you are switching from one style to another the current metronome speed is maintained Finally when playing a song with the re...

Page 19: ...nd the complete list of the automatic accompaniment styles divided into families FAMILY No STYLE FULL NAME 1 16 Beat 2 8 Beat1 3 8 Beat2 8 16 BEAT 4 Pop Bld Pop Ballad 1 SoftRock 2 ShflRock Shuffle Rock 3 HardRock ROCK 4 Funk 1 Rock n R Rock and Roll 2 Shuffle 3 Twist 50 s 4 SlowRock 1 Dance 2 Disco 70 3 Techno DANCE 4 Rap 1 Swing 1 2 Swing 2 3 Big Band SWING 4 SwngRock Swing Rock 1 Fox Trot 2 Dix...

Page 20: ...USA 2 4 CntrWltz Country Waltz 1 Samba 2 Bossa 1 Bossa Nova 1 3 Bossa 2 Bossa Nova 2 LATIN 1 4 Beguine 1 Cha Cha 2 Mambo 3 Salsa LATIN 2 4 Merengue 1 Tango 2 Hawaiian 3 Reggae WORLD 4 Caribean Caribbean 1 6 8March 2 Tarantel Tarantella 3 Polka 1 MARCH 4 Polka 2 1 Waltz 2 Musette 3 W Waltz Wiener Waltz WALTZ 4 JazzWltz Jazz Waltz ...

Page 21: ...ese played by the recorder actually shifting the sliders of the volumes section you set the instrument audio outputs mix 5 2 HOW DOES THE VOLUMES SECTION WORK The first slider on the left MASTER sets the instrument master volume if this is on the lowest position you won t hear any output sound neither on the line outputs LINE OUT nor on the headphones outputs PHONES The slider nearby STYLE SONG se...

Page 22: ... DRUM voice enabled the accompaniment will be limited only to the drum percussions rhythmic section The last three sliders on the right called 1st 2nd and MAN BASS concern the parts played on the keyboard each of these parts has an associated volume slider allowing to mix them as you like both among them and with the other voices generated by the instrument For instance playing the 1ST and 2ND par...

Page 23: ...way pressing and holding the CHORUS or TREMOLO buttons you can adjust the related effect as you like increasing or decreasing the parameters values Please look at the table on Paragraph 6 2 where you will find a list of the available effects and the related parameters In the upper row GLOBAL EFFECTS you can set the whole reverberation effect This one may be configured to simulate an auditorium HAL...

Page 24: ...ion that shifts the sound pitch Speed Depth 7 Vibrato Scanner vibrato effect typical in drawbar organs Mix Depth 8 AutoPanPot cyclically moves the sound image in the stereo field L R L R L Speed Depth 9 Cross Panner like AutoPanPot with stereo input so that L and R channels cyclically swap Speed Depth 1 0 Rotary Speaker rotating loudspeaker simulation mostly used with drawbar organs Hi Speed Lo Sp...

Page 25: ...FF 1 key No NAME DESCRIPTION 1 Small Room see name 2 Large Room 1 see name 3 Large Room 2 see name 4 Medium Hall 1 see name 5 Medium Hall 2 see name 6 Large Hall 1 see name 7 Large Hall 2 see name 8 Chamber 1 see name 9 Chamber 2 see name 10 Plate plate reverb simulation 11 Spring spring reverb simulation same ambience as the one related to the ROOM button on the panel same ambience as the one rel...

Page 26: ... select the desired song using the SONG and SONG buttons when you see the desired song name on the SONG NAME box press the PLAY button and you can listen to the song When the song is playing you can see the progress indication in the lower right corner of the screen The progression indication is given in the M B format where M indicates the current measure and B the current beat If you want to sto...

Page 27: ...EAT LEDs on the panel placed below the encoder will light up following the desired time pattern The STANDALONE option that can be activated through the pop up screen window where you program the measure allows you to listen to the metronome even out of the recording phase 7 4 THE MIXER OPTION Pressing and holding the PLAY button the LCD screen will display a set of 16 sliders split in two rows by ...

Page 28: ...s SET Global Settings Viscount proprietary file format for storing global settings see Paragraph 8 4 For what concerns the songs management pressing the DISK button a number of commands displayed on the screen will be available to you You can find here below the description of each command 1 Del delete a file The selected file is canceled and its contents are lost forever You have to confirm this ...

Page 29: ...ave the current performance This command stores the current performance see Paragraph 8 1 on a floppy in a PRF type file named by the user You have to use the F6 button to start the operation or the F1 button to cancel it 2 SvP Blk save all the performances All the performances that means the 32 locations of the four memory banks see Paragraph 8 1 in addition to the current performance are stored ...

Page 30: ... was before the latest switch off is stored in a volatile location not associated to any letter and number pair Pressing and holding a NUMBER key you can save the current configuration on the location shown by the BANK NUMBER pair a pop up window will ask you to confirm before going on saving The performances can be saved and recalled from the floppy disk as shown in paragraph 7 4 in this way the ...

Page 31: ...do so setting a value ranging from 12 to 12 semitones in the Transpose field The transposition doesn t affect the MIDI channel commonly related to dums percussions that is channel number 10 anyway you can choose the channel to exclude by using the Exclude Chan field the values allowed are OFF 1 2 16 3 Dynam crv dynamic curve for the keyboard You can choose among 8 different dynamic curves which de...

Page 32: ... above only for 1ST part 2nd Soft 2nd Sost 2nd Damper same as above only for 2ND part Start Stop doubles the START STOP button in the STYLE CONTROL KEYS section Simple doubles the SIMPLE button in the STYLE CONTROL KEYS section To Adv doubles the TO ADV button in the STYLE CONTROL KEYS section To Basic doubles the TO BASIC button in the STYLE CONTROL KEYS section Break doubles the BREAK MUTE butto...

Page 33: ... the front panel You can also save and recall the global settings using the floppy disk as shown in Paragraph 7 4 When you press the GLOBAL SETTINGS button the related LED will light up and a three fields pop up screen will appear by selecting each of these fields you will set the parameters listed here below 1 MIDI MIDI interface settings For a full explanation please contact Viscount 2 Display s...

Page 34: ...ation with an input MIDI Realtime Clock Finally pressing the F6 button the user can access the pair of screens showing the channel options Each MIDI input channel has a selectable internal destination Sez1 Sez2 Bass one of the 16 XG channels OFF the possibility of filtering Program Change and Control Change messages and a programmable pitch transposition of up to 32 halftones The MIDI output setti...

Page 35: ...se to work properly due to a transmission failure or whatever else in this case the user can gain back control sending the usual All notes off and Reset all controllers messages This is made possible by pressing and holding the EXIT key just below the rotative encoder a self explicative pop up screen will appear to confirm that the requested MIDI panic solving messages were sent 8 5 FACTORY SETTIN...

Page 36: ......

Page 37: ...rcOrg2 37 0 18 RockOrgn 0 0 19 RotaryOr 64 0 19 SloRotar 65 0 19 FstRotar 66 0 19 ChrchOrg 0 0 20 ChurOrg3 32 0 20 ChurOrg2 35 0 20 NotreDam 40 0 20 OrgFlute 64 0 20 TrmOrgFl 65 0 20 ReedOrgn 0 0 21 Puff Org 40 0 21 Acordion 0 0 22 Accordlt 32 0 22 Harmnica 0 0 23 Harmo 2 32 0 23 TangoAcd 0 0 24 TngoAcd2 64 0 24 Guitar Name CC32 CC0 PC NylonGtr 0 0 25 NylonGt2 16 0 25 NylonGt3 25 0 25 VelGtHrm 43 ...

Page 38: ...4 40 0 64 ChorBrss 41 0 64 VelBras2 45 0 64 AnaBras2 64 0 64 Reed Name CC32 CC0 PC SprnoSax 0 0 65 Alto Sax 0 0 66 Sax Sect 40 0 66 HyprAlto 43 0 66 TenorSax 0 0 67 BrthTnSx 40 0 67 SoftTenr 41 0 67 TnrSax 2 64 0 67 Bari Sax 0 0 68 Oboe 0 0 69 Eng Horn 0 0 70 Bassoon 0 0 71 Clarinet 0 0 72 Pipe Name CC32 CC0 PC Piccolo 0 0 73 Flute 0 0 74 Recorder 0 0 75 PanFlute 0 0 76 Bottle 0 0 77 Shakhchi 0 0 ...

Page 39: ... 0 0 112 Shanai 2 64 0 112 Pungi 96 0 112 Hichriki 97 0 112 Percussive Name CC32 CC0 PC TnklBell 0 0 113 Bonang 96 0 113 Gender 97 0 113 Gamelan 98 0 113 S Gamlan 99 0 113 Rama Cym 10 0 113 AsianBel 10 0 113 Agogo 0 0 114 SteelDrm 0 0 115 GlasPerc 97 0 115 ThaiBell 98 0 115 WoodBlok 0 0 116 Castanet 96 0 116 TaikoDrm 0 0 117 Gr Cassa 96 0 117 MelodTom 0 0 118 Mel Tom2 64 0 118 Real Tom 65 0 118 Ro...

Page 40: ...X AFTER TOUCH Key s Ch s X X X O only XG module PITCH BENDER X O CONTROL CHANGE 7 11 64 66 67 91 93 120 123 O O O O O O O O O O O O O O O O O O Main Volume Expression Contr Damper Pedal Sustain Pedal Soft Pedal Reverb Chorus All Sound Off All Note Off 1 2 PROGRAM CHANGE True 0 127 0 127 0 127 0 127 1 SYSTEM EXCLUSIVE O O SYSTEM COMMON Song Pos Song Sel Tune X X X X X X SYSTEM REAL TIME Clock Comma...

Page 41: ...tem since this version of the manual was completed The information contained in this version of the owner s manual supercedes all previous version NOTE This equipment has been tested and found to comply with the limits for a Class B digital Device persuant to Part 15 if the FCC Rules These limits are designed to provide reasonable protection against harmful interference in a residential installati...

Page 42: ...1 869605 e mail viscount omniway sm Internet www viscount organs com www viscount it Distribution for Italy TITAN MUSIC S A Strada Genghe di Atto 80 47031 Acquaviva Repubblica di San Marino tel 0549 999164 fax 0549 999490 e mail viscount omniway sm Internet www viscount organs com www viscount it ...

Reviews: