Viscount CANTICUS I - II
42
4. USING THE FLOPPY DISK DRIVE
4.1 FLOPPY DISK DRIVE
All Canticus series organs are equipped with a 3.5" floppy disk drive where users can save both their own performances and
also all the organ voice and memory programming data. The Canticus floppy disk drive is able to take DD floppy disks of
720 Kbytes and HD disks of 1.44 Megabytes; to avoid reading errors, good quality disks in the permitted formats should be
used. Never place floppy disks close to equipment which may generate strong magnetic fields, such as loudspeakers,
television sets, etc.
4.2 DATA FORMAT AND READING MODE
The Viscount Canticus organ uses the Standard Midi File (*.mid) in formats 0 and 1 for recording and playing back songs.
This format allows access to a vast library of pre-recorded songs and also permits perfect compatibility between the songs
recorded and the most common score print-out and sequence editing softwares.
The Canticus does not use any type of internal RAM memory for reading and writing files (and thus songs). Instead, it uses
the Direct to Disk technology, in which the data recorded on the floppy disk are played back as they are read, and
recordings are made directly during performance, providing excellent user-friendliness and faster procedures. Because of
the mode used, the floppy disk must never be removed from the drive except in stop position. The direct to disk technology
allows simultaneous recording of all the manuals and the pedal section. Since the performance is recorded on the disk as it is
received, no modification of the recording made, or over-recording, is possible.
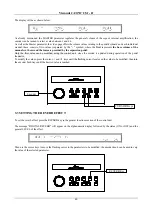
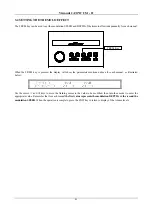
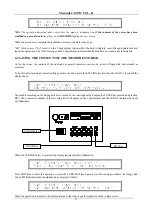
4.3 FLOPPY DISK DRIVE CONTROL PANEL
As already mentioned, the floppy disk drive control panel is located above the two manuals, in the left section. This section
is illustrated below:
4.4 FORMATTING FLOPPY DISKS
Before it can be used for saving data, every new floppy disk must be formatted (or initialized). The Canticus formats floppy
disks to the MS-DOS standards, allowing the disks it has written to be used with most of the computers and sequencers on
the market.
The formatting procedure is as follows:
•
Make sure that the drive does not contain a floppy disk (three dashes "---" must be visible on the display).
•
Keeping the CLEAR key pressed, insert the floppy disk to be formatted in the drive, after checking that the hole in the
top right-hand corner of the disk (writing protection) is closed; otherwise, move the little shutter.
•
The Canticus requests confirmation of this operation by showing "Sur" ("Are you sure?") on the display. Confirm by
pressing REC or press STOP to abort.
•
The display will show an "F" (Formatting) followed by a consecutive number from 1 to 80, indicating the disk tracks
being formatted.
Floppy disk drive
display

