ENGLISH
EN
09
ASSEMBLY INSTRUCTIONS (STEP 01-06)
Missing parts:
If any parts are missing from the packaging, carefully
check the polystyrene foam and the appliance itself. Some parts (bolts,
screws, etc.) are already attached to the unit.
Error message:
Make sure that all cables are carefully attached. The
aluminium feet of the console are very sensitive and must be kept
straight. If the console gives an error message after the machine
has been mounted, the aluminium feet of the console may be bent.
Straightening the aluminium feet may make the error message
disappear.
Hex head bolts:
Make sure that the hex head spanner is pushed into
the bolt before applying force. This will prevent the head of the socket
bolt from turning.
ADJUSTING
Resistance knob
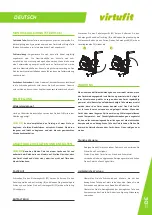
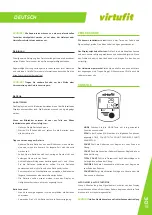
To adjust the resistance, use the handle as shown in the figure.
NOTE!
It is recommended that you begin training at a level that
matches your needs. Remember to start slow and easy and work
your way up to the desired level.
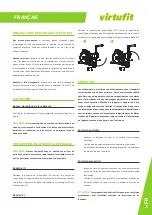
FOLDING INSTRUCTIONS
NOTE!
Store the device in a dry area away from children. Make
sure that the device is stable and safe so that it cannot fall over on
animals or children
Folding (1)
Unscrew the locking pin (33). Remove the locking pin and flat ring (15)
and simultaneously fold up the rails. Refit the locking pin (33) with the
flat ring (15).
Unfolding (2)
Unscrew the locking pin (33). Remove the locking pin and flat ring (15)
and simultaneously unfold the rail towards the ground. Replace the
locking pin (33) with the flat washer (15).
MAINTENANCE
Safe and efficient use can only be achieved if the appliance is
properly installed and maintained. It is your responsibility to ensure
that the appliance is maintained regularly. Parts that have been
used and/or damaged must be replaced before the appliance is
used again. The appliance should only be used and stored indoors.
Long-term exposure to weather and temperature/humidity changes
can have a serious impact on the electrical components and moving
parts of the unit. Always unplug the power cord from the unit before
cleaning or servicing it.
Daily maintenance
• Clean and remove sweat and moisture after each use.
• Check that the unit is free of dust and dirt.
• Do not use aggressive cleaning agents and keep the device
away from moisture.
Semi-annual maintenance
• Clean and remove sweat and moisture after each use.
• Check that the unit is free of dust and dirt.
• Do not use aggressive cleaning agents and keep the device
away from moisture.
CAUTION!
All repairs must be performed by a professional
technician, unless otherwise specified by the supplier or
manufacturer.
Cleaning
General cleaning of the machine will prolong its life. Keep the machine
clean by dusting it regularly.
1
2
Summary of Contents for Row 1.0
Page 2: ...USER MANUAL 02 USER MANUAL TOOLKIT 34 9 37 41 40 15 48 50 49 33 38 7 46 5 6 8 4...
Page 3: ...USER MANUAL 03 STEP 01 STEP 02...
Page 4: ...USER MANUAL 04 STEP 03 STEP 04...
Page 5: ...USER MANUAL 05 STEP 05 STEP 06...
Page 6: ...USER MANUAL 06 USER MANUAL FIG A...
Page 7: ...USER MANUAL 07 USER MANUAL FIG B 1 4 5 2 3...
Page 24: ...24 EXPLODED DRAWING...


