QUICK START GUIDE
ENGLISH
12
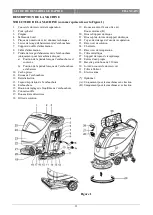
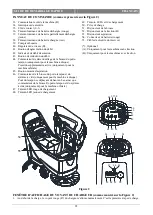
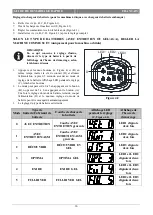
Figure 7
H
A
G
E
D
F
B
PAD INSTALLATION AND UNINSTALLATION (only for orbital machine)
1.
Lift the deck by pressing the switch (46).
2.
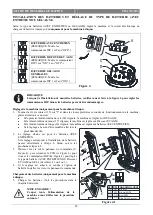
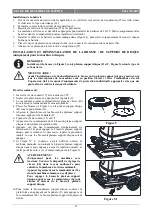
Install and uninstall the pad (A, Figure 5.1)
ADJUSTING THE BALANCE OF SQUEEGEE
1.
Install the squeegee and screw up the nut (H), then
connect the vacuum hose (G) to the squeegee.
2.
Adjust the squeegee by squeegee adjusting handle (A,
Figure 6).
a)
If there is gap between the ground and middle section
of rear squeegee blade (B), adjust the knob (A) in
counterclockwise direction (F) until all section of rear
squeegee blade good contact with ground, the front
blade touch the ground slightly.
b)
If there is gap between the ground and both end section
of rear blade (C and D), adjust the knob (A) in
clockwise direction (E) until all section of rear blade
good contact with the ground, the front blade touch the
ground slightly.
SOLUTION OR WASHING WATER TANK
FILLING
1.
Open the water inlet cover (B, Figure 7).
2.
Filling water or solution suitable for work performance
through the water inlet with filter.
The solution temperature must not 104F (+40°C).
3.
Do not overfill the tank, refer to water level indicator (H)
for the water volume.
WARNING!
Use only low-foam and non-flammable deter-
gents, intended for automatic scrubber appli-
cations.
MACHINE START AND STOP
Starting the machine
1.
Prepare the machine as shown in the previous paragraph.
2.
Insert the ignition key (A, Figure 8) and turn it to "I".
Check that the green warning light (B) turns on (charged
battery). If the yellow (C) or red warning light (D) turns on, turn the ignition key back to “0” and charge the
batteries (see the procedure in Maintenance chapter).
3.
Drive the machine to the working area:
By pushing it with the hands on the handlebar (E) (only for machine without traction).
By pushing it with the hands on the handlebar (E) and pressing the switch (F) to move forward, or pressing the
switch (F) together with the switch (G) to move backward (only for machine with traction). The forward speed
can be adjusted with the adjuster (H).
4.
Lower the squeegee (I) with the lever (J).
5.
Lower the brush/pad-holder deck (K) by lifting the pedal (L). (only for disc machine)
6.
Press the brush/pad-holder switch (M) and the vacuum system switch (N).
7.
Press the washing water flow control switches (O) as necessary, depending on the type of cleaning to be
performed.
8.
Start cleaning:
(only for machine without traction) by pushing the machine with the hands on the handlebar (E) and pressing the
switch (F).
(only for machine with traction) by pushing the machine with the hands on the handlebar (E) and by pressing the
switch (F). If necessary, the forward speed can be adjusted with the adjuster (H).
D
B
C
E
F
A
H
G
H
Figure 6
Summary of Contents for 50000398
Page 180: ...177 H CD ROM Adobe Reader CD ROM...
Page 181: ...178 1 2 3 5 20...
Page 182: ...179 OFF WET WET 0 C 40 C 30 95...
Page 183: ...180...
Page 187: ...184 WET GEL AGM 12V 3 A WET GEL AGM 1 54 2 35 I 38 37 36 B 1 2 3 WET GEL AGM 12V 12V 3...
Page 193: ...190 A 10 C 13 B 9 A B E G H F C B A D I 10...
Page 195: ...192 30 1 2 54 8 1 9 2 WET 1 2 2 2 2...
Page 292: ...289 CD ROM Adobe Reader CD ROM...
Page 293: ...290 1 2 3 5A 20A...
Page 294: ...291 WET WET 0 40 30 95...
Page 295: ...292...
Page 299: ...296 AGM 3 A AGM 1 54 2 35 I 38 37 36 B 1 2 3 AGM 12V 12V 3...
Page 305: ...302 A 10 A B C A 11 B A B 9 E G H F C B A D I 10...
Page 307: ...304 30 1 2 54 8 1 9 2 6 1 2 2 2 2...
Page 308: ...305 Adobe Reader...
Page 309: ...306 1 2 3 5A 20A...
Page 310: ...307 WET WET 0 C 40 C...
Page 311: ...308 30 95...
Page 315: ...312 AGM 12 3 A AGM 1 54 2 35 I 38 37 36 B 1 2 3 AGM 3 12V 12V...
Page 321: ...318 A 10 A B C A 11 B 9 10 E G H F C B A D I A B...
Page 323: ...320 30 1 2 54 8 1 9 2 1 2 2 2 2...
Page 356: ...Company information www vipercleaning eu info eu vipercleaning com...


