background image

8

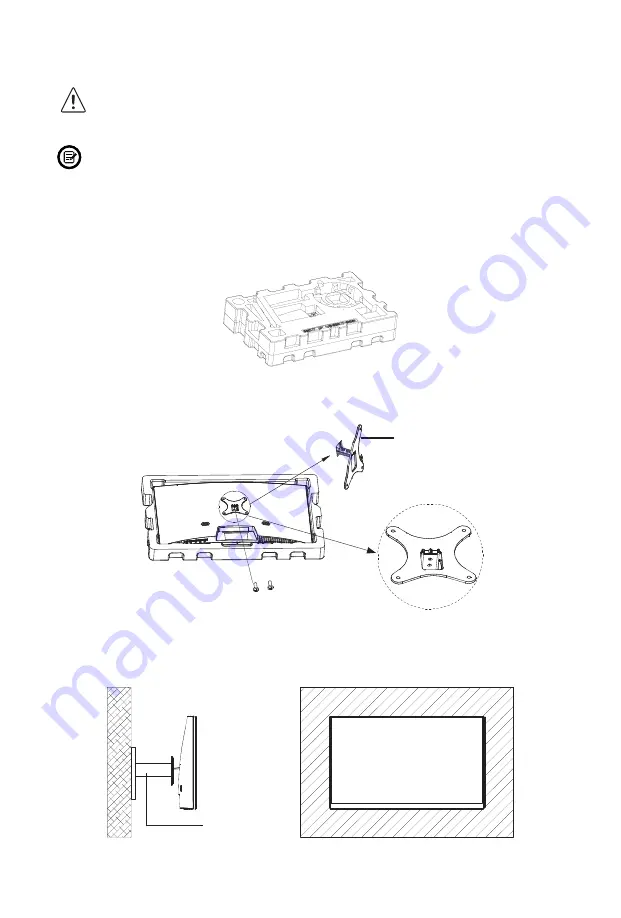
Section 5:  Mount Installation


  This monitor ONLY includes screws which may be used when attaching 

the monitor to a VESA 75x75mm type mount. No VESA mount or 
mounting accessory is included.


Keep the foam underneath the monitor before attaching the stand to a mount 
or accessory. 

1.   Open the package, take out the product with foam still attached, and gently 

place it on a desktop or table. Remove the extra parts and the foam covering the 
back of the monitor. If the monitor is already attached to the stand, remove the 
stand. 

2.  Fit the VESA adapter into the opening on the back of monitor, then use the NO.1 

screws to fasten it to the monitor.

NO.1 Screws 

6mm x 2

VESA Adapter

(75x75mm)

3.  Follow the directions received with your VESA mount, stand, or accessory and 

install the monitor on the wall or 

fi

 xture as desired. 

Mount 
(Not included)

Summary of Contents for NB24CB

Page 1: ...serving our customers and providing the best products our product information including our user manuals may receive updates from time to time Please check our website for the latest user manuals and...

Page 2: ......

Page 3: ...Mount Installation 8 Section 6 Connectivity Options 9 6 1 Connecting the Power Cable 9 6 2 VGA Connectivity 9 6 3 HDMI Connectivity 9 Section 7 Basic Operation 10 Section 8 Indicator Light 10 Section...

Page 4: ...nitor 5 Do not spray cleaner and or any kind of liquid directly onto the monitor s screen or any part of the monitor 6 Do not insert anything into any part of the monitor especially the ventilation op...

Page 5: ...Monitor x 1 Stand Stem x 1 Stand Base x 1 Power Adapter x 1 100 240V 1 0A VESA Adapter x 1 NO 1 Screws x 2 NO 2 Screw x 2 HDMI Cable x 1 Screwdriver x 1 User Manual x 1 8mm 6mm The screws come in two...

Page 6: ...nnector Insert one end of the HDMI cable into the computer s HDMI output and connect the other end to the monitor s HDMI port 2 3 4 5 6 1 1 M Menu Button Press to display the OSD menu or enter sub men...

Page 7: ...nd and remove the foam covering the back of the monitor Next insert the stand stem into the opening on the back of monitor then use the NO 1 screws to fasten it to the monitor Stand Stem NO 1 Screws 6...

Page 8: ...uct with foam still attached and gently place it on a desktop or table Remove the extra parts and the foam covering the back of the monitor If the monitor is already attached to the stand remove the s...

Page 9: ...r Adapter 6 2 VGA Connectivity In order for the monitor to receive VGA signals from the computer use the VGA cable to connect the monitor to the computer VGA VGA OUTPUT VGA Cable Not included 6 3 HDMI...

Page 10: ...ote you must have hardware with FreeSync capability an HDMI cable and the latest graphic drivers To use this feature connect your computer and monitor with an HDMI cable After connecting you may recei...

Page 11: ...onfiguration and parts etc 1 Press any one of the buttons M E to activate the navigation window eco 2 Press M button to enter the OSD menu BRIGHTNESS BRIGHTNESS CONTRAST ECO DCR STANDARD OFF 3 Press o...

Page 12: ...ze RGB components Green 0 50 Blue 0 50 OSD SETTING Language English Espa ol Fran ais Portugu s Deutsch T rk e Polski Italiano Nederlands Set OSD language OSD H POS 0 100 Adjust the OSD horizontal posi...

Page 13: ...of your game choose the corresponding game icon These game icons are primarily designed to optimize your aim during shooting games though they can be used for other scenarios 3 Press button to switch...

Page 14: ...to be scrolling rolling or moving unusually Check that your source frequency is within 55 75Hz Reconnect and ensure your video cable is secure The monitor needs cleaning Make sure the monitor has bee...

Page 15: ...lue Flicker LED Typical Brightness 220 cd m2 Default Color Temp 6500 Color Gamut 92 sRGB 68 NTSC Contrast Ratio 3 000 1 Static Dot Pitch 0 0905 x 0 2715mm Response Time GTG 8MS Refresh Rate 60 75 Hz 7...

Page 16: ...ed This Warranty is not assignable or transferable The original purchaser may call WP s toll free number at 1 855 229 9472 for service request When a product or part is exchanged any replacement item...

Page 17: ...quipment generates uses and can radiate radio frequency energy and if not installed and used in accordance with the instructions may cause harmful interference to radio communications However there is...

Page 18: ......

Page 19: ......

Page 20: ...COPYRIGHT 2018 VIOTEK ALL RIGHTS RESERVED...

Reviews: