background image

14

Main Menu  Sub-Menu

Options

Description

Multi-

Window

Multi-Window

Off, PIP Mode, 

PBP 2Win

Select PIP/PBP modes according to the

number of input signals etc.

Sub Win2 Input DVI, HDMI, DP

Select according to input signal for PIP/

PBP mode

PIP Size

Small, Medium, 

Large

Adjust the PIP/PBP display window size 

PIP Position

Top Right, Top 

Left, Bottom 

Right, Bottom Left

Adjust the PIP/PBP window position

Swap

NONE

Swap the PIP/PBP signal sources

Other

Language

English,

 简体中文,

한국어,

Español

Set OSD language

OSD H-Position 0-100

Adjust the OSD’s horizontal position 

OSD V-Position 0-100

Adjust the OSD’s vertical position

OSD 

Transparency

0-100

Adjust OSD’s overall transparency

OSD Time Out 5-100

Set how long the OSD remains open after 

non-use

OSD Rotation

Normal, 90, 180, 

270

When the user flips the display, this 

function can also flip the OSD to achieve 

the best display angle

Reset

Reset monitor configurations

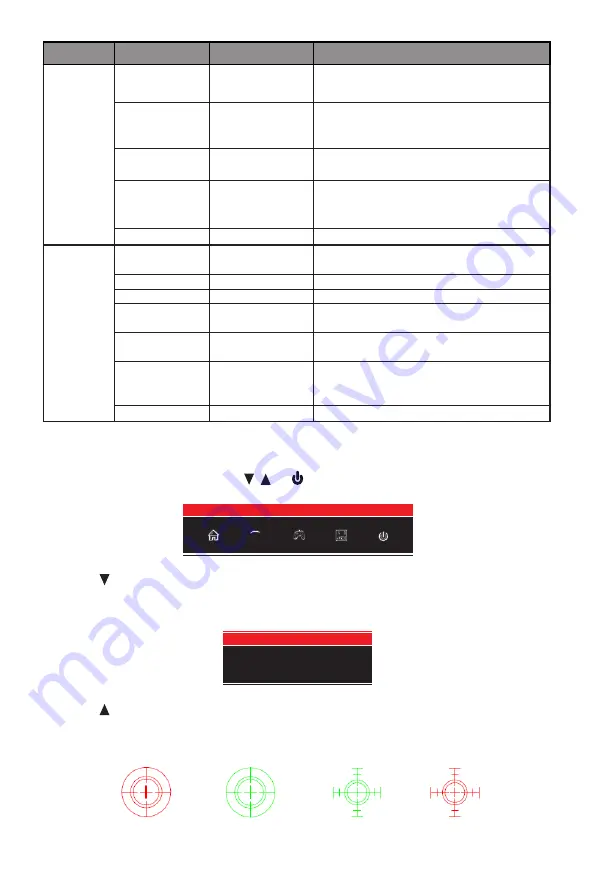
Section 10:  ECO Modes and Gameplus Switching

1.   Press any one of the buttons (

M

,  ,  , E,  ) to activate the navigation window.

eco

2.   Press   button to switch ECO modes. These modes include Standard, Text, Movie, 

Game, FPS, and RTS and can be used to optimize settings according to your activity. 

Standard mode is suitable for most activities.

Standard

3.   Press   button to switch Gameplus modes. According to the needs of your game, choose 

the corresponding game icon. These game icons are primarily designed to optimize your 

aim during shooting games, though they can be used for other scenarios.

Summary of Contents for GN32DR

Page 1: ...der to continue serving our customers and providing the best products our product information including our user manuals may receive updates from time to time Please check our website for the latest user manuals and product materials Ver 1 0 7 30 18 ...

Page 2: ...Connectivity 10 6 4 HDMI Connectivity 10 6 5 DVI Connectivity 10 Section 7 Basic Operation 11 Section 8 Indicator Light 11 Section 9 OSD 12 9 1 OSD Menu Functions 13 Section 10 ECO Modes and Gameplus Switching 14 Section 11 Troubleshooting 15 11 1 General Problems 15 11 2 PIP Picture in Picture Input Information 16 11 3 PBP Picture by Picture Resolution Information 16 Section 12 Information 16 12 ...

Page 3: ...onitor 5 Do not spray cleaner and or any kind of liquid directly onto the monitor s screen or any part of the monitor 6 Do not insert anything into any part of the monitor especially the ventilation openings 7 Always make sure your monitor is placed on a secure level surface to prevent it from falling and sustaining damage 8 Unplug your monitor during any extended periods of non use 9 Do not place...

Page 4: ...et Stand Base x 1 Cover Base x 1 Cover x 1 Power Cable x 1 AC 100 240V 50 60Hz NO 2 Screws x 3 NO 3 Screws x 4 for Wall Mounting NO 1 Screw x 1 DP Cable x 1 Screwdriver x 1 Allen Key x 1 User Manual x 1 Note The NO 3 Screws come in two sizes 26mm x 2 and 31mm x 2 26mm 31mm ...

Page 5: ...omputer s DVI output and connect the other end to the monitor s DVI port 8 9 10 11 1 3 4 5 6 7 2 1 Power Connector Insert the power cable to supply power to the monitor 2 M Menu Button Press to display the OSD menu or enter sub menus 3 Down Button Press to move down in the menus 4 Up Button Press to move up in the menus 5 E Exit Button Press to exit 6 Power Button Press to turn the monitor on off ...

Page 6: ...wo main parts of the stand and remove the foam covering the top of the monitor Next use the included allen key and the NO 1 screw to fasten the base to the stem Stand Base Stand Stem NO 1 Screw 1x Bracket 3 Take out the cover base insert it into the stand near the bottom and secure it with the NO 2 screws Next place the cover over the cover base and press lightly to secure NO 2 Screws 3x Cover Cov...

Page 7: ... the monitor on your desktop or table after completing installation and carefully pull or push the screen up or down to adjust height 7 If needed the stand can easily be detached from the monitor by pressing the button near the bracket Make sure the monitor is laid on a flat surface before removing the stem Button To avoid damage do not touch the screen when moving the monitor ...

Page 8: ...itor Stand Base Foam Foam Stand Stem 2 Remove the original screws from the opening in the back of the monitor 3 Follow the directions received with your mount stand or accessory and install the monitor on the wall or fixture as desired Remember to use the included NO 3 screws when attaching anything to the back of the monitor Refer to the image 1 for correct screw placement 1 Use the 31mm NO 3 Scr...

Page 9: ... Your Earphones Plug in your earphones to receive audio signals from your monitor If your earphones are connected to the monitor and audio devices are connected to your computer at the same time the audio devices will not produce sound Earphones and other audio devices not included Earphones Not included Listening to loud audio for prolonged periods of time may permanently damage your hearing ...

Page 10: ...ncluded 6 4 HDMI Connectivity In order for the monitor to receive HDMI signals from the computer use an HDMI cable to connect the monitor to the computer HDMI OUTPUT PC HDMI Cable Not included 6 5 DVI Connectivity In order for the monitor to receive DVI signals from the computer use a DVI cable to connect the monitor to the computer DVI Cable Not included DVI OUTPUT ...

Page 11: ...t to turn the monitor on FreeSync The feature itself is off by default In order to use this feature please note you must have hardware with FreeSync capability a DP cable and the latest graphic drivers To use this feature connect your computer and monitor with a DP cable After connecting you may receive a prompt to enable the feature on your computer If you do not receive the prompt you may need t...

Page 12: ...button to enter the OSD screen DP Resolution 2560x1440 60Hz Input Source Brightness Contrast Color Setting Picture Quality Setting Display Multi Window Audio Other DVI HDMI DP Window 1 InputSource DP Resolution 2560x1440 60Hz Window 3 InputSource Resolution Window 2 InputSource Resolution E 3 Press or to browse functions Highlight the desired function and then press M to enter the sub menu Press o...

Page 13: ...st hue and saturation levels Picture Quality Setting Bypass On Off Turn the bypass function on off Sharpness 0 100 Adjust display sharpness Response Time Off High Middle Low Adjust response time Noise Reduction Off High Middle Low Reduce the interference of image noise caused by signal source interference Super Resolution Off High Middle Low When the resolution of the display screen is low this fu...

Page 14: ...just OSD s overall transparency OSD Time Out 5 100 Set how long the OSD remains open after non use OSD Rotation Normal 90 180 270 When the user flips the display this function can also flip the OSD to achieve the best display angle Reset Reset monitor configurations Section 10 ECO Modes and Gameplus Switching 1 Press any one of the buttons M E to activate the navigation window eco 2 Press button to...

Page 15: ...nd ensure your video cable is secure The monitor needs cleaning Make sure the monitor has been powered off before cleaning Always use soft non abrasive cloth when cleaning Use dry non abrasive cloth to gently remove debris or dust If necessary lightly dampen a non abrasive cloth with water and gently clean the surface Never use alcohol or ammonia based cleaning solutions Never spray liquid directl...

Page 16: ...obtain an optimal viewing experience it is recommended to set both panels to the same resolution It is recommended to set the first panel to 1440p 60Hz resolution 1 It is recommended to set the second panel to 1440p 60Hz resolution 2 At this resolution tearing and visual deformation should be minimized Section 12 Information 12 1 Specifications Item Detail Model Number GN32DR Screen Size 31 5 Curv...

Page 17: ...sidents of the United States and Canada only and is available only to original purchasers This Warranty gives you specific legal rights and you may also have other rights which vary from state to state This Warranty starts on the date of your purchase and lasts for one year the Warranty Period The Warranty Period is not extended if the Product is repaired or replaced We may change the availability...

Page 18: ...NTY DECLARATION OF CONFORMITY This device complies with Part 15 of the FCC Rules Operation is subject to the following two conditions 1 This device may not cause harmful interference and 2 this device must accept any interference received including interference that may cause undesired operation FCC RELATED INFORMATION This equipment has been tested and found to comply with the limits for a Class ...

Page 19: ......

Page 20: ...COPYRIGHT 2018 VIOTEK ALL RIGHTS RESERVED ...

Reviews: