
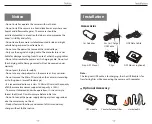
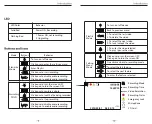


USB Data Cable
4m Car Charger
USB Cable
TM
TM
Non-GPS Mount
Clips
Note:
The long mini USB cable is for charging, the short USB cable is for
transferring files while connecting the camera with computer.
Car Adapter
GPS Mount (optional)
Optional Accessory
Circular Polarizer Filter
Hardwire Kit
GPS module
• Do not install or operate the camera with wet hands.
• Do not install the camera in a humid location or anywhere near
liquids and inflammable gases. The camera should be
installed/mounted in a location that does not compromise the
driver’s visibility and safety.
• Do not leave the camera installed/mounted inside an airtight
vehicle being exposed to extreme heat.
• Do not use the power that exceeds the rated voltage.
• Only use the original charging cable. The manufacturer is not
liable for damage resulting from the use of other charging cables.
• Do not disassemble the camera or its charging cable. Do not cut
the charging cable. Damage caused will not be covered under
warranty.
• Do not press the lens forcefully.
• Do not use any sharp objects on the camera or its accessories.
• Do not remove the Micro SD card when the camera is recording
or shutting down (avoids file damage).
• It is recommended to use a class 10 Micro SD card with a capacity
of 8GB or more (maximum supported capacity is 128G).
• To ensure stable read and write operations, it is necessary to
format the Micro SD card in-camera before initial use.
• Do not interrupt the power supply during a system upgrade, or
else the camera may not boot
• Product features/functions and content of this manual may
change without further notice.
Accessories
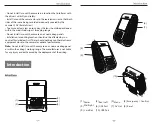
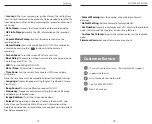
VIOFO Har
dwir
e K
it f
or C
ar Dash C
ame
ra
IN
PUT
:
RE
D
—
P
OW
ER
BL
AC
K
—
GN
D
YE
LL
O
W
—
A
CC
Inp
ut:
12 /
24V
; O
ut
put:
5V2A
M
ax
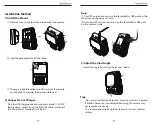
Installation
Notice


