background image


25   

Rev. 1 20.12.2019 

EN 

Program 

Description 

Options 

Factory Default 

Settings 

P3.1 

CELL CONSTANT 

0.1


-  1 - 10 

P3.2 

CALIBRATION METHOD 

AUTOMATIC / CUSTOM 

AUTOMATIC 

P3.3 

REFERENCE TEMPERATURE 

15 … 30 °C 

25 °C 

P3.4 

TEMP COMPENSATION FACTOR 

0.00 … 10.00 %/°C 

1.91 %/°C  

P3.6 

CALIBRATION DATA 

P3.8 

RESET SETTINGS 

YES – NO 

NO 

P3.9 

TEMPERATURE CAL


YES – NO 


P3.1 Cell constant Selection 
 

Choosing  the  right  conductivity  cell  is  a  decisive  factor  for  obtaining  accurate  and  reproducible 
measurements.
  

One of the fundamental parameters to consider is to use a sensor with the right cell constant in relation to 
the solution under analysis. 

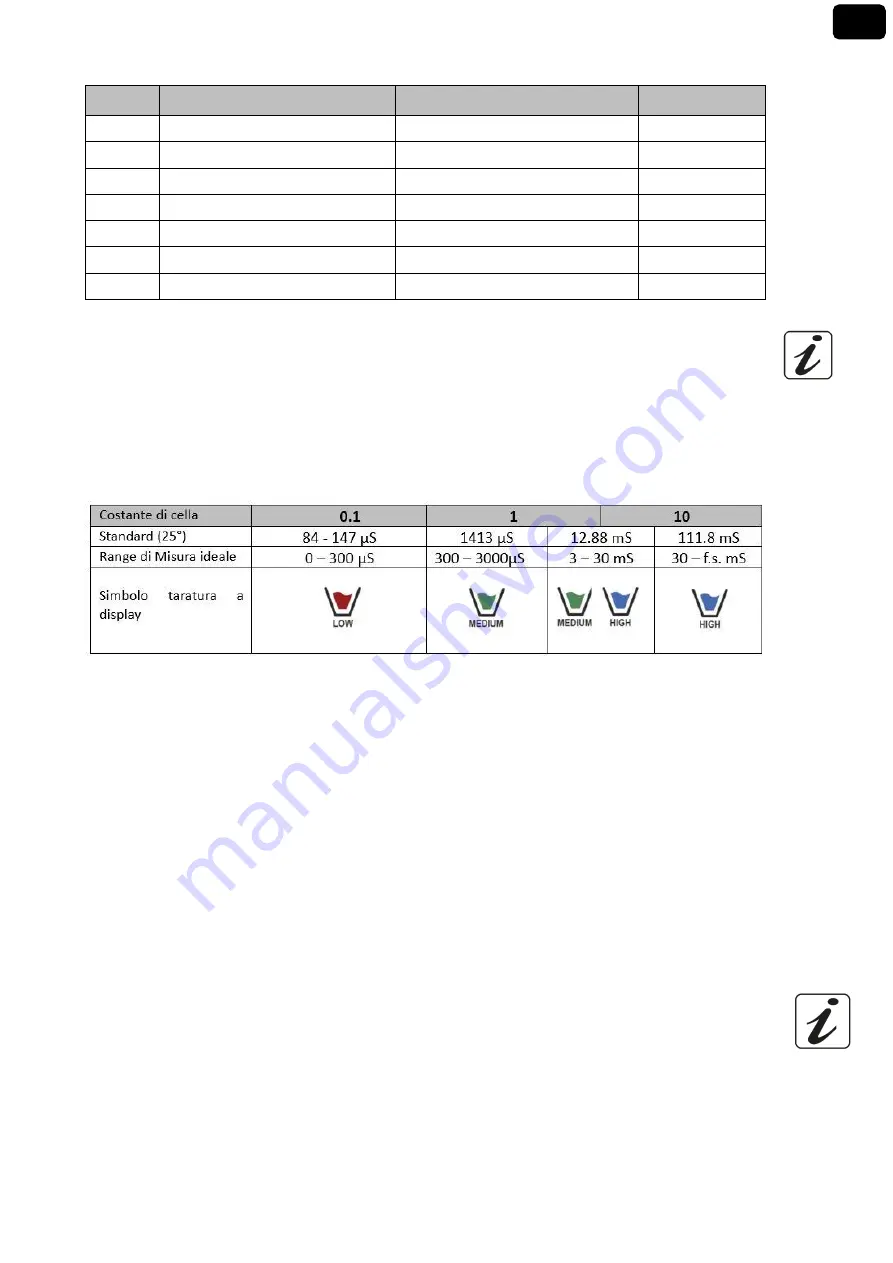
The following table relates the cell constant of the sensor with the measurement range and the standard 
with which it is preferable to calibrate: 


Access this setup menu to select the cell constant related to the sensor you are using: 


0.1 


1 -default- 


10 

 
For each of the 3 selectable cell constants the instrument stores the calibrated points. By selecting the cell 
constant, the previously performed calibration points are automatically recalled. 
 

P3.2 Calibration method 

Access this setup menu to select automatic or manual recognition of the standards with which to perform 
the calibration: 


Automatic:

 -default- The device automatically recognizes up to 3 of the following standards    

84 µS/cm, 147 µS/cm, 1413 µS/cm, 12.88 mS/cm e 111.8 mS/cm; 


Custom

: the device can be calibrated on a point with a manually entered value. 


Note: To obtain accurate results, it is advisable to calibrate the device with standards close to the theoretical 
value of the solution to be analysed 


P3.3 and P3.4  

Temperature  compensation  in  Conductivity  measurement  doesn’t  have  to  be  confused  with  pH 
temperature compensation. 

Summary of Contents for 7 Vio

Page 1: ...1 Rev 1 20 12 2019 EN 7 Vio INSTRUCTIONS MANUAL pH Cond PC ...

Page 2: ...2 Rev 1 20 12 2019 EN ...

Page 3: ...nt description 10 Display 10 Keyboard 10 LED 11 Installation 11 Supplied components 11 Implementation 11 Turning On and Off 11 Replacement of batteries 12 Instrument shipment 12 Key functions 12 Inputs Outputs connections 13 Symbols and icons on display 13 Operation of the device 14 Setup Menu 15 Setup Menu s Structure 16 Temperature measurement ATC MTC 17 pH Parameter 17 pH parameter Setup 17 Com...

Page 4: ...ductivity Parameter 24 Automatic Cond calibration 28 Manual Conductivity calibration 29 Errors during calibration 30 Performing Conductivity measurement 30 TDS Parameter 31 Instrument Settings 31 Composition of the setup menu for Settings Menu 32 Warranty 33 Warranty period and limitations 33 Disposal of electrical devices 34 XS Instruments Via della Meccanica n 25 41012 Carpi MO ITALY Tel 39 059 ...

Page 5: ... instructions that appear directly on the display The calibration is guided step by step and the instrument configuration menu is easy to consult In addition a LED indicates the status of the system to the user Up to 3 pH calibration points can be made between 8 automatically recognized values and 5 points for Conductivity in addition buffers chosen by the operator can be used It is also possible ...

Page 6: ...ng terms ATTENTION for a medium risk hazardous situation which could lead to serious injury or death if not avoided ATTENTION for a dangerous situation with reduced risk which if not avoided can cause material damage data loss or minor or medium sized accidents ADVICE for important product informations NOTE for useful important informations Warning symbols Attention This symbol indicates a potenti...

Page 7: ...nly if all the following indications are respected the instrument can only be used in accordance with the specifications mentioned above if using the instrument with the power supply use only the model supplied If you need to replace the power supply contact your local distributor the instrument must operate exclusively in the environmental conditions indicated in this manual the only part of the ...

Page 8: ...aranteed by the supplier can be dangerous for the user himself For the maintenance of the electrochemical sensors refer to the documentation present in their packaging or contact the supplier Responsibility of the owner of the instrument The person who owns and uses the tool or authorizes its use by other people is the owner of the tool and as such is responsible for the safety of all users of the...

Page 9: ...3 μS 12 88 111 8 mS 1 user value Reference temperature 15 30 C Temperature coefficient 0 00 10 00 C TDS COND 7 Vio PC 7 Vio Temperature coefficient 0 1mg l 200 gr l 0 40 1 00 Temperature pH 7 Vio COND 7 Vio PC 7 Vio Measuring range 0 100 C Resolution Accuracy 0 1 0 5 C Temperature compensation ATC NTC30KΩ and MTC pH 0 100 C Cond 0 80 C System Display High definition colours LCD Brightness and cont...

Page 10: ...tion used for calibration Error symbol Actual value Measure unit Temperature and type of compensation ATC automatic NTC 30KΩ MTC manual DHS connection icon Indication of use of the directional keys Stability indicator Text string Date and time Battery charge level Text string On Off button to switch the device on and off Meas Cal key to return to measurement mode and to start calibration UP MODE d...

Page 11: ...onnection cable NT55 temperature probe buffer solutions in single dose bottle and or sachet paper tissues screwdriver beaker electrode holder support only for multiparameter multilingual user manual and test report Versions with the sensors s already included are also available Contact your local distributor to be updated on the correct composition of the sales kit Implementation The device leaves...

Page 12: ...rument If you need to buy a new one contact your local distributor The inside of the case is shaped to be able to house the instrument and the sensor still connected Key functions Button Press Function Short Press to turn the device on or off Short In calibration mode and press to return to measurement mode In measurement mode press to start the calibration Short In measurement mode press to enter...

Page 13: ...e of sale are protected by a plastic cap Remove the cap before connecting the probes PC 7 Vio upper panel READ THE MANUAL BEFORE PROCEEDING TO CONNECT PROBES OR ANY OTHER ACCESSORY Symbols and icons on the display Symbol Description Symbol Description Press the directional keys to change the parameter or value on the display Error in measurement or calibration DHS digital sensor active Battery lev...

Page 14: ...o COND 7 Vio PC 7 Vio pH Conductivity pH mV TDS mV ORP ORP Conductivity TDS Note Pressing after the last parameter the instrument automatically restarts from the first In the measurement screens for the pH ORP and Conductivity parameters press the key to start the calibration of the active parameter Subsequent paragraphs On the left side of the display through a string of different colours it is a...

Page 15: ...asurement mode press the key to enter SETUP mode select the parameter you want to modify by moving with the directional keys and confirming with pH 7 Vio COND 7 Vio PC 7 Vio pH SETTINGS COND SETTINGS PH SETTINGS ORP SETTINGS TDS SETTINGS ORP SETTINGS SETTINGS SETTINGS COND SETTINGS TDS SETTINGS SETTINGS Within the selected menu move between the different programs using the directional buttons and ...

Page 16: ...solution P1 3 Set Stability criteria P1 6 View pH Cal P1 8 Reset pH Setting P1 9 Temp Cal pH P2 0 ORP SETTINGS P2 6 View ORP Cal P2 8 Reset ORP Setting P2 9 Temp Cal ORP P3 0 COND SETTINGS P3 1 Cell Constant P3 2 Buffer Selection P3 3 Reference Temp P3 4 Temp Compensation Factor P3 6 View Cond Cal P3 8 Reset Cond Setting P3 9 Temp Cal Cond P4 0 TDS SETTING P4 1 TDS Factor P9 0 SETTINGS P9 1 Temper...

Page 17: ...rument is also able to recognize the DHS sensor an innovative electrode capable of storing calibration data and then being able to be used immediately on any enabled instrument pH parameter Setup In measurement mode press to access the SETUP menu By pressing the button access the pH SETTINGS P1 0 menu Move with the keys and to select the sub menu you want to access The chart below shows the setup ...

Page 18: ...bands appear flowing on the display Access this menu to change the measurement stability criteria LOW choose this option to make the stability icon appear even in conditions of poor stability Readings included within 1 2 mV MEDIUM default value readings included within 0 6 mV HIGH choose this option to display the stability icon only in conditions of high measurement stability readings within 0 3 ...

Page 19: ...s are replaced by the stability icon Press as indicated by PRESS OK The measured value flashes on the display and then the icon of the pH 7 00 beaker appears at the bottom left indicating that the instrument is calibrated on the neutral point Remove the electrode rinse with distilled water and dab gently with absorbent paper Dip the sensor in the pH 4 01 buffer solution CHANGE BUFFER The instrumen...

Page 20: ...nd select in P1 1 Customer press twice to return to the measurement and position in pH mode Press to enter the calibration mode Rinse the electrode with distilled water and gently dab with absorbent paper Immerse the electrode in the first pH buffer solution ex pH 6 79 Wait for the pH value on the display to stabilize when the icon appears and the value flashes edit it using the directional keys b...

Page 21: ...in the sample while keeping stirred Scroll on the display with four red bands means that the measurement is not yet stable Consider the measurement truthful only when the stability icon appears Example of an unstable measurement Example of stable measurement After the measurement wash the electrode with distilled water and preserve it in the appropriate storage solution Never store the sensors in ...

Page 22: ...T STABLE The button has been pressed with still unstable signal Wait for the icon to appear to confirm the point WRONG BUFFER The buffer you are using is polluted or not part of the recognized families SLOPE OUT OF RANGE The slope of the sensor calibration line is out of the acceptable range 80 120 CALIBRATION TOO LONG the calibration has exceeded the time limit only the points calibrated up to th...

Page 23: ...nstrument does not work perfectly or incorrect settings have been made confirm YES with the key to return all the parameters of the ORP menu to the default settings P2 9 Temperature calibration All the instruments in these series are pre calibrated for a correct temperature reading In case however a difference between the measured and the real one is evident usually due to a probe malfunction it i...

Page 24: ... while the resistance R represents the proportionality constant Specifically V R x I the resistance is consequently R V I Where R resistance Ohm V voltage Volt I current Ampere The inverse of the resistance is defined as conductance G G 1 R and is expressed in Siemens S Measuring resistance or conductance requires a measuring cell which consists of two opposite charge poles The reading depends on ...

Page 25: ...ibrate Access this setup menu to select the cell constant related to the sensor you are using 0 1 1 default 10 For each of the 3 selectable cell constants the instrument stores the calibrated points By selecting the cell constant the previously performed calibration points are automatically recalled P3 2 Calibration method Access this setup menu to select automatic or manual recognition of the sta...

Page 26: ...s Conductivity at real temperature ATC or MTC and then converts it to the reference temperature using the correction Factor chosen in program P3 4 Access this setup menu to set the temperature to which you want to refer the Conductivity measurement The device can report Conductivity from 15 C to 30 C By default it is 25 C which is correct for most analyses P3 4 Temperature compensation Factor It i...

Page 27: ...ensation The displayed Conductivity value refers to the temperature value measured by the probe and not related to a reference temperature P3 6 Conductivity Calibration Data Access this menu to get information on the last calibration performed The following screens will automatically scroll on the display First screen beakers indicating the buffers used for calibration Second and possibly third fo...

Page 28: ...hin the measurement range For example the standard solution 1413 µS cm is suitable for measurements between about 200 2000 µS cm To calibrate the instrument on several points once returned to the measurement repeat all the calibrations steps The beaker relating to the new calibrated point will join the previous one It is advisable to start the calibration from the less concentrated standard soluti...

Page 29: ...ndicate that the measurement is not yet stable Wait for the Conductivity value on the display to stabilize when the icon appears use the keys and to adjust the value by entering that of the standard solution ex 5 00 µS cm as indicated by the string ADJUST THE VALUE and by the icon When the icon reappears confirm the calibration point by pressing the key The actual measured value flashes on the dis...

Page 30: ...emperature probe or an external probe NTC 30KΩ it is advisable to manually update the temperature value MTC Remove the cell from its test tube rinse with distilled water dab gently taking care not to scratch the probe Dip the sensor in the sample the measuring cell and any vent holes must be completely immersed Keep in slight agitation eliminate any air bubbles that would distort the measurement b...

Page 31: ...ETUP menu Use the directional keys to move to TDS SETTINGS P4 0 and access the menu by pressing the key Press again to enter the program TDS FACTOR P4 1 When the value flashes use the directional keys as indicated by the icon to enter the correct value and confirm with By default the TDS factor set is 0 71 the user can change it between 0 40 1 00 Below are the TDS factors in relation to the Conduc...

Page 32: ...hich contrast mode o use for the backlight display INDOOR In Default option Recommended if you use the device indoor OUTDOOR Out Recommended if you use the device outdoor P9 4 Brightness Access this setup menu to choose between three different levels of display brightness LOW NORMAL HIGH Note Keeping the display bright always adversely affects battery life P9 5 Sleep Mode Access this setup menu to...

Page 33: ...his setup menu to restore the instrument to factory conditions P9 9 Auto Off Access this setup menu to activate or deactivate the auto shutdown of the instrument YES The instrument automatically turns off after 20 minutes of inactivity NO The instrument remains always on even if you are not using it IMPORTANT The correct and systematic use of parameters P9 3 P9 4 P9 5 P9 9 allows to significantly ...

Page 34: ... 1 20 12 2019 EN Disposal of electrical devices This equipment is subjected to the regulations for electronic devices Dispose of in accordance with local regulations Series 7 Vio ENG Version 1 0 December 2019 ...

Reviews: