background image


22

901142 REV D 5/16/17, INST 63-66 CORVETTE EVAP wo AC PG 22 OF 25

Symptom                 Condition                          Checks                                                   Actions    

                                             N

ot

es

Blower 

sta

ys 

on 

high 

speed 

when 

ignition 

is 

on.

1a.

No 

other 

functions 

work.

Check 

for 

damaged 

pins 

or 

wires 

in 

control 

head 

plug.

V

erif

that 

all 

pins 

are 

inserted 

into 

plug. 

Ensure 

that 

no 

pins 

are 

bent 

or 

damaged 

in 

ECU

.

Check 

for 

damaged 

ground 

wire 

(white) 

in 

control 

head 

harness.

V

erif

continuit

to 

chassis 

ground 

with 

white 

control 

head 

wire 

at 

various 

points.

Loss 

of 

ground 

on 

this 

wire 

renders 

control 

head 

inoper

able.

All 

other 

functions 

work.

Check 

for 

damaged 

blower 

switch 

or 

potentiometer 

and 

associated 

wiring.

Blower 

sta

ys 

on 

high 

speed 

when 

ignition 

is 

on 

or 

off

.

Unplug 

3-

wire 

BSC 

control 

connector 

from 

ECU

If 

blower 

shuts 

off

ECU 

is 

either 

improperly 

wired 

or 

damaged.

Be 

sure 

the 

small, 

20 

GA 

white 

ground 

wire 

is 

connected 

to 

the 

battery 

ground 

post. 

If 

it 

is, 

replace 

the 

ECU

.

Unplug 

3-

wire 

BSC 

control 

connector 

from 

ECU

If 

blower 

sta

ys 

running, 

BSC 

is 

either 

improperly 

wired 

or 

damaged.

Check 

to 

ensure 

that 

no 

BSC 

wiring 

is 

damaged 

or 

shorted 

to 

vehicle 

ground. 

The 

BSC 

oper

ates 

the 

blower 

b

ground 

side 

pulse 

width 

modulation 

switching. 

The 

positiv

wire 

to 

the 

blower 

will 

alw

ays 

be 

hot. 

If 

the 

“ground” 

side 

of 

the 

blower 

is 

shorted 

to 

chassis 

ground, 

the 

blower 

will 

run 

on 

HI.

R

eplace 

BSC 

(This 

will 

require 

remo

val 

of 

ev

apor

ator 

from 

vehicle).

No 

other 

part 

replacements 

should 

be 

necessary

.

Compressor 

will 

not 

turn 

on 

(All 

other 

functions 

work).

2.

S

ystem 

is 

not 

charged.

S

ystem 

must 

be 

charged 

for 

compressor 

to 

engage.

Charge 

system 

or 

b

ypass 

pressure 

switch.

Danger: Never bypass  safety switch with  engine running. Serious  injury can result.

S

ystem 

is 

charged.

1b.

Troubleshoot

ing Guide

Check 

for 

fault

A/C 

potentiometer 

or 

associated 

wiring 

(Not 

applicable 

to 

3-pot 

controls).

Check 

for 

disconnected 

or 

fault

thermistor

.

Check 

continuit

to 

ground 

on 

white 

control 

head 

wire. 

Check 

for 

5V 

on 

red 

control 

head 

wire.

Check 

2-pin 

connector 

at 

ECU 

housing.

To 

check 

for 

proper 

pot 

function, 

check 

voltage 

at 

white/blue 

wire. 

V

oltage 

should 

be 

between 

0V 

and 

5V

and 

will 

vary 

with 

pot 

lev

er 

position.

Disconnected 

or 

fault

thermistor 

will 

cause 

compressor 

to 

be 

disabled.

R

ed 

wire 

at 

A/C 

pot 

should 

ha

ve 

appro

ximately 

5V 

with 

ignition 

on. 

White 

wire 

will 

ha

ve 

continuit

to 

chassis 

ground. 

White/

Blue 

wire 

should 

vary 

between 

0V 

and 

5V 

when 

lev

er 

is 

mo

ved 

up 

or 

down.

3.

Compressor 

will 

not 

turn 

off 

(All 

other 

functions 

work).

Check 

for 

fault

A/C 

potentiometer 

or 

associated 

wiring.

Check 

for 

fault

A/C 

rela

y.

R

epair 

or 

replace 

pot/control 

wiring.

R

eplace 

rela

y.

See 

blower 

switch 

check 

procedure.

Summary of Contents for 561163

Page 1: ... 561163 901142 REV D 5 16 17 INST 63 66 COVETTE EVAP wo AC PG 1 OF 25 an ISO 9001 2008 Registered Company 18865 Goll St San Antonio TX 78266 Phone 800 862 6658 Sales sales vintageair com Tech Support tech vintageair com www vintageair com ...

Page 2: ...NSTALLATION CONT FIGURES 9 10 13 FIREWALL BLOWER COVER INSTALLATION CONT LUBRICATING O RINGS A C HOSE INSTALLATION MODIFIED A C HOSE KIT FIGURES 11 11a 12 14 63 65 VETTE AC HEATER HOSE ROUTING FIGURE 13 15 DRAIN HOSE INSTALLATION CENTER CONSOLE TRIM MODIFICATION FIGURE 14 15 16 PASSENGER SIDE UNDER DASH LOUVER INSTALLATION DRIVER SIDE UNDER DASH LOUVER INSTALLATION FIGURES 16 17 17 DRIVER PASSENGE...

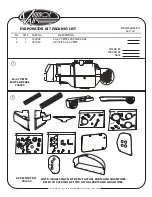
Page 3: ...IN 15 DAYS AFTER 15 DAYS VINTAGE AIR WILL NOT BE RESPONSIBLE FOR MISSING OR DAMAGED ITEMS EVAPORATOR KIT 561163 EVAPORATOR KIT PACKING LIST 1 No QTY PART No DESCRIPTION 2 1 1 744009 781063 1 ACCESSORY KIT 781063 2 63 67 VETTE EVAP SUB CASE 744009 63 67 VETTE EVAP SUB CASE ACC KIT 63 66 VETTE NOTE IMAGES MAY NOT DEPICT ACTUAL PARTS AND QUANTITIES REFER TO PACKING LIST FOR ACTUAL PARTS AND QUANTITIE...

Page 4: ...ur A C system This is especially important with the receiver drier Additionally when caps are removed for assembly BE CAREFUL Some components are shipped under pressure with dry nitrogen Evacuate the System for 35 45 Minutes Ensure that system components Drier compressor evaporator and condenser are at a temperature of at least 85 F On a cool day the components can be heated with a heat gun or by ...

Page 5: ...an be sensitive to voltage spikes on the power leads which can cause unexpected resets strange behavior and or permanent damage Vintage Air strives to harden our products against these types of electrical noise but there is a point where a vehicle s electrical system can be degraded so much that nothing can help Radio interference capacitors should be available at most auto and truck parts supplie...

Page 6: ...IDE IF MOUNTED ON DRIVER SIDE DISCONNECT TERMINAL OEM BLOWER MOTOR ASSEMBLY UNDER HOOD DISCARD OEM HEATER HOSES DISCARD SEE FIGURE 1 REMOVE OEM RADIATOR EXPANSION TANK RETAIN IF EQUIPPED OEM HEATER HOSES OEM RADIATOR EXPANSION TANK OEM BLOWER MOTOR ASSEMBLY BEFORE STARTING THE INSTALLATION CHECK THE FUNCTION OF THE VEHICLE HORN LIGHTS ETC FOR PROPER OPERATIONS STUDY THE INSTRUCTIONS ILLUSTRATIONS ...

Page 7: ...ER SIDE FRESH AIR CABLE ASSEMBLY FROM DASH FOR LATER INSTALLATION REMOVE OEM CENTER CONSOLE FLOOR TRIM RETAIN 63 MODELS ONLY REMOVE CENTER FLOOR CONSOLE RETAIN PASSENGER COMPARTMENT CONDENSER ASSEMBLY INSTALLATION REFER TO SEPARATE INSTRUCTIONS INCLUDED WITH THE CONDENSER KIT TO INSTALL THE CONDENSER BINARY SWITCH INSTALLATION REFER TO CONDENSER INSTRUCTIONS REFER TO SEPARATE INSTRUCTIONS INCLUDED...

Page 8: ...UCT MOUNTING HOLES TOWARDS FIREWALL AS SHOWN BELOW IN FIGURE 3a OEM DEFROST DUCT OPENING DEFROST DUCT MOUNTING HOLES TOP VIEW DEFROST DUCT 2 OEM NUTS DEFROST DUCT 491634 FIREWALL BLOWER COVER INSTALLATION INSTALL 4 GROMMETS IN FIREWALL BLOWER COVER SEE FIGURE 4a BELOW ROUTE 10 HOSE THROUGH FIREWALL BLOWER COVER AS SHOWN BELOW DO NOT ATTACH TO FIREWALL AT THIS TIME 4 GROMMETS 33137 VUI FIREWALL BLO...

Page 9: ... BELOW FROM INSIDE THE CAR INSTALL FIREWALL COVER ON FIREWALL USING 2 1 4 20 x 1 HEX BOLTS AND 2 FLAT WASHERS SEE FIGURE 5 BELOW NOTE USE SEAM SEALER TO FILL GAP BETWEEN COVER LIP IN FIREWALL BEFORE PAINTING INSTALL 3 8 GROMMET IN FIREWALL COVER AS SHOWN BELOW FIGURE 5 2 1 4 20 x 1 HEX BOLTS 2 1 4 x 3 4 FLAT WASHER GROMMET 33144 VUI BACK SIDE OF FIREWALL COVER SILICONE FIREWALL COVER ...

Page 10: ...M FIREWALL AS SHOWN BELOW AFTER EVAPORATOR IS INSTALLED PUSH CARPET BACK IN PLACE THIS WILL BE A VERY CLOSE FIT TAKE CARE NOT TO DAMAGE STEPPER MOTORS DURING INSTALLATION FIGURE 6c KICK PANEL COVER INSTALLATION INSTALL 4 GROMMETS IN KICK PANEL COVER SEE FIGURE 6b BELOW REMOVE TAB FROM KICK PANEL AS SHOWN IN FIGURE 6a ROUTE A C AND HEATER HOSE THROUGH FIREWALL BLOWER COVER AND KICK PANEL COVER AS S...

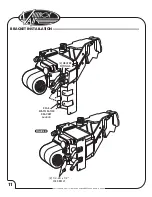
Page 11: ...11 901142 REV D 5 16 17 INST 63 66 CORVETTE EVAP wo AC PG 11 OF 25 REAR EVAPORATOR BRACKET 644040 2 HEATER FITTINGS BRACKET INSTALLATION FIGURE 8 2 1 4 20 x 1 2 HEX BOLT ...

Page 12: ... FIGURE 10 BELOW DRILL 3 16 HOLE IN PASSENGER SIDE DASH BRACE USING DRIVER SIDE FRONT MOUNTING BRACKET AS TEMPLATE SEE FIGURE 10 BELOW SECURE DRIVER SIDE FRONT MOUNTING BRACKET TO PASSENGER SIDE DASH BRACE USING 14 x 3 4 HEX SHEET METAL SCREW SEE FIGURE 10 BELOW VERIFY THAT EVAPORATOR UNIT IS LEVEL AND SQUARE TO THE DASH THEN TIGHTEN ALL MOUNTING BOLTS NOTE TIGHTEN THE BOLTS ON FIREWALL FIRST THEN...

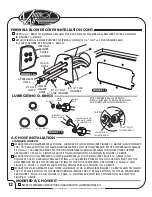
Page 13: ...EMALE FITTING TO THE DRIER HARDLINE ROUTE THE 90 FEMALE FITTING TO THE 6 EVAPORATOR SEE FIGURE 9 PAGE 12 AND FIGURE 13 PAGE 14 TIGHTEN EACH FITTING CONNECTION AS SHOWN IN FIGURE 12 ABOVE A C HOSE INSTALLATION STANDARD HOSE KIT LUBRICATING O RINGS 6 O RING 8 O RING 10 O RING HOLD WITH THIS W RENCH FOR A PROPER SEAL OF FITTINGS INSTALL SUPPLIED O RINGS AS SHOWN AND LUBRICATE WITH SUPPLIED OIL O RING...

Page 14: ...PAGE 12 AND FIGURE 13 BELOW INSTALL HEATER CONTROL VALVE IN LINE WITH INTAKE MANIFOLD PRESSURE SIDE HEATER HOSE SECURE USING HOSE CLAMPS AS SHOWN IN FIGURE 13 BELOW NOTE PROPER FLOW DIRECTION FROM HTR CNTRL VLV TO HEATER CORE HEATER HOSE F R O M H E A T E R T O R A D I A T O R E X P A N S I O N T A N K I F E Q U I P P E D O R W A T E R P U M P F R O M I N T A K E M A N I F O L D 6 DRIER CORE SUPPO...

Page 15: ...S CENTER CONSOLE TRIM MODIFICATION FIGURE 15 6 2 PASSENGER SIDE CENTER CONSOLE FLOOR PLATE 63 MODELS ONLY CENTER CONSOLE FLOOR TRIM CUT REMOVE CUT REMOVE PASSENGER SIDE CENTER CONSOLE FLOOR PLATE CENTER CONSOLE FLOOR TRIM LOCATE EVAPORATOR DRAIN ON BOTTOM OF EVAPORATOR CASE IN LINE WITH DRAIN LIGHTLY MAKE A MARK ON THE FIREWALL MEASURE 1 DOWN AND DRILL A 5 8 HOLE THROUGH THE FIREWALL SEE FIGURE 14...

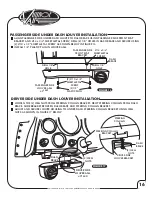
Page 16: ...R SIDE LOUVER BRACKET 2 OEM NUTS DASH BRACE DASH BRACE STEERING COLUMN BRACKET DRIVER SIDE LOUVER ASM 491630 ALIGN PASSENGER SIDE UNDER DASH LOUVER TO DASH BRACE USING PASSENGER SIDE FRONT EVAP BRACKET AND 14 x 3 4 SHEET METAL SCREW DRILL 2 1 8 HOLES IN DASH BRACE AND SECURE USING 2 10 x 1 2 SHEET METAL SCREW AS SHOWN BELOW IN FIGURE 16 INSTALL 1 2 PLASTIC PLUG IN LOUVER ASM PASSENGER SIDE UNDER D...

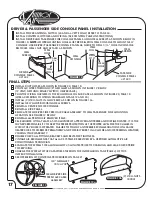
Page 17: ...ZING WEATHER VOIDING YOUR WARRANTY DOUBLE CHECK ALL FITTINGS BRACKETS AND BELTS FOR TIGHTNESS VINTAGE AIR RECOMMENDS THAT ALL AC SYSTEMS BE SERVICED BY A CERTIFIED AUTOMOTIVE AIR CONDITIONING TECHNICIAN EVACUATE THE SYSTEM FOR A MINIMUM OF 45 MINUTES PRIOR TO CHARGING AND LEAK CHECK PRIOR TO SERVICING CHARGE THE SYSTEM TO THE CAPACITIES STATED ON THE INFORMATION PAGE PAGE 4 OF THIS INSTRUCTION MAN...

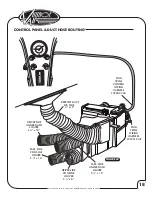
Page 18: ... 2 x 16 DRIVER SIDE CONSOLE LOUVER 2 x 8 CONTROL PANEL DUCT HOSE ROUTING DEFROST DUCT DR SIDE 3 x 12 FIGURE 20 PLUG FROM CONTROL WIRING HARNESS 232002 VUA PLUG FROM WIRING HARNESS 232001 VUR PASS SIDE UNDER DASH LOUVER 2 x 16 12 1 2 3 4 5 6 7 8 9 10 11 108 104 100 96 92 88 A I R PULL DE F TUNING F A N TEMP P U L L V O L T O N E ...

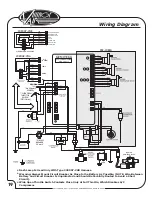
Page 19: ... 232007 VUR 232002 VUA CIRCUIT BREAKER 30 AMP WIDE OPEN THROTTLE SWITCH OPTIONAL DASH LAMP IF USED Dash Lamp Is Used Only With Type 232007 VUR Harness Warning Always Mount Circuit Breaker As Close to the Battery As Possible NOTE Wire Between Battery and Circuit Breaker Is Unprotected and Should Be Carefully Routed to Avoid a Short Circuit Wide Open Throttle Switch Contacts Close Only at Full Throt...

Page 20: ...e Compressor Body Is Grounded Trinary Switch Connect According To Trinary Switch Wiring Diagram Install With Servo Motor Facing Down As Shown Note Flow Direction Arrow Molded Into Valve Body And Install Accordingly White Must Run To Battery Red May Run To Battery Or Starter Mount Circuit Breaker As Close to Battery As Possible Heater Control Valve Binary Trinary Compressor Circuit Breaker Battery ...

Page 21: ... ALL THE WAY LEFT TO THE HOT POSITION ROTATE KNOB LEFT OR RIGHT TO ADJUST DESIRED TEMPERATURE ROTATE KNOB LEFT OR RIGHT TO ADJUST DESIRED TEMPERATURE COMPRESSOR IS AUTOMATICALLY ENGAGED THE TEMPERATURE KNOB TOGGLES BETWEEN A C AND HEAT MODES FOR A C MODE ROTATE THE TEMPERATURE KNOB ALL THE WAY LEFT FOR HEAT MODE ROTATE THE KNOB ALL THE WAY TO THE RIGHT TO DISENGAGE THE COMPRESSOR THEN MOVE THE KNO...

Page 22: ...always be hot If the ground side of the blower is shorted to chassis ground the blower will run on HI Replace BSC This will require removal of evaporator from vehicle No other part replacements should be necessary Compressor will not turn on All other functions work 2 System is not charged System must be charged for compressor to engage Charge system or bypass pressure switch Danger Never bypass s...

Page 23: ...r function No mode change at all Check for damaged mode switch or potentiometer and associated wiring Partial function of mode doors Typically caused by evaporator housing installed in a bind in the vehicle Be sure all mounting locations line up and don t have to be forced into position Blower turns on and off rapidly 6 Battery voltage is at least 12V Check for at least 12V at circuit breaker Ensu...

Page 24: ......

Page 25: ...USING TEMPLATE PROVIDED BELOW MARK DRILL AND CUT HOLES INSTALL POWER ANTENNA SWITCH USING 2 OEM SCREWS AND 2 OEM NUTS AS SHOWN BELOW POWER ANTENNA SWITCH INSTALLATION 65 66 VETTE ONLY 2 OEM SCREWS MARK DRILL 65 66 VETTE POWER ANTENNA SWITCH TEMPLATE MARK CUT 2 OEM NUTS ...

Page 26: ......

Page 27: ......

Page 28: ...KIT 561163 EVAPORATOR KIT PACKING LIST 1 No QTY PART No DESCRIPTION 2 1 1 744009 781063 1 ACCESSORY KIT 781063 2 63 67 VETTE EVAP SUB CASE 744009 63 67 VETTE EVAP SUB CASE ACC KIT 63 66 VETTE NOTE IMAGES MAY NOT DEPICT ACTUAL PARTS AND QUANTITIES REFER TO PACKING LIST FOR ACTUAL PARTS AND QUANTITIES ...

Reviews: