31
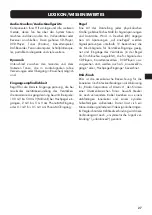
FRONT VIEW
1. INPUT: Input Selector
One of the six audio sources connected to the
amplifier inputs can be selected for playback
here. The LED above the dial associated with the
selected input is lit as long as the amplifier remains
switched on and is not muted.
2. Infrared receiver for the remote control
3. VOLUME
The volume of the loudspeakers and the speakers
may be increased or decreased with this knob.
4. SPEAKERS
With this switch you can turn loudspeaker outputs
A and B on and off separately.
5. TONE
Bypasses the tone control that has been set with
the BASS and TREBLE dials.
6. BASS
For setting the bass proportions (low frequencies)
of the sound.
7. POWER: Mains switch
This is the main power switch for turning on and
off the device. When switched off, the device
is disconnected from the mains. The switching
operation is signalled via the cables connected in
the terminal “POWER CONTROL” (18).
8. TREBLE
For setting the treble proportions (high fre-
quen-cies) of the sound.
9. LOUD: Loudness function
This button activates and deactivates an audio
signal correction that adapts the speaker audio
signal to the human auditory sensation in the lo-
wer volume range.
10. PHONES
If desired, you can connect a set of headphones with
an impedance between 32 Ohm and 600 Ohm
to this stereo jack. As long as the headphones are
plugged in, the loudspeakers are switched off.
The volume of the headphone can be changed
with the rotary knob “VOLUME” (3)(27). Before
plugging-in a headphone, the volume setting
should be reduced.
11. VU-Meter
These displays show the range in dB and the
direct voltage generated out of the music signal.
This voltage is in accordance with your volume
sensitivity.
1
4
5
6
7
8
9
10
3
11
2


