background image

24

Vincent

SAFETY GUIDELINES

This appliance was produced under strict quality controls. 

It complies with all established international safety standards.

Nonetheless, the following instructions should be fully read and

observed in order to prevent any hazard:

Cleaning

Pull out the power plug before cleaning the outside
of the product. Whenever possible, use a soft, lint-
free cloth that has been dampened. Do not use abra-
sives, solvents, thinners, flammable chemicals, polis-
hes and other cleaning products that leave marks. 

Batteries

Take note of the instructions for using batteries in
the chapter "Remote Control".

Maintenance/Alterations

All equipment that is connected to the domestic mains
voltage can be dangerous to the user if not handled
properly. Leave maintenance work to qualified profes-
sionals. The product is only permitted for connection
to AC 230Volt/50Hz, for earthed sockets and use in
enclosed areas. Altering the product or manipulating
its serial number voids the warranty. After a fault,
leave the appliance’s fuse to be replaced only by a
professional with one of the same kind.

Power Cable Connection

Always pull the plug and never the power cable if
you want to disconnect the appliance from the
mains power. Make sure when setting up the appli-
ance that the power cable is not squashed, severely
bent or damaged by sharp edges. Do not touch the
power lead with wet or damp hands. Use the power
cable supplied or another one from Vincent.  

Switching Off

Switch the appliance off every time before you con-
nect or remove other components or loudspeakers,
disconnect or connect it to the mains power, leave it
unused for a longer period or want to clean its outsi-
de. On all amplifiers and receivers, wait approx. 1
minute after this before disconnecting or reconnecting
the cable.  

Moisture/Heat/Vibration

Contact of electrically operated equipment with
liquids, moisture, rain or water vapour is dangerous
for such equipment and the user and must be avoi-

ded without fail. Take care that no liquids or objects
get inside the appliance (ventilation slots etc.). 
It must be disconnected from the mains power imme-
diately and examined by a professional if this hap-
pens. Never expose the appliance to high tempera-
tures (direct sunshine) or strong vibration.

Heat Build-up

Make sure that a gap of 5 cm remains around the
appliance and that the surrounding air can circula-
te (do not install in enclosed cupboards). Vents must
not be covered up.

Volume

The maximum tolerable volume is always reached well
below the maximum possible setting on the amplifier.
Be careful with the volume setting, therefore, in order
to prevent damage to hearing. So that you do not
expose yourself to high volumes unintentionally, always
set to a low level before changing the input channel.

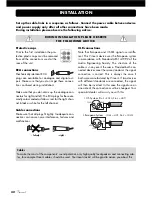
ON

OFF

Do not open the appliance! Risk of electric shock! 

There are no parts in the appliance that require maintenance by the user.

Summary of Contents for CD-S1.1

Page 1: ...Vincent CD S1 1 CD HDCD Player mit Hybrid Ausgangsstufe Hybrid CD HDCD Player Lecteur de CD et HDCD hybride Bedienungsanleitung deutsch Instructions for use english Manuel d utilisation fran ais...

Page 2: ...ne in your system and obtaining the best possible performance even if it was installed by your dealer Please follow the security precautions though some instructions may seem obvious In the appendix t...

Page 3: ...es 24 Other instructions 25 Included in delivery 26 Description of the device 26 Remote control 29 Installation 32 Operating the appliance 35 Tips 40 Search for errors 41 Technical specifications 42 G...

Page 4: ...tandards Trotzdem sollten folgende Hinweise vollst ndig gelesen und beachtet werden um eine Gef hrdung zu vermeiden Das Ger t nicht ffnen Gefahr des elektrischen Schocks Es befinden sich keine vom Ben...

Page 5: ...on Andreas B er Es ist ein Produkt der Sintron Vertriebs GmbH 76473 Iffezheim und darf ohne ausdr ckli che und schriftliche Genehmigung weder komplett noch auszugsweise kopiert oder verteilt werden HD...

Page 6: ...Audio Quellger t stecken Verst rkerschaltungen und auch bei diesen kann R hrentechnologie den Klang voranbringen Die ser Ansatz wird heute nur noch von einigen aus gesuchten Herstellern verfolgt Der...

Page 7: ...eige LED WARM UP LED leuchtet beim Aufw rmen der R hren 2 Anzeige LED HDCD Diese LED leuchtet w hrend eine HDCD abge spielt wird 3 CD Schublade Zum Einlegen der CD kann diese Schublade mit der Taste O...

Page 8: ...Verst rker Receiver oder die Vorstufe mit einem digitalen koaxialen Eingangsanschluss ver sehen ist kann dieser CD Player Signalausgang durch ein mit Cinch Steckern ausgestattetes Digital kabel damit...

Page 9: ...telachse reagiert das Ger t eventuell schlechter auf Bedienversuche Tauschen Sie beide Batterien wenn der Abstand zum Ger t in dem die Fernbedienung benutzt wer den kann sich verringert Verwendung der...

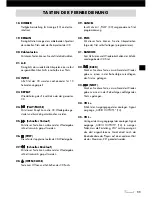
Page 10: ...10 Vincent TASTEN DER FERNBEDIENUNG 20 18 28 21 23 24 26 27 19 30 31 22 33 32 34 25 35 29...

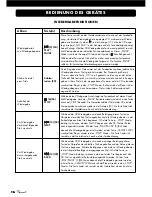
Page 11: ...ste kann w hrend der Wiedergabe schnell r ckw rts gespult werden 28 OPEN CLOSE Taste zum ffnen und Schlie en des CD Fachs 29 CANCEL L scht die mit PGM 30 vorgenommene Titel programmierung 30 PGM Mit d...

Page 12: ...beraten Stellen Sie zuerst die Kabelverbindung f r den Signalausgang des Players her Bringen Sie erst danach das Netzkabel an und verbinden es mit der Steckdose Beachten Sie bitte bei der Installation...

Page 13: ...ss des meist mit CD XLR IN BALANCED IN oder FRONT R L beschrifteten XLR Verst rkereingangs CD S1 1 Vollverst rker Vorverst rker oder Receiver BALANCED IN CD Verwendung eines analogen Ausgangs mit Cinc...

Page 14: ...ausger steter Kopfh rer kann an die Kopfh rerbuchse PHONES 8 an der Vorderseite des Ger tes eingesteckt werden Es k nnen alle Kopfh rer mit einer Impedanz zwischen 32 Ohm und 600 Ohm verwendet werden...

Page 15: ...den anderen Quellen am Verst rker Receiver viel lauter ist oder verzerrt bersteuerung Halten Sie die VOL Taste gedr ckt um den Ausgangspegel zu erh hen Verwenden Sie VOL um diesen zu verringern In der...

Page 16: ...in Tastendruck auf diesen Knopf die Wiedergabe Auch der PAUSE Betriebszustand wird durch einen Tasten druck auf STOP beendet Die Gesamtanzahl der Titel auf der CD und die Gesamtspielzeit erscheinen wi...

Page 17: ...Geschwindigkeit r ckw rts abgespielt R ckspulen Wird die Taste losgelassen wird die Wiedergabe in der normalen Ge schwindigkeit in Vorw rtsrichtung fortgesetzt Ist die CD Wiedergabe gestoppt so hat d...

Page 18: ...te zweimal bet tigt wird die gesamte CD oder das gesamte Programm fortw hrend nach Ablauf der Spieldauer wiederholt In der Anzeige 10 ist dieser Betriebszustand durch den Schriftzug REPEAT ALL gekennz...

Page 19: ...durchlaufen und danach gel scht Die Wiedergabefunktion REPEAT 11 23 kann auch auf die programmier te Titelauswahl angewendet werden Das Programm bleibt auch bei Bet ti gung von STOP 6 26 gespeichert u...

Page 20: ...vorgerufen sofern eine Audioverbindung zum Verst rker besteht Eine weitere m gliche Quelle f r Brummst rungen stellt die elektromagnetische Einstrahlung des Netz teiles anderer Ger te z B Verst rker R...

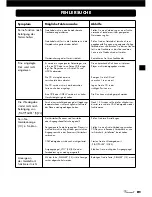
Page 21: ...ann mit diesem Player nicht wiedergegeben werden Reinigen Sie die CD und versuchen Sie es erneut Legen Sie die CD in der richtigen Position ein Die Disc kann nicht abgespielt werden Die Wiedergabe sta...

Page 22: ...r Kabelverbindungen sind lose die Anschl sse verschmutzt oder ein Kabel defekt W hlen Sie an diesen Ger ten einen gew hnlichen Hochpegeleingang CD oder LINE IN Pr fen Sie die Audio Anschl sse ber die...

Page 23: ...are Ver f lschungen darstellt Nur sehr wenige CD Titel sind in diesem erweiterten Format erh ltlich Pegel Eine Art der Darstellung jeder physikalischen Gr e gebr uchliches Ma f r Signalspannungen und...

Page 24: ...not touch the power lead with wet or damp hands Use the power cable supplied or another one from Vincent Switching Off Switch the appliance off every time before you con nect or remove other component...

Page 25: ...eim and may not be copied or distributed part ly or in full without express written consent HDCD High Definition Compatible Digital and the HDCD symbol are registered trademarks owned by the Microsoft...

Page 26: ...there are amplifier circuits and with these too the sound can be greatly improved by sophisticated ampli fier circuitry Today this approach is taken by only a few selected manufacturers The CD S1 1 i...

Page 27: ...his LED is illuminated while after switching on the tubes are being warmed up 2 HDCD indicator LED This LED is illuminated while an HDCD is being played 3 Disc tray This drawer can be opened or closed...

Page 28: ...lifier receiver or preamplifier is equip ped with a coaxial digital input connector the relevant CD player signal output may be connec ted to this It is not necessary to connect an ana logue 14 and a...

Page 29: ...ppliance as beyond an angle of 30 to the centre axis the appliance may not respond as well to the remote control Change both batteries if the distance at which the remote control can be used effective...

Page 30: ...30 Vincent BUTTONS OF THE REMOTE CONTROL 20 18 28 21 23 24 26 27 19 30 31 22 33 32 34 25 35 29...

Page 31: ...D 27 Fast rewind You can wind backwards quickly during playback with this button 28 OPEN CLOSE Button for opening and closing the CD compart ment 29 CANCEL Deletes the track programming set up with PG...

Page 32: ...ailures and malfunctions 1 2 OU OUTPUT falsely right DURING INSTALLATION PLEASE OBSERVE THE FOLLOWING ADVICE 1 USA System Pin 2 COLD Pin 3 HOT 2 1 3 HOT GND COLD 2 Europ isches System Pin 2 HOT Pin 3...

Page 33: ...ut which is usually labelled CD XLR IN BALANCED IN or FRONT R L CD S1 1 preamplifier integrated amplifier receiver BALANCED IN CD Use of one of the analogue outputs with RCA connectors This is where t...

Page 34: ...IFIER A set of headphones equipped with a 6 3 mm jack can be plugged into the PHONES socket 8 on the front of the appliance All headphones with an impedance of between 32 Ohm and 600 Ohm may be used U...

Page 35: ...ve it there A different value is only used if the CD player is much louder compared with the other sources at the amplifier receiver or it is distorted clipping Hold down the VOL button to raise the o...

Page 36: ...his button stops the playing If the play er was in PAUSE mode this mode will also be ended by pressing the STOP button The total number of tracks on the CD and the total playing time appear in the dis...

Page 37: ...as you continue to hold down this button while the CD is playing If the button is released play will continue at normal speed in a forward direction If the CD playback is stopped then this button has...

Page 38: ...over and over again when it has finished In the display 10 this ope ration mode is indicated by the text REPEAT ALL A third press of the key switches this function off The desired repeat mode can als...

Page 39: ...The REPEAT play function 11 23 can also be applied to the programmed track selection In this case even if STOP 6 26 is pressed the program remains in the memory and it will run again with the next pla...

Page 40: ...ers record players or headpho ne amplifiers that are connected to the audio inputs of the amplifier Another possible reason for humming noise is electromagnetic interference of other components power...

Page 41: ...in the player s drive After 1 2 hours the moisture should have eva porated and the CD will play again No sound on both channels although the unit is ready for use front panel display 10 is functional...

Page 42: ...cannot perform any functions No batteries inserted in the remote control batteries are not inserted correctly or are depleted The line of sight between the remote control and the unit is obstructed th...

Page 43: ...ple which represents inaudible alterati ons there Only very few CD titles are obtainable in this extended format dB Level This is a way of describing any physical quantity it is a common measurement f...

Page 44: ...pas cras pli l ex tr me ou endommag par des ar tes tranchantes Ne saisissez pas l appareil avec les mains mouill s ou humides Utilisez le c ble fourni ou un autre c ble de Vincent Arr t Arr tez chaque...

Page 45: ...ffezheim qui ne doit tre ni copi ni distribu dans sa totalit ou en partie sans accord explicite et crit Vincent est une marque enregistr e de la soci t Sintron Vertriebs GmbH 76473 Iffezheim HDCD High...

Page 46: ...rcuits d amplification dans chaque appareil source audio pour lesquels la technologie tubes peut am liorer le son Seuls quelques rares fabricants appr ci s s engagent encore aujourd hui dans cette d m...

Page 47: ...indre pendant la lecture un des titres suivant dans la suite des titres 1 Voyant LED WARM UP Voyant pour la phase de mise en temp rature des tubes 2 Voyant LED HDCD Cette LED s allume pendant la lectu...

Page 48: ...que Si l amplificateur le r cepteur ou le pr amplifica teur sont quip s d une prise d entr e num rique coaxiale le signal de sortie correspondant du lec teur de CD peut y tre reli Il n est pas n cessa...

Page 49: ...t l axe central l appareil peut ventuellement r agir moins bien aux instructions de commande Remplacez les deux piles lorsque la distance d uti lisation de la t l commande par rapport l appa reil dimi...

Page 50: ...50 Vincent TOUCHES DE LA TELECOMMANDE 20 18 28 21 23 24 26 27 19 30 31 22 33 32 34 25 35 29...

Page 51: ...pide Avec cette touche on peut proc der un retour rapide pendant la lecture 28 OPEN CLOSE Touche pour ouvrir et fermer le tiroir de charge ment du CD 29 CANCEL Efface la programmation des titres effec...

Page 52: ...s pour la sortie du signal du lecteur Raccordez alors seulement le cordon secteur et reliez le la prise secteur Veuillez tenir compte des instructions suivantes lors de l installation D pose du capot...

Page 53: ...DIO OUTPUTS 14 la prise gauche et droite de l entr e XLR de l amplificateur g n ralement d sign es par CD XLR IN BALANCED IN ou FRONT R L CD S1 1 p ex pr amplificateur BALANCED IN CD Utilisation d un...

Page 54: ...S RECEPTEURS OU PREAMPLIFICATEURS Un casque quip d une fiche jacks de 6 3 mm peut tre branch sur la face de l appareil la prise PHONES 8 On peut utiliser tout casque d coute ayant une imp dance de 32...

Page 55: ...CD est beaucoup plus fort que celui des autres sources raccord es l amplificateur r cepteur ou s il y a de la distorsion saturation Un appui continu de la touche VOL augmente le niveau de sortie Utili...

Page 56: ...ouche arr te la lecture Un appui sur STOP met galement fin au mode PAUSE Le nombre total de titres du CD et le temps total de lecture apparaissent de nouveau sur l afficheur 10 La touche se trouve aus...

Page 57: ...u che est maintenue appuy e pendant la lecture du CD Retour rapide En rel chant la touche la lecture se poursuit la vitesse d avance norma le Si la lecture du CD est arr t e cette touche n a plus de f...

Page 58: ...lecture du CD la totalit du CD ou la totalit du programme sera r p t e la fin du temps de lecture Cet tat de fonctionnement est indiqu par REPEAT ALL sur l afficheur 10 Un troisi me appui sur la touch...

Page 59: ...ramme est ex cut une fois puis ensuite effac La fonction de reproduction REPEAT 11 23 peut galement tre utilis e sur la s lection programm e des titres Le programme reste aussi en m moire apr s un app...

Page 60: ...ntre l alimentati on d autres appareils p ex amplificateur r cep teur lecteur de CD tuner etc et la t te de lectu re d une platine tourne disque connect e On peut facilement d terminer soi m me de tel...

Page 61: ...ure ambiante de l humidit a pu se d po ser dans le lecteur Apr s une ou deux heures l humidit devrait s vaporer et la lecture du CD devrait de nou veau tre possible Pas de son bien que l appareil soit...

Page 62: ...ne fonction ne peut tre ex cut e l aide de la t l commande Absence de piles dans la t l commande erreur de montage des piles ou les piles sont vides La trajectoire entre la t l commande et l appareil...

Page 63: ...na lisation HDCD qui repr sente ici des alt rations inaudibles Seuls de tr s rares titres de CD sont disponibles dans ce format tendu Niveau dB Une mani re de repr senter toute grandeur physi que mesu...

Page 64: ...it together with this manual The receipt is your proof for the beginning of the warranty period Note the serial number in the following box you can read it from the rear side of the device Gardez soi...

Reviews: