


46NVR.64
Viale Vicenza, 14
36063 Marostica VI - Italy
www.vimar.com
49401504A0 02 2103
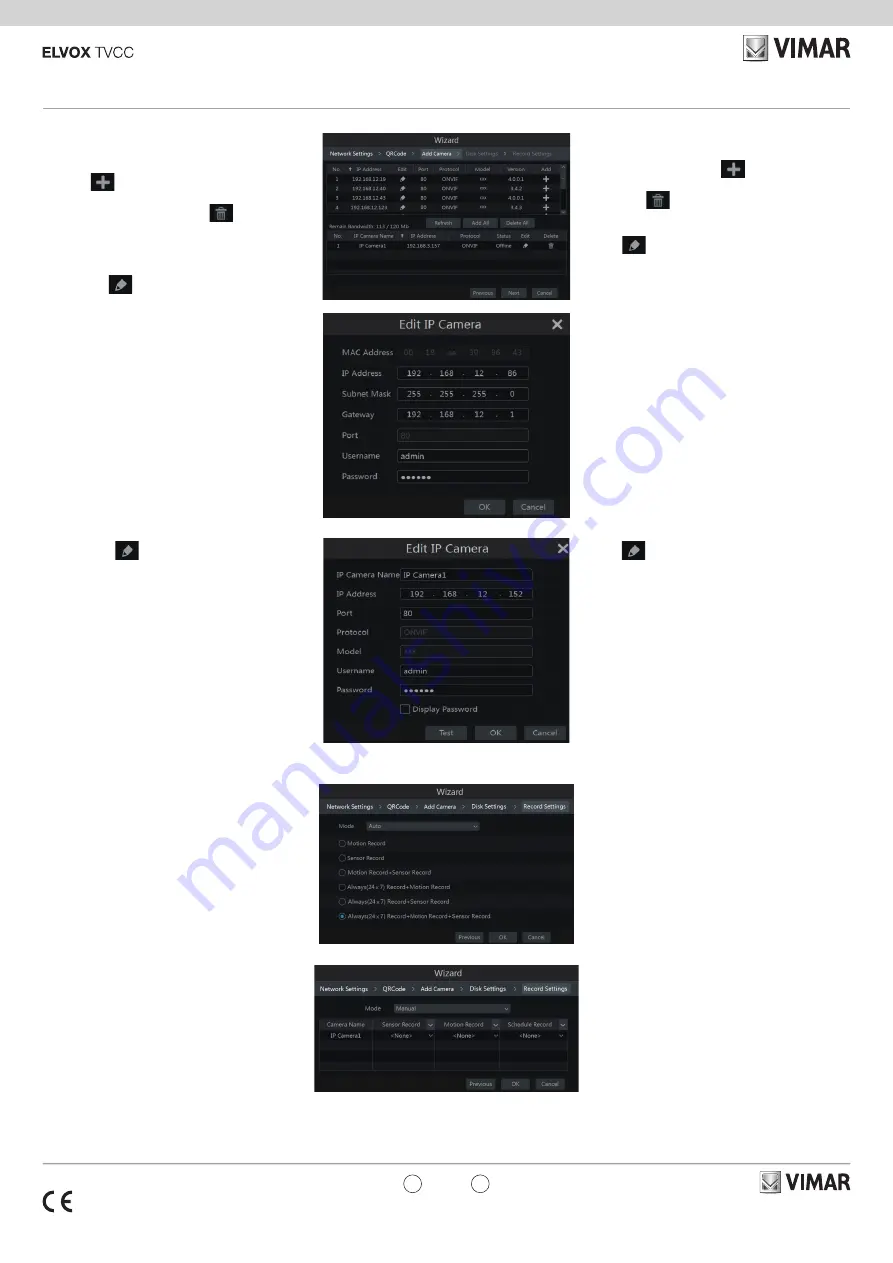
5 -
Aggiunta Telecamera
. Fare clic su “Refresh”
(Aggiorna) per aggiornare l’elenco delle telecamere IP
online che si trovano nella stessa rete locale dell’NVR
e fare clic
per aggiungere la telecamera cercata.
Fare clic su “Add All” (Aggiungi Tutto) per aggiungere
le telecamere nell’elenco. Fare clic
per eliminare
la telecamera aggiunta. Fare clic su “Delete All”
(Elimina tutto) per eliminare tutte le telecamere
aggiunte.
Fare clic su
per modificare la telecamera IP
cercata come mostrato in basso a sinistra. Immettere
il nuovo indirizzo IP, la subnet mask, il gateway, il
nome utente e la password della telecamera. Fare clic
sul pulsante “OK” per salvare le impostazioni.
5-
Add Camera
. Click “Refresh” to refresh the list of
online IP cameras which are in the same local network
with NVR and then click
to add the searched
camera. Click “Add All” to add all the cameras in the
list. Click
to delete the added camera. Click
“Delete All” to delete all the added cameras.
Click
to edit the searched IP camera as shown
on the below left. Input the new IP address, subnet
mask, gateway, username and the password of the
camera. Click “OK” to save the settings.
IT
EN
7 -
Impostazioni registrazione
. Sono disponibili
due modalità di registrazione: automatica e manuale.
Automatica
: Selezionare una modalità automatica
nell’interfaccia come indicato di seguito, quindi fare
clic sul pulsante “OK” per salvare le impostazioni.
Manuale
: Impostare “Sensor Record” (Registrazione
Sensore), “Motion Record” (Registrazione
Movimento) e “Schedule Record” (Registrazione
Programmazione) di ciascuna telecamera. Fare clic
sul pulsante “OK” per salvare le impostazioni.
7-
Record Settings
. Two record modes are available:
auto and manual.
Auto
: Select one auto mode in the interface as shown
below and then click “OK” button to save the settings.
Manual
: Set the “Sensor Record”, “Motion Record”
and “Schedule Record” of each camera. Click “OK” to
save the settings.
Fare clic su
per modificare la telecamera
aggiunta come mostrato in alto a destra. Immettere
il nuovo nome della telecamera, l’indirizzo IP, la
porta, il nome utente e la password della telecamera.
È possibile fare clic sul pulsante “Test” (Prova) per
verificare l’esattezza delle informazioni immesse. Fare
clic sul pulsante “OK” per salvare le impostazioni. È
possibile modificare il nome della telecamera IP solo
quando la telecamera aggiunta è online. Fare clic su
“Next” (Avanti) per continuare.
6 -
Impostazioni disco.
È possibile visualizzare
il numero disco, la capacità disco dell’NVR e il
numero di serie, lo stato R&W del disco. Fare clic su
“Formatting” (Formattazione) per formattare il disco.
Fare clic su “Next” (Avanti) per continuare.
Click
to edit the added camera as shown on the
above right. Input the new camera name, IP address,
port, username and the password of the camera. You
can click “Test” to test the effectiveness of the input
information. Click “OK” to save the settings. You can
change the IP camera name only when the added
camera is online. Click “Next” to continue.
6 -
Disk Settings.
You can view the disk number, disk
capacity of the NVR and serial number, R&W status
of the disk. Click “Formatting” to format the disk. Click
“Next” to continue.


