46NVR.64
Viale Vicenza, 14
36063 Marostica VI - Italy
www.vimar.com
49401504A0 02 2103
IT
EN
3 -
Impostazioni di rete
. Selezionare “Obtain an
IP address automatically” (Ottenere un indirizzo IP
automaticamente) e “Obtain DNS automatically”
(Ottenere DNS automaticamente) per ottenere
l’indirizzo IP e DNS automaticamente, o immettere
manualmente l’indirizzo IP, maschera di sottorete,
gateway, DNS preferito e DNS alternativi. Immettere
la porta HTTP, la porta RTSP e la porta Server. Fare
clic su “Next” (Avanti) per continuare.
3 -
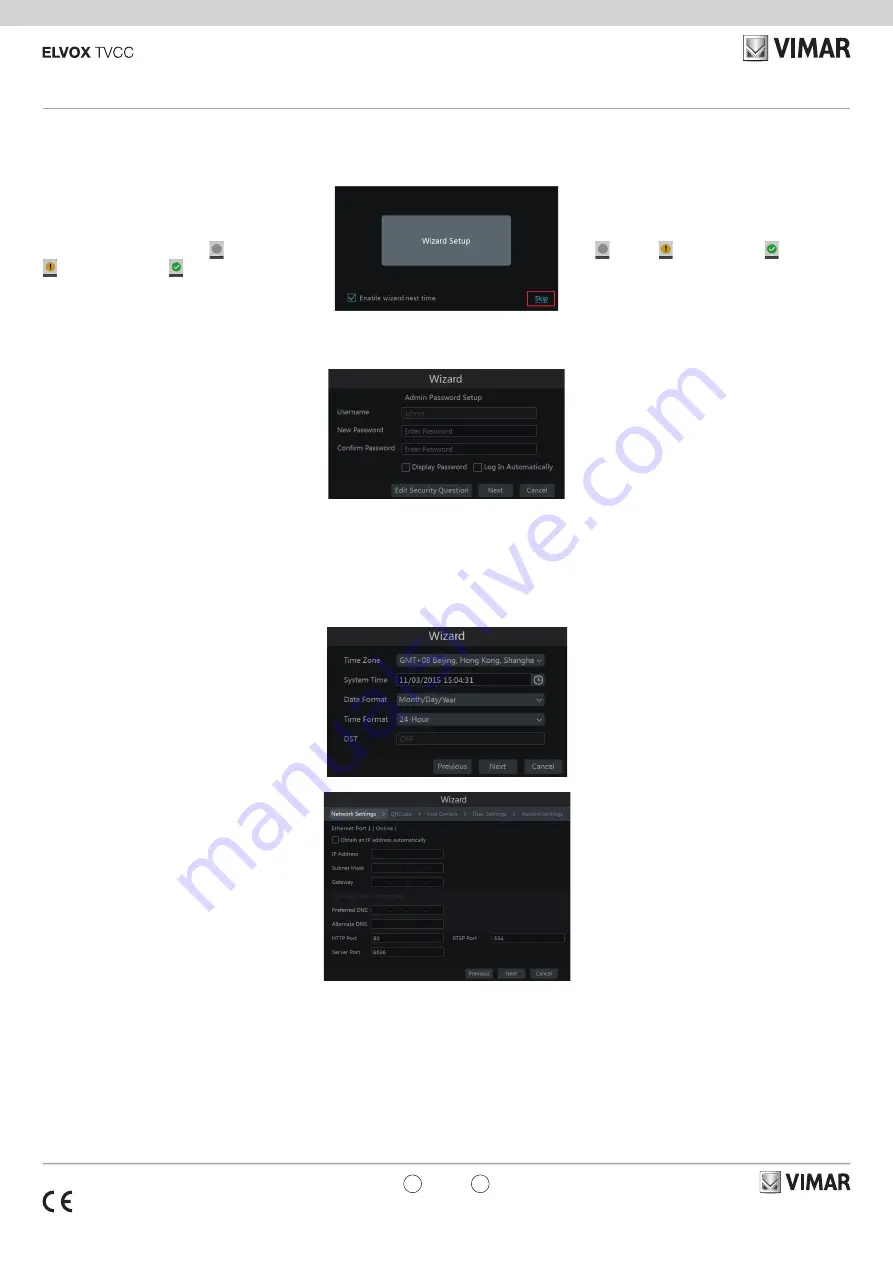
Network Settings
. Check “Obtain an IP address
automatically” and “Obtain DNS automatically” to get
the IP address and DNS automatically, or manually
input IP address, subnet mask, gateway, preferred
DNS and alternate DNS. Input the HTTP port, RTSP
port and Server port. Click “Next” to continue.
4 Procedura guidata e interfaccia
principale
4.1 Procedura guidata per l’avvio
Le icone del disco verranno visualizzate in alto
nell’interfaccia di avvio. È possibile visualizzare il
numero e lo stato di ciascun disco in maniera veloce
e intuitiva attraverso queste icone (
: disco assente;
: disco non disponibile; : disco RW disponibile).
È possibile configurare rapidamente l’NVR tramite la
procedura guidata d’impostazione per far funzionare
l’NVR normalmente. È necessario configurare la
procedura guidata quando l’NVR viene avviato per
la prima volta (oppure fare clic su “Skip” (Salta) per
annullare la procedura guidata la volta successiva).
Fare clic su “Wizard Setup” (Procedura Guidata
Impostazione) per iniziare la procedura guidata. Le
fasi di impostazione sono le seguenti.
1 -
Accesso al sistema
. Impostare la propria
password o utilizzare quella predefinita quando viene
utilizzata la procedura guidata per la prima volta (il
nome utente predefinito del sistema è
admin
; la
password predefinita di admin è
123456
); selezionare
il nome utente di accesso e inserire la password
corrispondente la volta successiva.
Fare clic su “Edita Security Question” (Modifica
domanda di sicurezza) per impostare le domande e
le risposte di sicurezza per la password dell’admin.
Fare clic su “Next” (Avanti) per continuare oppure fare
clic su “Cancel” (Annulla) per uscire dalla procedura
guidata.
2 -
Configurazione di data e ora
La data e l’ora del
sistema devono essere impostate se la procedura
guidata viene utilizzata per la prima volta. Fare
riferimento alla figura seguente. Impostare il fuso
orario, l’ora del sistema, il formato della data e il
formato dell’ora. Il DST sarà abilitato per impostazione
predefinita se il fuso orario selezionato comprende
DST. Fare clic su “Next” (Avanti) per continuare.
4 Wizard & Main Interface
4.1 Startup Wizard
The disk icons will be shown on the top of the startup
interface. You can view the number and status of each
disk quickly and conveniently through these icons (
: no disk; : unavailable disk; : RW available
disk).
You can quickly configure the NVR by wizard setup to
make the NVR work normally. You must configure the
wizard if you start the NVR for the first time (or click
“Skip” to cancel the wizard next time).
Click “Wizard Setup” to start wizard. The setting steps
are as follows.
1 -
System Login
. Set your own password or use
the default when you use the wizard for the first time
(the default username of the system is
admin
and the
default password of admin is
123456
); select the login
username and enter the corresponding password
next time.
Click “Edit Security Question” to set questions and
answers for password security of admin.
Click “Next” to continue or click “Cancel” to exit the
wizard.
2 -
Date and Time Configuration
. The date and time
of the system need to be set up if you use the wizard
for the first time. Refer to the following figure. Set the
time zone, system time, date format and time format.
The DST will be enabled by default if the time zone
selected includes DST. Click “Next” to continue.
4 -
QRCode.
È possibile scansionare il QRCode
attraverso l’applicativo client installato nel telefono
cellulare o nel PAD per accedere istantaneamente.
Per maggiori dettagli vedere il paragrafo 5.2
Sorveglianza Client Mobile.
4-
QRCode.
You can scan the QRCode through
mobile client which is installed in the mobile phone or
PAD to log in the mobile client instantly. Please refer
to 5.2 Mobile Client Surveillance for details.


