Vimar Elvox TVCC 46613.036 User Manual Download Page 22

◆ 

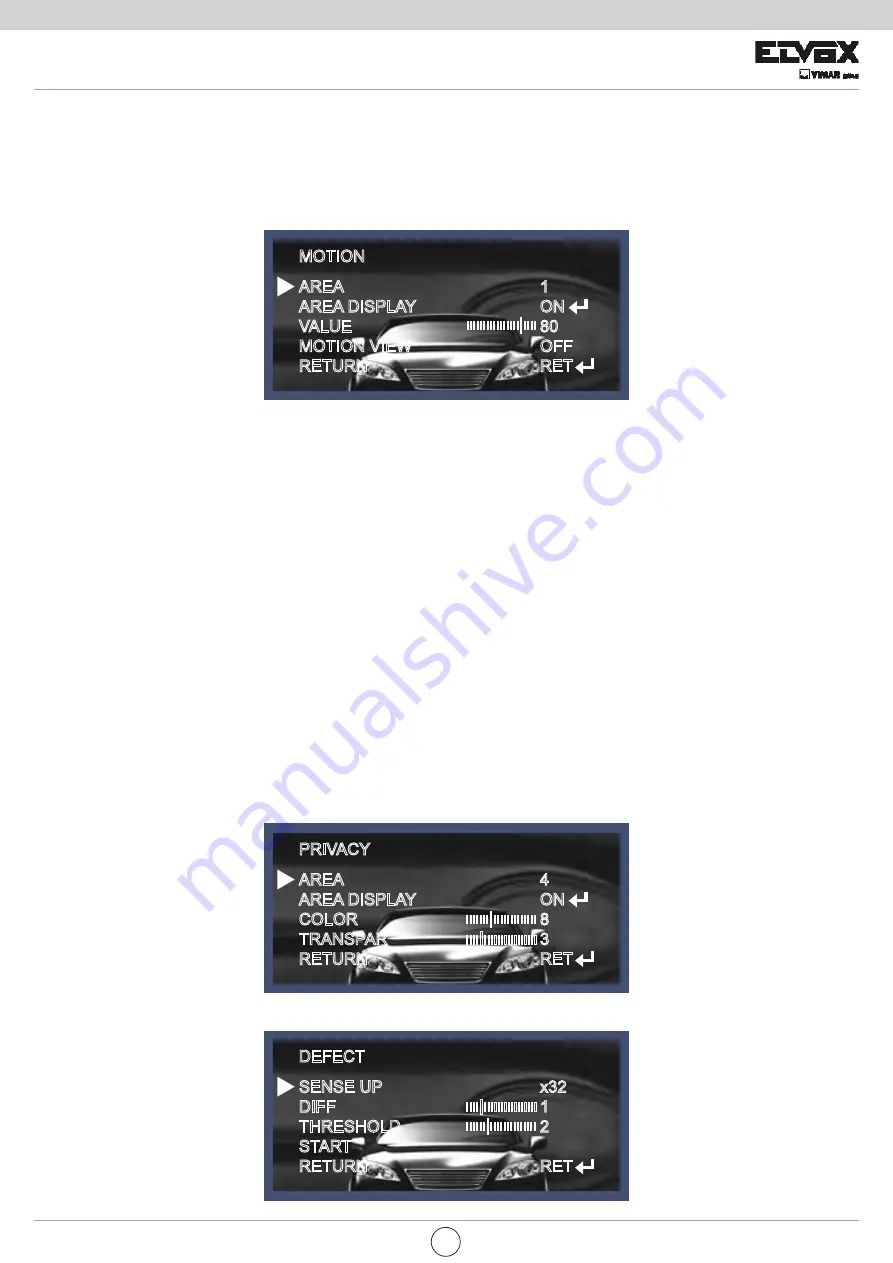
MOTION (movimento): Questa opzione permette di rilevare il movimento di un soggetto  


e si può vedere l'immagine in movimento del soggetto sul monitor quando la telecamera  


lo rileva. Nello stato di Motion Detection On, quando si preme il tasto Set un nuovo  


sottomenu appare al di sotto.

◆ 

PRIVACY (nascondi): Questa funzione permette di nascondere certe aree dello schermo. 


È possibile inserire fino a 8 aree diverse. 


Le dimensioni di un'area designata possono essere regolate. Il colore di una zona di privacy  


può essere configurato su 15 colori. 


Quando si seleziona invio, i valori delle impostazioni in questo menu funzioni 


vengono salvate, poi si esce da questo menu

◆ 

DEFECT (difetti): è possibile eliminare fino a 512 macchie bianche (difetti).

   - Area: è possibile indicare fino a un massimo di 4 aree.
  - AREA DISPLAY: dopo aver selezionato un'area, la schermata dell'area dovrebbe essere 
    attivata su On per utilizzare la funzione di rilevamento del movimento nell'area designata. 
    Una volta attivata, è possibile selezionare la posizione dell'area e le dimensioni di copertura 
   dell'area.
  - VALUE (sensibilità): più alto è il valore, più alta sarà la sensibilità al movimento di un 
   soggetto. 

  - Motion View (vista movimento): Se la telecamera rileva un movimento, sul monitor appare il 

    messaggio "Motion Detection" (rilevamento di movimento).
  - Return (indietro): Salvare le impostazioni di questo menu e tornare al menu SPECIAL.

PRIVACY

DEFECT

AREA
AREA DISPLAY
COLOR
TRANSPAR
RETURN

SENSE UP
DIFF
THRESHOLD
START
RETURN

4
ON
8
3
RET

x32
1
2

RET

MOTION

AREA
AREA DISPLAY
VALUE
MOTION VIEW
RETURN

1
ON
80
OFF
RET

IIIIIIIIIIIIIIII IIII

|

IIIIIIIIIIIIIIII

IIII

|

IIIIIIIIIIIIIIII

IIII

|

IIIIIIIIIIIII

IIIIIII

|

IIIIII IIIIIIIIIIIIII

|

22

TVCC

IT

Summary of Contents for Elvox TVCC 46613.036

Page 1: ...MANUALE UTENTE 46613 036 46617 212 46617 550 46627 212A 46627 212 46623 036A TELECAMERA AD ALTA RISOLUZIONE 700TVL TVCC ...

Page 2: ...ffrire protezione adeguata contro le interferenze dannose quando l apparecchiatura è utilizzata in un ambiente commerciale L attrezzatura genera utilizza e può irradiare frequenze radio e se non installata e utilizzata secondo il manuale di istruzioni può provocare interferenze dannose alle comunicazioni radio L utilizzo di questa attrezzatura in aree residenziali può causare interferenze dannose ...

Page 3: ... otturatore elettronico AGC Sense up BLC D WDR WDR digitale Return indietro White Bal bilanciamento del bianco Day Night giorno e notte 3DNR Special effetti speciali Cam Title titolo telecamera D Effect effetto digitale Motion movimento Privacy nascondi Defect difetti Defog disappanna Language lingua Return indietro Adjust regola Reset ripristina Exit esci 7 10 11 12 13 13 13 14 15 15 15 17 18 19 ...

Page 4: ...de che si muovono con il vento Smart IR Nessuna saturazione dell immagine immagine nitida anche al buio elimina l effetto fantasma La telecamera Zeus rende immagini video molto nitide anche al buio Questa tecnologia elimina la saturazione dell immagine video dell oggetto vicino al buio grazie al controllo della sensibilità ai raggi infrarossi Nelle nostre telecamere Zeus non avviene mai la saturaz...

Page 5: ...atura compresa fra 10 C e 50 C Prestare particolare attenzione a garantire un adeguata ventilazione quando la telecamera opera a temperature elevate Questa è una delle parti più importanti della telecamera Fare attenzione a non lasciare impronte sulla copertura dell obiettivo Se si bagna asciugare immediatamente I liquidi possono contenere minerali che corrodono i componenti elettronici Ciò potreb...

Page 6: ... cavo di alimentazione a basso voltaggio adatto a evitare incendi o scosse elettriche Assicurarsi che l area di installazione supporti il peso della telecamera Non utilizzare detergenti forti o abrasivi per pulire la telecamera Non esporre la telecamera alla luce diretta del sole Non installare la telecamera in luoghi ad alto tasso di umidità Non installare vicino a dispositivi di raffreddamento o...

Page 7: ... Menu Set Up impostazioni Come impostare il menu della telecamera 7 TVCC IT ...

Page 8: ... Menu Set Up impostazioni Come impostare il menu della telecamera 8 TVCC IT ...

Page 9: ... Menu Set Up impostazioni Come impostare il menu della telecamera 9 TVCC IT ...

Page 10: ...are la funzione desiderata utilizzando il tasto su e giù Muovere l indicatore a forma di triangolo verso l alto o il basso per selezionare la funzione desiderata premendo sul tasto su o giù Configurazione del menu SETUP SETUP LENS EXPOSURE WHITE BAL DAY NIGHT 3DNR SPECIAL ADJUST RESET EXIT LENS EXPOSURE WHITE BAL DAY NIGHT 3DNR SPECIAL ADJUST RESET EXIT DCAUTO ATW AUTO ON DCAUTO ATW AUTO ON 10 TVC...

Page 11: ...tasto SET per uscire Questa funzione permette di regolare la luminosità del monitor 1 Spostare l indicatore a forma di triangolo su LENS utilizzando i tasti su e giù sulla schermata del menu Set Up 2 Selezionare il tipo di obiettivo desiderato premendo il tasto destra o sinistra NOTA Spostarsi al sottomenu disponibile spostando la freccia sulla funzione desiderata Il sottomenu non è disponibile se...

Page 12: ...tà è possibile selezionare INDOOR interno o OUTDOOR esterno in base all ambiente di installazione 2 Selezionare il tipo di otturatore desiderato premendo il tasto destra o sinistra DC LENS BRIGHTNESS MODE RETURN 50 OUTDOOR RET IIIIIIIIII IIIIIIIIII SETUP LENS EXPOSURE WHITE BAL DAY NIGHT 3DNR SPECIAL ADJUST RESET EXIT DC ATW AUTO ON EXPOSURE SHUTTER AGC SENSE UP BLC D WDR RETURN AUTO HIGH AUTO OFF...

Page 13: ...o Gain Control controllo automatico del guadagno Più alto è il livello di AGC Più l immagine presenta l effetto neve Off disattivato Low basso è applicato un guadagno 28dB Mid medio è applicato un guadagno 32dB High alto è applicato un guadagno 36dB Sense Up È possibile visualizzare la schermata luminosa impostando la percezione automatica del buio in situazioni di scarsa luminosità o di notte Off...

Page 14: ...occando il forte segnale luminoso Normale BLC Back Light Compensation compensazione controluce La telecamera dotata di 3D DNR permette di avere un controllo intelligente della luminosità per superare situazioni di forte controluce Off stato disattivato BLC L area per la configurazione può essere vista in modo vivido dall utente che imposta la zona desiderata per compensare il chiaroscuro direttame...

Page 15: ...a all aperto Return indietro tutte le funzioni vengono impostate dal menu EXPOSURE quindi tornare al menu precedente White Balance bilanciamento del bianco Utilizzare questa funzione per regolare i colori dello schermo 1 Spostare l indicatore a forma di triangolo su WHITE BAL sulla schermata del menu SET UP utilizzando il tasto su e giù 2 Selezionare la modalità desiderata premendo il tasto destra...

Page 16: ...sa dopo aver regolato il bilanciamento del bianco usando la modalità ATW o AWB cambiare la modalità in manuale e premere il tasto Set Osservando il cambiamento di colore del soggetto visualizzato sullo schermo dopo aver impostato la corretta temperatura di colore aumentare il valore blu e rosso NOTA Il bilanciamento del bianco potrebbe non funzionare correttamente nelle seguenti condizioni Se non ...

Page 17: ...luminosità in base alle condizioni ambientali premendo il tasto Set Day Night giorno e notte È possibile cambiare la modalità colore da colore a bianco nero impostando questa modalità 1 Selezionare Giorno e notte usando il pulsante Su o Giù nella schermata del menu Impostazioni 2 Selezionare la modalità desiderata premendo il tasto Sinistro o Destro SETUP LENS EXPOSURE WHITE BAL DAY NIGHT 3DNR SPE...

Page 18: ...ggiore rapporto di compensazione disponibile in relazione all ambiente impostando la modalità 3DNR su On e premendo il tasto Set Off stato disattivato On La proporzione di compensazione va da 0 a 200 L eccellente effetto di riduzione del rumore in condizioni di scarsa luminosità NOTA Se si utilizza la funzione 3DNR l effetto di cancellazione di rumore è eccellente Maggiore è la proporzione di comp...

Page 19: ...le visualizzare 15 titoli della telecamera e regolare la loro posizione sullo schermo Spostare l indicatore a forma di triangolo su CAMERA ID con il tasto su e giù nel menu Setup quindi impostare su On con il tasto destra o sinistra Dopo aver impostato le lettere da visualizzare sul monitor premere il tasto Set su END e completare l impostazione SETUP LENS EXPOSURE WHITE BAL DAY NIGHT 3DNR SPECIAL...

Page 20: ...fetto immagine video FREEZE blocca L immagine del monitor viene temporaneamente interrotta da questa funzione MIRROR specchio L immagine sul monitor viene rovesciata in senso verticale o orizzontale D Zoom zoom digitale È possibile utilizzare lo zoom digitale con un ingrandimento x1 x32 Più elevato è l ingrandimento dello zoom minore è la risoluzione D EFFECT FREEZE MIRROR D ZOOM SMART DZOOM DIS N...

Page 21: ...Questa funzione è collegata allo zoom digitale per visualizzare in dettaglio un oggetto specifico quando è presente un movimento in una determinata area Viene utilizzata una funzione di sensibilità aggiuntiva per rilevare il movimento La funzione è più efficace con lo zoom ottico NEG IMAGE immagine On attiva un negativo come in un film Off immagine normale Return indietro Salvare le impostazioni d...

Page 22: ...bile indicare fino a un massimo di 4 aree AREA DISPLAY dopo aver selezionato un area la schermata dell area dovrebbe essere attivata su On per utilizzare la funzione di rilevamento del movimento nell area designata Una volta attivata è possibile selezionare la posizione dell area e le dimensioni di copertura dell area VALUE sensibilità più alto è il valore più alta sarà la sensibilità al movimento...

Page 23: ...esta funzione aiuta a riconoscere l oggetto in condizioni di nebbia e polvere LANGUAGE lingua I menu possono essere cambiati in tempo reale nella lingua selezionata INGLESE COREANO GIAPPONESE CINESE RUSSO FRANCESE SPAGNOLO ITALIANO PORTOGHESE OLANDES TEDESCO POLACCO TURCO EBRAICO ARABO Return indietro Impostare il valore e uscire dal menu attuale Adjust regola Questa funzione permette di controlla...

Page 24: ... questa opzione quando si utilizza il monitor CRT È possibile regolare il Livello e il Guadagno blu e rosso nel sottomenu USER Utente Utilizzare questa opzione a meno di regolare i due valori di cui sopra Se si utilizza un monitor che non ha un buon tasso di contrasto entrare nel sottomenu e regolare la Gamma il Livello e il Guadagno blu e rosso nel sottomenu Reset ripristina Exit esci La telecame...

Page 25: ...o impostato su ON nel menu MD AREA è stato definito in modo adeguato Verificare che l impostazioneAGC nel menu EXPOSURE non sia su OFF Controllare il menu EXPOSURE e assicurarsi che SHUTTER sia impostato su Assicurarsi che la telecamera non sia esposta alla luce solare diretta o a luci fluorescenti Se necessario modificare la posizione della telecamera Controllare le impostazioni nel menu WHITE BA...

Page 26: ... MEMO 26 TVCC IT ...

Page 27: ... MEMO 27 TVCC IT ...

Page 28: ...Via Pontarola 14 a 35011 Campodarsego PD Italia Tel 39 049 920 2511 Fax 39 049 920 2603 www elvox com S6I TVC 002 RL 00 13 03 ELVOX Campodarsego Italia ...

Page 29: ...USER MANUAL 46613 036 46617 212 46617 550 46627 212A 46627 212 46623 036A HIGH RESOLUTION 700TVL CAMERA CCTV ...

Page 30: ... protection against harmful interference when the equipment is operated in a commercial environment This equipment generates uses and can radiate radio frequency energy and if not installed and used in accordance with the instruction manual may cause harmful interference to radio communications Operation of this equipment in a residential area is likely to cause harmful interference in which case ...

Page 31: ...structions 7 Set Up Menu Menu Set Up Lens Exposure Electronic shutter AGC Sense Up BLC D WDR Return White Bal Day Night 3DNR Special Cam Title D Effect Motion Privacy Defect Defog Language Return Adjust Reset Exit 7 10 11 12 13 13 13 14 15 15 15 17 18 19 19 20 22 22 22 23 23 23 23 24 24 3 CCTV EN ...

Page 32: ...by the wind or climate changing Smart IR No saturation image vivid image in darkness ZEUS camera makes very sharp video image in darkness This technology eliminates saturation of video image of the closer object in darkness by control of the IR sensitivity Saturation never happens in our ZEUS cameras you can enjoy vivid image in any dark condition Sens Up Despite a limited low light condition Sens...

Page 33: ...e camera under conditions where temperatures are between 10 C and 50 C Be especially careful to provide ventilation when operating under high temperatures This is one of the most important parts of the camera Be careful not to leave fingerprints on the lens cover If it gets wet wipe dry immediately Liquids can contain minerals that corrode the electronic components It can cause malfunctions to occ...

Page 34: ...nitial adjustments Use appropriate low voltage power cable to prevent fire or electrical shock Please insure that your installation area can support the weight of the camera Do not use a strong or abrasive detergent when cleaning the camera Do not expose the camera to direct sun Do not install camera in places where humidity is high Do not install near cooling or heating device Do not expose camer...

Page 35: ... Setup Menu How to Set Up the camera menu 7 CCTV EN ...

Page 36: ... Setup Menu How to Set Up the camera menu 8 CCTV EN ...

Page 37: ... Setup Menu How to Set Up the camera menu 9 CCTV EN ...

Page 38: ... required function using the Up and Down button Move the triangular indicator Up or Down to select the desired feature by pressing the Up or Down button Menu Set Up SETUP SETUP LENS EXPOSURE WHITE BAL DAY NIGHT 3DNR SPECIAL ADJUST RESET EXIT LENS EXPOSURE WHITE BAL DAY NIGHT 3DNR SPECIAL ADJUST RESET EXIT DCAUTO ATW AUTO ON DCAUTO ATW AUTO ON 10 CCTV EN ...

Page 39: ...SET button to EXIT This function is to adjust the brightness of the monitor 1 Move the triangular indicator to LENS using the Up and Down buttons on the Set Up menu screen 2 Select the desired lens type by pressing the Left of Right button NOTE Move to the available submenu by moving arrow to desired feature Submenu is not available when this symbol displayed Lens SETUP LENS EXPOSURE WHITE BAL DAY...

Page 40: ...n select INDOOR or OUTDOOR depending on the installation environment DC LENS BRIGHTNESS MODE RETURN 50 OUTDOOR RET IIIIIIIIII IIIIIIIIII SETUP LENS EXPOSURE WHITE BAL DAY NIGHT 3DNR SPECIAL ADJUST RESET EXIT DC ATW AUTO ON 2 Select the desired shutter mode by pressing the Left or Right button EXPOSURE SHUTTER AGC SENSE UP BLC D WDR RETURN AUTO HIGH AUTO OFF OFF RET 12 CCTV EN ...

Page 41: ...er the AGC level is the greater is the snow effect shown by the image Off Deactivated Low 28dB Gain is applied Mid 32dB Gain is applied High 36dB Gain is applied Sense Up The bright screen can be displayed by sensing the degree of the darkness automatically under the circumstance of low light condition or at night Off Deactivated status Auto Sense Up auto mode status The brightness degree is decid...

Page 42: ...ize the car plate numbers by blocking the strong light signal Nomarl BLC HSBLC VALUE AREA DEFAULT RETURN GAIN MODE DEFAULT RETURN MIDDLE RET 8 ALL DAY RET BLC Back Light Compensation The camera with 3D DNR provides the intelligent light level control to overcome strong backlight conditions Off Deactivated status BLC The set up area can be seen vividly by the user who set up the desired area to com...

Page 43: ...amera is installed in the outdoor circumstances Return Every function is set up at the EXPOSURE menu and then return the previous menu WDR OFF WDR ON White Balance SETUP LENS EXPOSURE WHITE BAL DAY NIGHT 3DNR SPECIAL ADJUST RESET EXIT DC ATW AUTO ON Use this function when the color adjustment of a screen is needed 1 Move the triangular indicator to WHITE BAL on the SETUP menu screen using the Up a...

Page 44: ... after adjusting the white balance using the ATW or AWB mode change the mode into the manual compensation mode and then press Set button While looking at the color change of the subject seen on the screen after setting up the proper color temperature increase the each value of the blue and the red MANUAL WB BLUE RED RETURN 31 20 RET IIIIIIIIII IIIIIIIIII IIIIIIII IIIIIIIIIIII NOTE The White Balanc...

Page 45: ...htness according to the ambient conditions by pressing the Set button Day Night SETUP LENS EXPOSURE WHITE BAL DAY NIGHT 3DNR SPECIAL ADJUST RESET EXIT DC ATW AUTO ON You can change the color mode of color or black white by setting up the mode 1 Select Day Night using the Up or Down button on the Set Up menu screen 2 Select the desired mode using the Left or Right buttons DAY NIGHT B W DAY NIGHT AU...

Page 46: ... the mode to use by pressing the Right or Left button 3 Adjust the most available proportion of compensation with the ambient environment by changing the 3DNR mode into On and pressing the Set button Off Deactivated status On The compensation proportion is from 0 to 200 The excellent effect of noise decrease in the low light condition 3DNR LEVEL RETURN 200 RET IIIIIIIIII IIIIIIIIII NOTE If 3DNR fu...

Page 47: ...ted when you get into the Cam Title menu This function is to display the letters of the camera on the monitor The 15 camera titles can be displayed and the location of the camera title on the screen can be adjusted Move the triangular indicator to CAMERA ID using the Up and Down button on the Setup menu and then Set to On using the Left or Right button After the letters you want to display on the ...

Page 48: ...the video image effect by this function FREEZE The image of the monitor is paused temporarily by this function MIRROR The image of the monitor is reversed vertically or horizontally D Zoom You can use the digital zoom with x1 x32 magnification The higher the digital zoom magnification is the lower the resolution is D ZOOM RANGE PAN TILT RETURN x2 0 0 0 RET D EFFECT FREEZE MIRROR D ZOOM SMART DZOOM...

Page 49: ...nction is interlocked with Digital Zoom to distinguish a specific object in more detail when there is a movement detected in a certain area An extra sensitivity function is used to detect motions This function works more effectively with the optical zoom NEG IMAGE On Activate a negative image just like a film Off Normal image Return Save the digital zoom setting then return to the SPECIAL menu DIS...

Page 50: ... a maximum of 4 AREA DISPLAY After the selection of an area the area screen should be activated On to use the motion detection function in a designated area When this is activated you can select the location of area a size of area coverage VALUE Sensitivity The higher the setting value is the higher the sensitivity gets even though the movement of a subject Motion View If the camera detects a moti...

Page 51: ... recognize the object in a foggy or dusty weather condition LANGUAE The menus can be changed in real time in the selected language ENGLISH KOREAN JAPANESE CHINESE RUSSIAN FRANCAIS ESPANOL ITALIANO PORTU DOUTCH GERMAN POLISH TURKI HEBREW ARAB Return Save the setting value and get out of the current menu DEFOG OFF DEFOG ON Adjust SETUP LENS EXPOSURE WHITE BAL DAY NIGHT 3DNR SPECIAL ADJUST RESET EXIT...

Page 52: ... Blue Red Gain on the submenu CRT Select this when you use the CRT monitor You can adjust the Level Blue Red Gain on the submenu USER Use this unless you adjust two values above If you use the monitor which don t have a good contrast rate get into the submenu and adjust the Gamma Level Blue Red Gain in the submenu Reset Exit The camera is set to the Factory Default value Press the Set button in th...

Page 53: ... ON in the menu Has MD AREA been properly defined Check that theAGC setting in the EXPOSURE menu is t set to OFF Check the EXPOSURE menu and make sure SHUTTER is set to Make sure that the camera isn t facing direct sunlight or fluorescent lighting If necessary change the camera position Check the settings in WHITE BALANCE menu Check the camera is correctly connected to an appropriate regulated pow...

Page 54: ... MEMO 26 CCTV EN ...

Page 55: ... MEMO 27 CCTV EN ...

Page 56: ...Via Pontarola 14 a 35011CampodarsegoPD Italy Tel 39 049 920 2511 Fax 39 049 920 2603 www elvox com S6I TVC 002 RL 00 13 03 ELVOX Campodarsego Italy ...

Reviews: