Vimar Elvox 46238.036 Quick Manual Download Page 3

1

46238.036 - 46239.036

IT

Caratteristiche - Characteristics
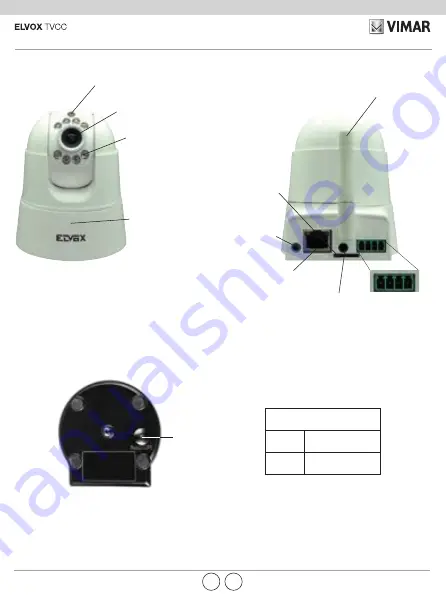
Fotoresistore

Photoresistor

Obiettivo HD

HD Lens

Fig. 4 - Fondo della telecamera - Video camera bottom

Fig. 3 - Fronte e retro / Front and back

Luce LED visione

notturna agli infrarossi

Infrared LED light for 

night vision

Alimentazione

Power supply

Uscita audio

Audio output

Slot per scheda di 

memoria TF

TF memory card slot

1 2 3 4

46238.036, 46239.036

Morsetti/Terminals

1 - 2 

Uscita (5 V 0,5 A)

Output (5 V 0.5 A)

3 - 4 

Ingresso

Input

Morsetti I/O 

allarme

Alarm I/O 

terminals

Porta di rete 

Network port

EN

Antenna Wi-Fi

Wi-Fi antenna

Microfono

Microphone

Tasto di reset

Reset button

Summary of Contents for Elvox 46238.036

Page 1: ...Guida rapida Quick Guide 46238 036 46239 036 Telecamera Wi Fi Cube Telecamera Wi Fi Pan Tilt Wi Fi Cube video camera Wi Fi Pan Tilt video camera ...

Page 2: ...red LED light for night vision Antenna Wi Fi Wi Fi antenna Alimentazione Power supply Tasto di reset Reset button Porta di rete Network port Microfono Microphone Morsetti I O allarme Alarm I O terminals Slot per scheda di memoria TF TF memory card slot Fig 1 Fronte e retro Front and rear sides Fig 2 Lato destro e sinistro Right and left side 1 2 3 4 EN ...

Page 3: ...turna agli infrarossi Infrared LED light for night vision Alimentazione Power supply Uscita audio Audio output Slot per scheda di memoria TF TF memory card slot 1 2 3 4 46238 036 46239 036 Morsetti Terminals 1 2 Uscita 5 V 0 5 A Output 5 V 0 5 A 3 4 Ingresso Input Morsetti I O allarme Alarm I O terminals Porta di rete Network port EN Antenna Wi Fi Wi Fi antenna Microfono Microphone Tasto di reset ...

Page 4: ...te guida rapida nella sezione Soluzioni a possi bili problematiche e consigli e nel manuale per il col legamento e l uso telecamera P2P IP Wi Fi disponibile nella scheda di prodotto al seguente indirizzo Internet faidate vimar com Il Cliente dovrà inserire una propria password In caso di richiesta di assistenza da parte del Cliente al centro di assistenza Vimar per poter accedere al sistema verran...

Page 5: ... verificare facendo riferimento al manuale del router in dotazione 3 1 fare clic su clicca qui per aggiungere camera per Android oppure Aggiungi per iOS 3 2 fare clic su Setup Rapido 3 3 Il nome identificativo della propria rete appare in automatico service set identifier o SSID Immettere la password della propria rete Wi Fi 3 4 Attendere la fine della connessione della telecamera segnalata dalla ...

Page 6: ...roprio router tramite il cavo rete in do tazione vedi figura 1 e 3 porta di rete per aggiungere il dispositivo vedi par 4 1 successivo preferendo opzione A 4 Aggiungere il dispositivo 4 1 fare clic su AVANTI per Android Salta per iOS dopo aver configurato correttamente la tele camera al router passi 3 1 3 2 e 3 3 oppure passi 3 5 e 3 6 precedenti 4 2 Aggiungere un dispositivo tramite una delle seg...

Page 7: ... un altra o nuova rete Wi Fi è necessario ripristinare il dispositivo alle impostazioni predefinite di fabbrica vedi sotto Dopo circa 30 secondi dal collegamento dell alimentazione la telecamera PT articolo 46239 036 ruo terà compiendo un test di movimentazione Se si dimentica la password è possibile ripristinare le impostazioni predefinite di fabbrica e reimpostar la vedi sotto I tempi di conness...

Page 8: ...vice sec tion of this quick guide and in the Manual for Connection and Use of the P2P IP Wi Fi Video Camera available in the product information at faidate vimar com The Customer must enter a password of his own choice In the event that the Customer requests after sales service from the Vimar Service Centre the access credentials will be requested in order to enable the service to access the syste...

Page 9: ...e check referring to the manual of the router supplied 3 1 click on click here to add video camera for Android or Add for iOS 3 2 click on Quick Setup 3 3 The identification name of your network appears automatically service set identifier or SSID Enter the password for your Wi Fi network 3 4 Wait for the end of the connection of the video camera indicated by the end of the acoustic signalling thi...

Page 10: ...only connect the video camera to your router using the network cable supplied see figure 1 and 3 network port to add the device see par 4 1 below preferring option A 4 Add the device 4 1 click NEXT for Android Skip for iOS after correctly configuring the video camera to the router steps 3 1 3 2 and 3 3 or steps 3 5 and 3 6 above 4 2 Add a device using one of the following three options Option A re...

Page 11: ...hange the settings for another or new Wi Fi network it is required to reset the device to the factory default settings see below After about 30 seconds from the power supply connection the PT camera 46239 036 will rotate carrying out a movement test If you forget your password it is possible to restore the factory default settings and reset it see below Connection times may be due to the upstream ...

Page 12: ...Viale Vicenza 14 36063 Marostica VI Italy www vimar com 49400878A0 02 1803 ...

Reviews: