


Viale Vicenza, 14
36063 Marostica VI - Italy
www.vimar.com
49401619B0 00 2107
4621.028FS
EN
IT
Connessione alla rete Ethernet
Come esempio, accediamo alla telecamera IP attraverso la LAN. In una LAN è
possibile accedere in due modi:
1. Accesso tramite IP-Tool
2. Accesso diretto tramite Internet Explorer
Accesso alla telecamera tramite IP-Tool
1) Assicurarsi che la telecamera e il PC siano connessi alla LAN.
2) Eseguire il download di IP-Tool dalla sezione prodotto del sito http://www.vimar.
com e installarlo sul computer. Infine, avviare IP-Tool come mostrato di seguito.
3) Modificare l'indirizzo IP. L'indirizzo IP predefinito di questa telecamera è
192.168.226.201. Fare click sulle informazioni della telecamera elencate nella
tabella sopra riportata per visualizzare le informazioni di rete sulla destra. Mo-
dificare l'indirizzo IP e il gateway della telecamera e assicurarsi che l'indirizzo
di rete si trovi nello stesso segmento della rete locale del computer. Modificare
l'indirizzo IP del dispositivo in base alla situazione specifica.
Ad esempio, l'indirizzo IP del computer in uso è 192.168.1.4. Di conseguenza l'indi-
rizzo della telecamera deve essere cambiato in 192.168.1.X.
Dopo la modifica inserire la password di amministratore e fare clic sul pulsante
"Modifica" per modificare l'impostazione.
La password predefinita dell'amministratore è 123456.
4) Fare doppio clic sull'indirizzo IP, il sistema aprirà Internet Explorer per collega-
re l'IP-CAM. Internet Explorer scarica automaticamente i controlli ActiveX. Dopo il
download viene visualizzata la finestra di accesso. Immettere User Name (Nome
utente) e Password per accedere.
Il Nome Utente predefinito è admin, la Password è 123456
Accesso alla telecamera tramite Internet Explorer
Le impostazioni di rete predefinite sono indicate di seguito:
- Indirizzo IP: 192.168.226.201 HTTP:80
- Subnet Mask: 255.255.255.0 Porta Dati:9008
- Gateway: 192.168.226.1
Il Nome Utente predefinito è admin, la Password è 123456
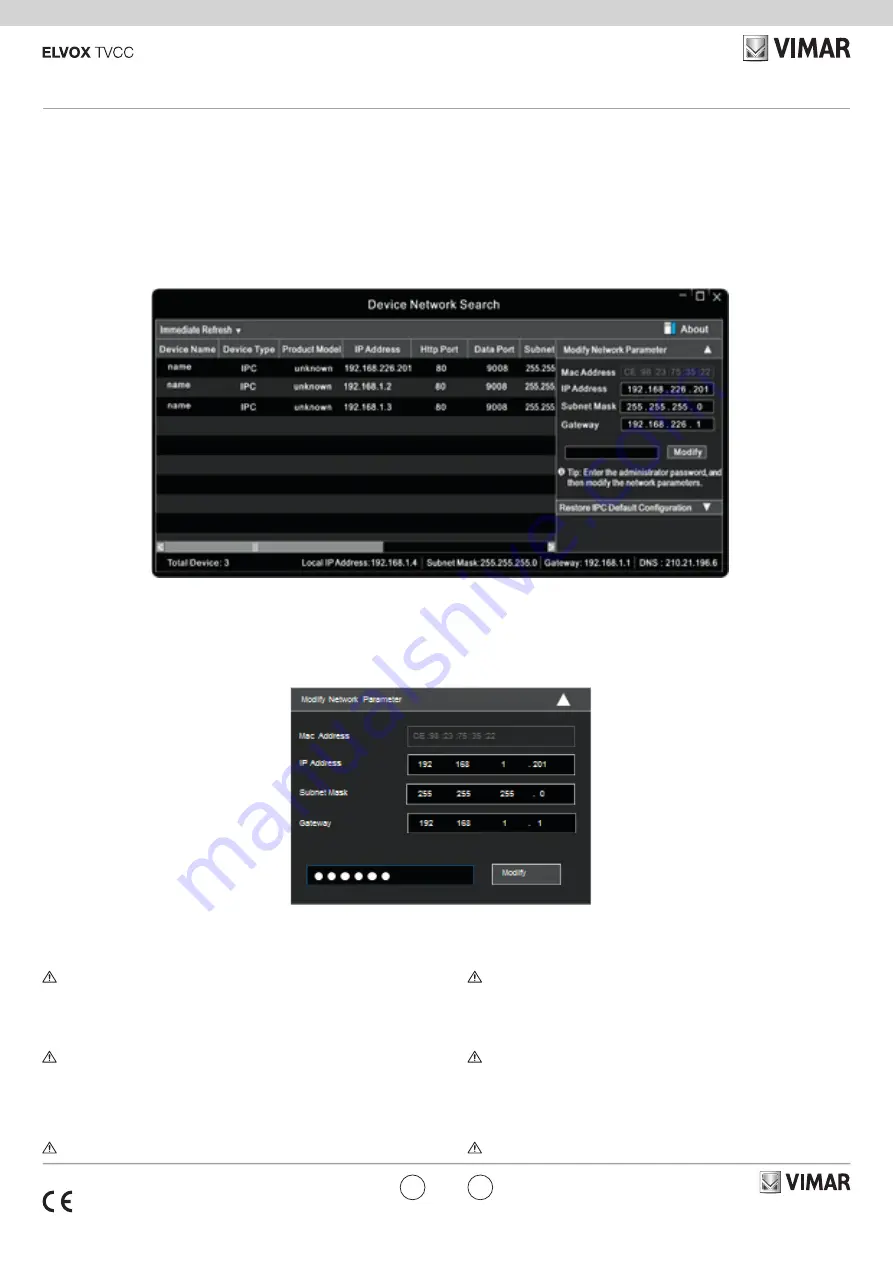
Network Connections
Here we take accessing IP camera via LAN for example. In LAN, there
are two ways to access.
1. Access through IP-Tool
2. Directly Access through IE Browser
Access the camera through IP-Tool
1) Make sure that the camera and the PC are well connected to the LAN.
2) download IP-Tool Product info sheet section of www.vimar.com website and then
install it in the computer. After that, run the IP-Tool as shown below.
3) Modify the IP address. The default IP address of this camera is 192.168.226.201.
Click the information of the camera listed in the above table to show the net-
work information on the right hand. Modify the IP address and gateway of
the camera and make sure its network address is in the same local network
segment as the computer’s. Please modify the IP address of your device ac
-
cording to the practical situation
For example, the IP address of your computer is 192.168.1.4. So the IP address of
the camera shall be changed to 192.168.1.X.
After modification, please input the password of the administrator and click “Modify”
button to modify the setting.
The default password of the administrator is 123456.
4) Double-click the IP address and then the system will pop up the IE browser to connect
IP-CAM.
IE browser will automatically download the Active X control.
After downloading, a login window will pop up. Input the user name and password to login.
The default password of the administrator is 123456.
Directly Access Through IE
The default network settings are as shown below:
IP address: 192.168.226.201 HTTP:80
Subnet Mask: 255.255.255.0 Data Port:9008
Gateway: 192.168.226.1
The default user is admin, password of the administrator is 123456.


