background image

VIKING TECHNICAL SUPPORT 1.800.908.0884

3 5

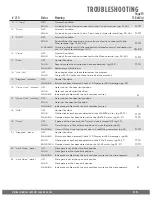
# LED

Status

Meaning

Page 39

TS Ref#(s)

9

“C Loop”

OFF

Normal Condition.

SOLID

An input from a device connected to the C Loop terminal (pg. 31, 40)

9, 10

10 “Open”

OFF

Normal Condition.

SOLID

An input from a device to Exit, Fire, Strike or Open terminal (pg. 30, 40)

9, 10

11

“STOP”

OFF 

Normal Condition.

SOLID

Control Board is receiving an input from a device connected to the 
Stop terminal (pg. 12, 30, 40).

9, 10

FLASHING

There is a problem with the required monitored sensor(s) connected to 
the “UL” input terminal (pg. 10-11)

16, 22

12 “Close”

OFF

Normal Condition.

SOLID

An input from a device connected to the Close terminal (pg. 30, 40)

9, 10

13 “Siren”

OFF

Normal Condition.

SOLID

Second consecutive obstruction has been detected. (pg 25, 27)

11, 13

FLASHING

Batteries are critically low.

14 “Aux. Pwr”

OFF

No voltage output on these terminals at the moment.

SOLID

There is 24VDC output on these terminals at the moment.

15 “Diagnose” (master)

OFF

Normal Condition

FLASHING

Errors have been detected; Check LCD Display for ERR messages (pg. 38)

16

“Close Limit” (master)

OFF

Gate is not at the close limit position.

SOLID

Gate is at the close limit position.

FLASHING

Indicates a problem with the limit switches or wires.

6

17

“Open Limit” (master)

OFF

Gate is not at the open limit position.

SOLID

Gate is at the open limit position.

FLASHING

Indicates a problem with the limit switches or wires.

6

18 “ODS”

OFF

Normal Condition.

SOLID

Obstruction event has been detected on the MASTER motor. (pg 25, 27)

11, 13

FLASHING

Overload event has been detected on the MASTER motor. (pg 25, 27)

11, 13

19 “Timer”

OFF

If gate is at the open limit, the Timer to close is turned OFF. (pg 25)

SOLID

Timer to close is ON and counting down to close the gate. (pg 25)

FLASHING

Timer is ON but is not timing out due to a conflicting command. (pg 25)

9, 10

S1 “Diagnose” (slave)

OFF

Normal Condition

FLASHING

Errors have been detected; Check LCD Display for ERR messages. (pg 38)

SOLID

Obstruction event has been detected on the SLAVE motor. (pg 25, 27)

11, 13

RAPID FLSH Overload event has been detected on the SLAVE motor. (pg 25, 27)

11, 13

S2 “Limit Close” (slave)

OFF

Slave gate is not at the close limit position.

SOLID

Slave gate is at the close limit position.

FLASHING

Indicates a problem with the limit switches or wires on the slave operator.

6

S3 “Limit Open” (slave)

OFF

Slave gate is not at the open limit position.

SOLID

Slave gate is at the open limit position.

FLASHING

Indicates a problem with the limit switches or wires on the slave operator.

6

TROUBLESHOOTING

Summary of Contents for X-9S

Page 1: ...SOLAR POWER C L A S S I Residential Vehicular Swing Gate Operator INSTALLATION INSTRUCTIONS AND SAFETY INFORMATION FOR THE VIKING X 9S GATE OPERATOR ...

Page 2: ...600 lbs and 14 ft long under extreme conditions This efficient operator provides a solution for residential swing gate solar applications thanks to its efficient electromechanical design Equipped with the latest solar innovations the X 9S is the most energy efficient articulated arm swing gate operator offered on the market ...

Page 3: ...VIKING TECHNICAL SUPPORT 1 800 908 0884 1 X 9s Solar Vehicular Swing Gate Operator Revision SX9MN10 D2 February 2017 ...

Page 4: ...PC 2 Motor Gear Assembly VX9MOSLR 3 Chassis VAX9CH 4 Strain Relief X 9 VAX9ST 5 Arm Assembly articulated VAX9AA 6 Limit Switch Holder VAX9LSH 7 Limit Switch 2 VAX9LS 8 Limit Cam Holder VAX9LCS 9 Terminal Block Motor VAX9TB 10 Key Release VAX9KR 11 Cover Screw 2 VAX9CS 12 Positive Stop Extension VAX9PSE ...

Page 5: ... Dual Controller only VSSMPCBU16 6 Board Mounting Plate VECUBMP 7 Solar Battery Breaker VASBB25 8 Solar Panel Switch DUMRS5 9 Solar Terminal Block Assembly VSTBAECU 10 Solar Charger VSCHARGECU 11 Power Switch DUMRS10 12 ECU Cabinet Chassis VNXECUBB 13 Alarm Reset Switch ECURW 14 ECU Key Cylinder Key s ECUKEYC20 15 ECU Access Key s ECUKEY20 16 Fuse Kit DUFSKNX 17 Radio Antenna Kit VARAK 18 Strain R...

Page 6: ...o navigate through the Diagnostics LCD Display pg 36 38 16 FEATURE ACTIVATION PIN HEADERS activate features by placing a jumper onto the pin headers pg 26 17 AUX PWR Terminal Block used for solar applications in motion warning devices pg 21 26 18 ON BOARD 3 BUTTON STATION controls the gate during set up 19 Siren TERMINAL BLOCK Vikings UL Siren is connected here pg 12 27 20 CONTROL BOARD MOUNTING H...

Page 7: ...to Open Installation 15 Mounting the Gate Operator 16 Limit Switch Setup 17 ECU BOX INSTALLATION 18 ELECTRICAL INSTALLATION 19 23 Battery Solar Panel Selection 19 Solar Panel Care Installation Tips 20 Solar Connection Power Saving Tips 21 Motor Cable 22 23 LIMIT INDICATIONS 24 CONTROL BOARD SETUP 25 27 Initial Settings 25 26 Obstruction Detection Sensor Primary Entrapment Protection 27 ACCESSORY C...

Page 8: ... gate and usage Class of the gate refer to page 9 b All openings of a horizontal slide gate are guarded or screened from the bottom of the gate to a minimum of 6 feet 1 83 m above the ground to prevent a 2 1 4 inch 57 2 mm diameter sphere from passing through the openings anywhere in the gate and in that portion of the adjacent fence that the gate covers in the open position c ALL EXPOSED PINCH PO...

Page 9: ...to page 10 d Use only Miller Edge photoelectric beams refer to pages 10 11 10 For a gate operator utilizing a contact sensor edge sensor or like in accordance with section 31 1 1 of the UL 325 standard a One or more contact sensors shall be located where the risk of entrapment or obstruction exists such as a the leading edge trailing edge and post mounted both inside and outside of a vehicular hor...

Page 10: ...product must be used only for that which it has been expressly designed Any other use is to be considered improper and therefore dangerous The manufacturer cannot be held responsible for possible damage caused by improper erroneous or unreasonable use Avoid operating in the proximity of the hinges or moving mechanical parts Do not enter the path of the moving gate while in motion Do not obstruct t...

Page 11: ... for use in a commercial location or building such as a multi family housing unit five or more single family units hotel garages retail store or other building servicing the general public INDUSTRIAL LIMITED ACCESS VEHICULAR GATE OPERATOR CLASS III A vehicular gate operator or system intended for use in an industrial location or building such as a factory or loading dock area or other locations no...

Page 12: ...ST be connected also refer to page 43 You may connect up to FOUR monitored sensors wired parallel Failure to install an approved monitored secondary entrapment protection sensor will render the gate operator INOPERABLE until one is installed Consult the installation manual of the sensor for detailed information about the usage installation and maintenance This type of installation will only revers...

Page 13: ...the Viking control board as illustrated below Up to four 10K resistor based sensors can be wired in parallel Proceed with the following Learn Process If the number of connected sensors does not match the display If the Stop LED is flashing If the error message ERR UL SENSOR is displayed LEARN PROCESS With the UL LEARN menu displayed and all secondary sensors properly connected to the control board...

Page 14: ...ng parts of the gate and out of reach of children a Controls intended for user activation must be located at least six feet 6 away from any moving part of the gate and where the user is prevented from reaching over under around or through the gate to operate the controls Outdoor or easily accessible controls shall have a security feature to prevent unauthorized use b The Stop and or Reset button m...

Page 15: ...trol Buttons 1 Within sight of the gate 2 At a minimum height of 5 feet so small children are not able to reach it and 3 At least 6 feet away from all moving parts of the gate DO NOT allow pedestrian use of this gate DO NOT install the gate operator to lift gates 14 ft 600 lb X 9S Specifications UL Application Class Class I Maximum Gate Length 14 ft Maximum Gate Weight 600 lb Operating Temperature...

Page 16: ...o Open Installation Option This application is typically used to open the gate towards the inside of the property The operator will PULL the gate to open 1 The gate must be installed in a location so that enough clearance is provided between the gate and adjacent structures to reduce the risk of entrapment when opening and closing 2 Swing gates are not to open into public access areas ...

Page 17: ...perty The operator will PUSH the gate open 1 The gate must be installed in a location so that enough clearance is provided between the gate and adjacent structures to reduce the risk of entrapment when opening and closing 2 Swing gates are not to open into public access areas Varying from the dimensions provided above may severely affect the speed and performance of the gate operator ...

Page 18: ...e operator to the gatepost 1 Mounting hardware provided for 3 00 O D pipe 2 Mounting Bracket is powder coated 1 4 steel GATE OPERATOR INSTALLATION STEP 1 Chassis Installation a Remove the operator from the mounting chassis b Position according to pages 14 or 15 c Ensure the chassis is level and tack weld in place TIP Alternatively this operator chassis may be bolted to the gatepost using the mount...

Page 19: ...allation on the following pages e Run the operator 2 full cycles without interruption to determine if further limit adjustments are required STEP 2 Positive Stop Extension a Run the gate to the close limit b Adjust the Positive Stop Bolt until it makes firm contact to the Primary Arm c Lock the Positive Stop Bolt in position by tightening the nuts on each side of the bracket against each other NOT...

Page 20: ...Supplied STEP 3 Position the ECU Box and secure it to the mounting surface using the Sealed Washers provided rubber side of the washers against the inside of the control box Mounting the ECU Box WARNING If the control box is not mounted properly it may fall causing damage and or injury The Electronic Control Unit ECU weight is approximately 40 lbs Be sure that the substrate being mounted to and th...

Page 21: ...t fire or explosion from vented gasses Observe proper precautions Observe proper polarity orientation between the battery and charging circuit Solar Panel Selection Solar panel s are sold separately Use only UL Listed 12V solar panel s such as Viking part s Wattage Viking Part Open Circuit Voltage Short Circuit Current 20 Watts VA SO20W 21 7V 1 25A 40 Watts VA SO40W 21 8V 2 57A Important The numbe...

Page 22: ... glass with a soft cloth using a mild detergent and water Install solar panels in the following conditions Operating temperature 40 F to 185 F Humidity Below 85RH Wind pressure Below 50 12lb ft 2400Pa Snow load pressure Below 112 76lb ft 5400Pa DO NOT install the solar panel near open flames or flammable materials DO NOT install the solar panel where there is a risk of being immersed in water or c...

Page 23: ...dicates that there is no voltage being provided from the solar panel ERR NO Sol UNIT Solar board can t detect a solar gate operator ERR CHRG HIGH Potential problem with the Solar Charger ERR BAT LOW The battery is low Power Saving Tip The solar VFlex control board shuts down the power at the Aux Pwr Terminal when the board is in sleep mode To save energy get the power for your non essential device...

Page 24: ... apply for this type of application STEP 3 Master Motor a Connect motor cable to the Motor Connector at the Master Control Board as illustrated according to the printed color code 3b 3a STEP 4 Master Open Left or Open Right Place the terminal block in the proper location for the gate opening direction OPEN RIGHT Connector if the gate opens Inside to the Right or Outside to the Left OPEN LEFT Conne...

Page 25: ...ave Motor a Connect motor cable to the terminal block at the Slave Module as illustrated according to the color code provided b Attach the grounding wire non insulated to the Board Mounting Plate using the screw provided STEP 7 Slave Open Left or Open Right Refer to the illustration on page 22 Place the terminal block in the proper location for the gate opening direction OPEN RIGHT Connector if th...

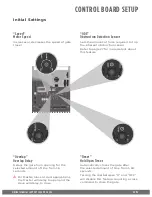
Page 26: ...l limits Therefore the limits cannot be set electronically by this controller The Limit Buttons on the control board have been rendered inactive by the controller Refer to page 18 for specific instructions on how to set the limits for this gate operator LIMIT INDICATIONS Open Limit LED indicates the gate is at the open limit Close Limit LED indicates the gate is at the close limit Limit Close LED ...

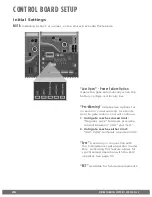
Page 27: ...close command to close the gate Speed Motor Speed Increases or decreases the speed of gate travel ODS Obstruction Detection Sensor Sets the amount of force required to trip the inherent obstruction sensor Refer to page 27 for more details about this feature Overlap Overlap Delay Delays the gate from opening for the selected amount of time from 1 6 seconds For Master Slave or dual applications the ...

Page 28: ...chronized operation with the B 12 operator See page 33 EXT Available for future developments Last Open Power Failure Option Opens the gate automatically when the battery voltage is critically low Pre Warning Initiates two options for an audio or visual warning 3 seconds prior to gate motion and will continue 1 Until gate reaches closed limit Magnetic Lock terminals provide a contact between COM an...

Page 29: ...ecutive entrapment events sensed by the Inherent Entrapment Protection of the Gate Operator The audio alarm will sound for a period of 5 minutes or until a Stop command or the Alarm Reset switch has been actuated refer to page 12 When the Obstruction Sensor detects an obstruction it will 1 Stop the gate s movement and reverse it momentarily 2 Bring the gate to a resting position 3 Disable the Hold...

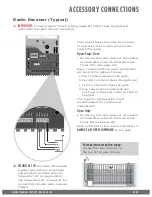
Page 30: ...ppendix A pages 40 41 Note regarding Photo Beam types Fail Safe type connect the N C terminal of the photo beam to the Re Open terminal on the control board Typically these are the reflective type photo beams Fail Secure type connect the N O terminal of the photo beam to the Re Open terminal on the control board Typically these are the transmitter receiver type photo beams Check for proper operati...

Page 31: ...pens the gate b Second command stops the gate and c Third command closes the gate d Any subsequent commands will continue in the same order to control the gate This type of configuration is not recommended for commercial installations Open Only 2 By having the radio receiver connected as illustrated and with the Hold Open Timer ON see page 25 Each command of the radio transmitter is ALWAYS AN OPEN...

Page 32: ... will stop the gate when the vehicle triggers the sensor then closes the gate when the vehicle leaves the sensor preventing unauthorized vehicles from entry Guard Station All three buttons must be a Normally Open N O type of switch and can share the same common C connection to GND Open Commands Exit Fire and Strike input terminals all provide an open command to the control board Any device connect...

Page 33: ...oop Rack that plug in type loop detectors can be connected to This provides a convenient alternative to the box type loop detectors that would need to be wired to the control board Viking does not provide either type of loop detectors Loop Rack Part VA LR Loop Rack Wiring Harness Part VA LRH ACCESSORY CONNECTIONS ...

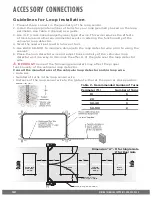
Page 34: ...of moisture and other environmental events in altering the functionality of the vehicular loop detector 4 Twist the lead wire at least 6 turns per foot 5 Use BACKER ROD to minimize damage to the loop detector wire prior to using the sealant 6 Place the loop detector wire and adjust the sensitivity of the vehicular loop detector unit in a way to minimize the effects of the gate over the loop detect...

Page 35: ...s Gate Operator reaches its Open Limit 3 The Gate Operator will delay to close until the Barrier Arm reaches its Close Limit STEP 2 Figure A At the B 12 Barrier Arm Operator connect the primary device that will be used as the OPEN input STEP 1 Figure A B Connect the Gate Operator to the Viking B 12 Barrier Arm Operator as illustrated STEP 4 Figure C D Connect Viking B 12 Barrier Arm Operator to th...

Page 36: ...rd is sending power to the motor but the circuit is open 7 8 3 Battery Low OFF Normal Condition SOLID Does not apply to Solar Units FLASHING Batteries critically low Check power supply to the operator pg 21 4 POWER OFF No power to control board pg 21 or board is in sleep mode 5 SOLID Normal Condition 5 Radio OFF Normal Condition SOLID Control Board is receiving an input from a device connected to ...

Page 37: ...LASHING Indicates a problem with the limit switches or wires 6 17 Open Limit master OFF Gate is not at the open limit position SOLID Gate is at the open limit position FLASHING Indicates a problem with the limit switches or wires 6 18 ODS OFF Normal Condition SOLID Obstruction event has been detected on the MASTER motor pg 25 27 11 13 FLASHING Overload event has been detected on the MASTER motor p...

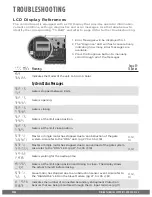
Page 38: ...ap time HOLDING __ SEC Gate is at the limit open position and timing to close The display shows the actual time left before closing STOP BY ODS S Slave motor has stopped due to an obstruction sensor event Also refer to the DIAGNOSE LED on the Slave Module pg 27 34 35 S1 11 12 13 UL LEARN SENSOR _ Indicates the number of connected Secondary Entrapment Protection Sensors that are being monitored thr...

Page 39: ...to the Control Board from the Viking Solar Charger BAT VOLT __ _ VDC This is the actual voltage from the Battery Board Settings Messages Speed __ Shows the percentage of speed set by the Speed adjustment on the control board pg 25 OVERLAP _ _ SEC Shows the number of seconds set by the Overlap Adjustment on the control board ODS SENS ___ Shows the force setting selected to trip the obstruction sens...

Page 40: ...provided from the solar panel ERR NO Sol UNIT Solar board can t detect a solar gate operator ERR CHRG HIGH Potential problem with the Solar Charger ERR BAT LOW The battery is low ERR FUSE 15 AMP 15 Amp motor fuse is blown on the Master or Single Control Board 7 11 12 ERR FUSE 15A S 15 Amp motor fuse is blown on the SLAVE Module 7 11 12 ERR REFV WRONG One or more of the internal reference voltages ...

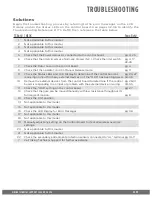
Page 41: ...o determine if the control board is receiving an input from any external devices or if the ODS has been triggered pg 25 27 34 36 10 Remove the external devices from the control board to determine if the control board is responding to an input or problem with the external device or wiring pg 28 31 34 35 11 Check the ODS setting on the control board pg 27 12 Check that the gate can be moved manually...

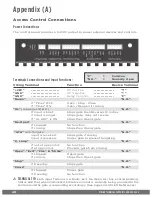
Page 42: ...inal 28V DC Positive GND DC Negative GND Relay Common C Radio N O If Timer OFF Open Stop Close If Timer ON Open Reopen if closing UL see pages 10 11 N O If input is brief Stops gate then Reverses 12 inches If input is longer Stops gate does not reverse If UL ADV is ON Stops then Opens gate Re Open N O If stopped No function If closing Stops then Opens gate ATG Anti Tailgate N O Input is received S...

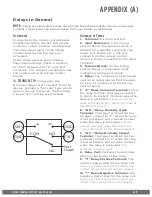
Page 43: ...rminal Block On the Viking control board a removable block containing multiple terminals 4 Relay The component of an access control or safety device that provides an input or command to the Viking control board 5 C Relay Common Terminal This is the relay terminal that makes contact a short to the N O terminal when the device is activated Always wire this relay terminal to any GND terminal at the c...

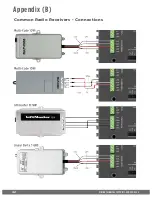
Page 44: ...VIKING TECHNICAL SUPPORT 1 800 908 0884 42 Common Radio Receivers Connections Appendix B ...

Page 45: ...The feature should now be displayed as ON STEP 1 Connect the Monitored Sensor to the Viking control board input terminals UL and GND as illustrated UL ADV OFF 24VDC may not be required on all sensors 10K Sensor s Monitored Terminals UL ADV Feature IMPORTANT REQUIREMENTS The installed sensor MUST be 10K Resistor Based Only use this feature if ALL sensors connected to the UL input terminal are desir...

Page 46: ... compatible hand held device With the Viking App this tool becomes a wireless extension of the control board allowing you to view and change settings review diagnostic information operate the gate for testing and update the control boards firmware Part VA KONNECT D Q 7 B 12 ECU Operators require 1 Antenna Extension Cable part VA RPSMA VIKING MONITOR Off site access to operator diagnostics and perf...

Page 47: ...oftware to ensure operation and functionality protection from lightning short circuit and power surges and our exclusive drive train design offering the highest efficiency rating in the industry Our entire product line is continually modified and improved based on the latest technology and our customer s valuable feedback The results are products that offer accuracy efficiency reliability and perf...

Page 48: ...al accessories minimizes current draw on stand by High Efficiency Electromechanical Design increases the number of cycles per day Twice or more the number of cycles per day with a 10W solar panel compared to other manufacturers Real Time Status Display of the solar panel voltage charging voltage and battery voltage 3 years limited warranty Visit our website for more details Built in protection aga...

Reviews: