background image

32

33

P

ro

d

u

ct

C

a

re

P

ro

d

u

ct

C

a

re

Cleaning and Maintenance

Glass Shelves

To clean your refrigerator's glass shelves, lift the shelf out by
lifting the front and releasing the hooks from the metal track.
Then pull the shelf out. Be sure to allow the glass shelves to
adjust to room temperature before cleaning.

To clean crevices, dilute mild detergent with water. Brush this
solution into crevices using a plastic bristle brush. Let set for
five minutes. Spray warm water into crevices using faucet spray
attachment. Dry glass shelf thoroughly and replace shelf by
inserting hooks into metal track and lowering front.

Door Gaskets

Clean the door gaskets every three months using the same
procedures used for interior surfaces. You should apply a light
film of petroleum jelly to keep gaskets pliable.
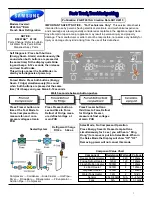
CAUTION

To avoid personal injury or property damage, handle tempered glass
shelves carefully. Shelves may break suddenly if nicked, scratched, or
exposed to sudden temperature changes.

WARNING

ELECTRICAL SHOCK HAZARD

Disconnect power or turn power
disconnect switch to OFF position before
removing top grille. Failure to do so can
result in death or electrical shock.

WARNING

BURN HAZARD

Do not touch condenser coils near
defrost pan.
Doing so can result in burns.

Defrost Pan

To prevent condensation from overflowing, check defrost pan
periodically.

To check defrost pan, remove two screws securing kickplate to
unit. Pull defrost pan forward until it stops. Remove any excess
water from pan. Wipe and clean defrost pan with a sponge.
Return defrost pan to original position. Return kickplate to unit
by securing with two screws.

Door Stop Adjustment

Your refrigerator is factory set at the 110° door stop position.
To change to either the 90° or 120° position, remove the door
stop pin using a 3/16” allen wrench.

Cleaning and Maintenance

3

1

2

1

1

2

2

110˚

120˚

90˚

Open refrigerator door so door stop and

shoulder screw are accessible.

Remove shoulder screw and place in 90° or

120° position.

Side-by-Side

Summary of Contents for F20841 EN

Page 1: ...t Greenwood Mississippi 38930 USA 662 455 1200 For product information call 1 888 VIKING1 845 4641 or visit the Viking Web site at vikingrange com F20841 EN 120211 Viking Use Care Manual Professional Custom Panel Built In Refrigerator Freezer ...

Page 2: ...ire or electrical shock Your safety is important to us This use and care manual contains safety symbols and statements Please pay special attention to these symbols and follow any instructions given This symbol alerts you to hazards such as fire electrical shock or other injuries Congratulations and welcome to the elite world of Viking ownership We hope you will enjoy and appreciate the care and a...

Page 3: ...ld entrapment and suffocation are not problems of the past Junked or abandoned refrigerators are still dangerous even if they will sit for just a few days Table of Contents Getting Started Important Safety Instructions ______________________6 Proper Disposal of old refrigerator ________________7 Features __________________________________________8 Product Controls Settings and Functions __________...

Page 4: ...Instructions Use the refrigerator only for the uses described in this manual Properly maintain the refrigerator Be sure the refrigerator is not used by anyone unable to operate it properly Getting Started DANGER RISK OF CHILD ENTRAPMENT Before You Throw Away Your Old Refrigerator or Freezer Take off the doors Leave the shelves in place so that children may not easily climb inside IMPORTANT Now tha...

Page 5: ... Humidity Zone Drawer s all models except all freezer Equipped with an adjustable humidity control the Adjustable Humidity Zone Drawer s can be set on the high setting for leafy greens or the low setting for fruits and vegetables with skins Super Clog Resistant Condenser The pin and tube design of the condenser coil prevents dust and other airborne particles from clogging the condenser Under norma...

Page 6: ... Drawers 2 9 Lights 3 4 6 5 7 8 1 2 9 1 2 3 4 15 6 5 7 8 9 10 11 12 13 14 Features built in side by side non dispenser 1 Variable Speed DC Overdrive Compressor and Super Clog Resistant Condenser 2 Plasmacluster Ion Air Purifier 3 Electronic Controls with digital temperature readouts 4 Spillproof Shelves 4 5 Dairy Compartments 2 6 Adjustable Door Bins 4 Patent Pending 7 Deli Compartment s 42 W Full...

Page 7: ...er 1 15 Ice and Storage Bucket 1 16 Adjustable Freezer Door Bins 3 17 Lights 18 Built In Ice and Water w Motorized Ice Dispenser Patent Pending 1 2 3 4 17 6 5 7 8 9 10 12 13 15 14 16 11 18 Features built in side by side dispenser Getting Started Getting Started Features built in bottom mount 1 2 3 4 6 5 7 8 9 10 11 1 Variable Speed DC Overdrive Compressor and Super Clog Resistant Condenser 2 Plasm...

Page 8: ...F pad will remain inactive until the ACTIVATE CONTROLS pad is pressed Once activated pad remains programmable for at least ten minutes When you first plug your new refrigerator in you will find that the refrigerator is factory set at 38 F in the refrigerator and 0 F in the freezer Wait 24 hours after plug in for the cabinets to reach this setting After 24 hours you may adjust controls as desired T...

Page 9: ...rature sensor alarm is a special feature that electronically senses temperature sensor problems The temperature sensor alarm will sound and the display will show either oPn or Shr The alarm can be deactivated by pressing the ALARM OFF pad on your refrigerator s control panel If the display does not return to showing the temperature contact an authorized Viking Range Corporation technician immediat...

Page 10: ...p at the front releasing the hooks from the shelf support then pull the shelf straight out To replace shelves guide the rear hooks of the shelf into the slots in the shelf supports Then tilt the shelf up at the front until the hooks drop into the slots and lower the front of shelf to level position Operation Refrigerator all units Door Bin Adjustment Your refrigerator s door bins hold two liter bo...

Page 11: ...eplace the drawer extend the glides out to the stop Next place the drawer onto the glides and push it back until the drawer engages the hook Lower the front part of the drawer grasp the glides drawer and lightly squeeze until the drawer snaps onto the glides Then slide the drawer back until it stops MOIS TURE CONT ROL LOW HIGH MOISTURE CONTROL LOW HIGH Refrigerator all units Adjustable Cold Zone D...

Page 12: ...ce drawer slides forward for easy access to ice After the refrigerator reaches normal temperature the ice maker fills with water and begins operating Under normal conditions the ice maker will produce seven to nine batches of ice per 24 hour period NOTE Allow 24 to 48 hours after installation before looking for ice in your ice drawer You should discard the first three full drawers of ice produced ...

Page 13: ... ice dispenser allows you to select either cubed or crushed ice by sliding the lever on the ice dispenser panel A slight delay occurs when switching between cubed and crushed modes and pieces of crushed ice will vary in size and shape Once you have made your selection dispense ice by pressing a sturdy wide mouth drinking glass or container against the ice dispenser pad You should release pressure ...

Page 14: ...apped in your refrigerator s water filtration system may cause water and the cartridge to eject Use caution when removing the filter Locate water filter door The door is located under the Adjustable Cold Zone drawer handle Push the upper left corner of the door to release the door latch Pull the door downward Turn filter cartridge counterclockwise until it releases from filter head Drain water fro...

Page 15: ...r Recommended storage times Chicken 1 2 days Bacon 5 7 days Ground Beef 1 2 days Cold Cuts 3 5 days Steaks Roasts 3 5 days Variety Meats 1 2 days Cured Meats 7 10 days NOTE Use fresh fish and shellfish the same day as purchased Food Storage Guide Packaging Food for Freezing The secret of successful freezing is in the packaging the way you close and seal a package of food must not allow air or mois...

Page 16: ...sconnect switch to OFF before cleaning After cleaning return power disconnect switch to ON position Product Care Cleaning Chart Part What to Use How to Clean Removable parts Sponge or cloth with mild Hand wash shelves drawers detergent and warm water rinse and dry thoroughly Front door panels Stainless steel Stainless steel cleaner Wipe with soft cloth Painted Sponge or cloth with mild Hand wash d...

Page 17: ...lves may break suddenly if nicked scratched or exposed to sudden temperature changes WARNING ELECTRICAL SHOCK HAZARD Disconnect power or turn power disconnect switch to OFF position before removing top grille Failure to do so can result in death or electrical shock WARNING BURN HAZARD Do not touch condenser coils near defrost pan Doing so can result in burns Defrost Pan To prevent condensation fro...

Page 18: ...or so door stop and shoulder screw are accessible Remove shoulder screw and place in 90 or 120 position Bottom Mount Cleaning and Maintenance 3 1 2 1 1 2 2 110 120 90 Open refrigerator door so door stop and shoulder screw are accessible Remove shoulder screw and place in 90 or 120 position All Refrigerator All Freezer ...

Page 19: ...eler on each side until drawer disengages from glide Lightly grasp light cover on the underneath side and pull up Replace with an incandescent medium base tubular bulb with a maximum of 40 watts Replace cover by engaging the top of the light cover over the light bracket Once engaged snap the bottom of the light cover over the light bracket with light pressure Replace center freezer basket and fram...

Page 20: ...ric service to your refrigerator will be interrupted for 24 hours or less keep the doors to the freezer closed This helps food stay frozen If service will be interrupted longer than 24 hours remove all frozen food and store it in a frozen food locker or place two pounds of dry ice inside the freezer for every cubic foot of interior volume This will keep food frozen for two to four days Be sure to ...

Page 21: ...e water valve turned on Is water getting to the water valve Check water line for leaks Lights do not work Has a household fuse blown or circuit breaker tripped Is a bulb burned out Motor seems to run too long The motor naturally runs longer on hot days if the room is too warm if a large amount of food has been added or if the doors are opened often Temperature display does not match set point Just...

Page 22: ...chts etc Under this Residential Plus warranty the product its components and accessories are warranted to be free from defective material or workmanship for a period of ninety 90 days from the date of original retail purchase This warranty excludes use of the product in all commercial locations such as restaurants food service locations and institutional food service locations SIX YEAR FULL WARRAN...

Page 23: ...ARTICULAR PURPOSE APPLICABLE TO THIS PRODUCT ARE LIMITED IN DURATION TO THE PERIOD OF COVERAGE OF THE APPLICABLE EXPRESS WRITTEN LIMITED WARRANTIES SET FORTH ABOVE Some states do not allow limitations on how long an implied warranty lasts so the above limitation may not apply to you WARRANTY SERVICE To obtain warranty service contact an authorized Viking Range Corporation service agent or Viking R...

Page 24: ...46 47 ...

Reviews: