Stainless Steel Parts
All stainless steel parts should be wiped regularly with hot, soapy water
at the end of each cooling period and with liquid stainless steel cleaner
when soapy water will not do the job.
Do not use
steel wool, abrasive
cloths, abrasive cleaners, or powders. If necessary to scrape stainless
steel to remove encrusted materials, soak the area with hot towels to
loosen the material, then use a wooden or nylon spatula or scraper.
Do
not use a metal knife, spatula, or any other metal tool to scrape stainless
steel. For occasional heavy cleaning use, a cleaner such as Liquid Zud
TM
can be used according to package directions. Do not permit citrus or
tomato juice to remain on stainless steel surface, as citric acid will
permanently discolor stainless steel. Wipe up any spills immediately.
Glass Surface
Clean with detergent and warm water. Glass cleaner can be used to
remove fingerprints. If using glass cleaner ammonia, make sure that it
does not run down on exterior door surface.
Brass Parts
CAUTION
:
All brass special ordered parts are coated with an epoxy
coating.
DO NOT USE BRASS OR ABRASIVE CLEANERS ON THE
BRASS OPTION PARTS.
All brass parts should be wiped regularly with
hot soapy water.
Oven Racks
Clean with detergent and hot water. Stubborn spots can be scoured with
a soap-filled steel wool pad.
DO NOT CLEAN THE OVEN RACKS OR
RACK SUPPORTS USING THE SELF-CLEAN CYCLE.
They could
sustain damage due to the extreme heat of the Self-Clean cycle.
33
Oven Surfaces
Several different finishes have been used in your self-clean oven.
Cleaning instructions for each exterior surface are given below. Your
oven features a self-clean cycle for the oven interior. See the self-clean
section for complete instructions.
NEVERS USE AMMONIA, STEEL
WOOL PADS, ABRASIVE CLOTHS, ABRASIVE CLEANERS, CAUSTIC
OVEN CLEANERS, OR ABRASIVE POWDERS. THEY CAN
PERMANENTLY DAMAGE YOUR OVEN.
Control Panel
DO NOT USE any cleaners containing ammonia or abrasives. They could
remove the graphics from the control panel. Use hot, soapy water and a
soft clean cloth.
32
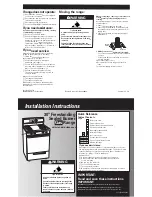
Grill
The grill grate may be cleaned immediately after cooking is complete
and before turning off the flame. Wearing a barbecue mitt to protect
your hand from heat, use a soft bristle barbecue brush to scrub the grill
grate. Dip the brush frequently in a bowl of water. Steam is created as
the water contacts the hot grate. The steam assists the cleaning process
by softening the food particles. For thorough cleaning of the grill grate,
soak 15 to 30 minutes in a hot water and detergent solution. After
soaking, scrub with a soft scotch brite pad. DO NOT USE a steel wool
pad or abrasive cleaners as they could damage the porcelain finish.
After using the grill, always remove the drip pan located below it by
pulling the drip pan toward you. The drip pan needs to be cleaned after
each use of the griddle. Cooked-off grease will drain from the griddle
through the drain tube and accumulate in the drip pan. Wash in hot
soapy water or with an antibacterial cleaner. The drip pan needs to be
cleaned after each use. If grease is permitted to accumulate, fire hazard
could occur, since the grill burners are directly above the pan.
Clean greasy parts with a household grease solvent such as household
ammonia and water. If necessary, a soap-filled steel wool pad can be
used on the grill frame shield, grill burner, and grill heat deflector.
1. Grill Grates
2. Flavor Generator
plates
3. Heat Deflector
4. Grill Frame
5. Grill Burner Sheild
(Do not remove
from burner)
6. Burner
(Do not remove)
To disassemble for thorough cleaning, remove parts after they have
cooled in the following order:
1
2
3
4
5
6
12” Grill Assembly
24” Grill Assembly