background image


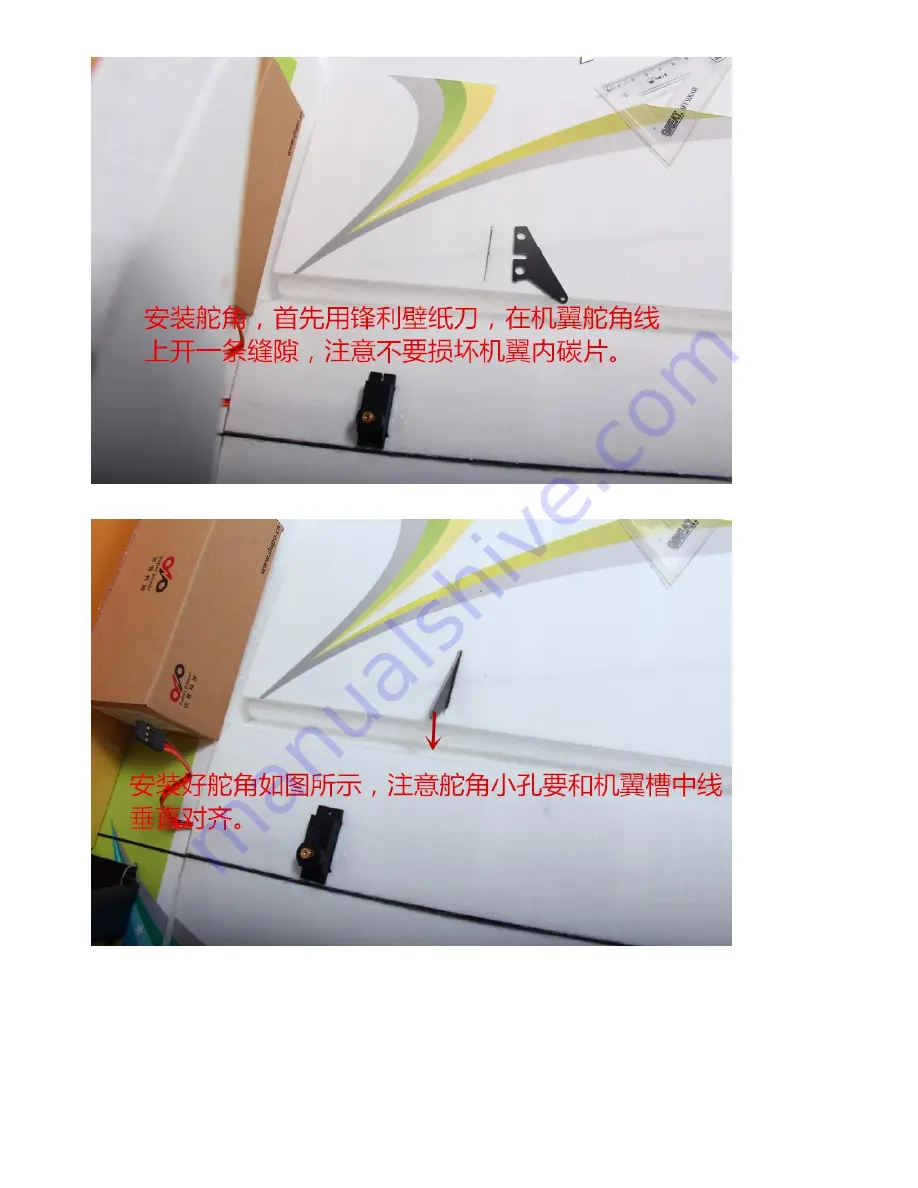
Install the horn. Cut a slit for the horn with the hobby knife. Avoid to damage the carbon spars pre- installed. 


Install the servo as shown in the picture, and notice that the servo should be perpendicular to the pre-cut slot. 

Summary of Contents for SUPER EXTRA330SC

Page 1: ...SUPER EXTRA330SC Instruction Manual ...

Page 2: ...he product or the property of others Always keep a safe distance in all directions around your model to avoid collisions or injury This model is controlled by a radio signal subject to interference from many sources outside your control Interference can cause momentary loss of control Always operate your model in open spaces away from full size vehicles traffic and people Always carefully follow t...

Page 3: ... EPP thermal cutting wings and the outside is covered with PP material The embedded carbon spar makes the aircraft more rigid and more durable The thick landing gear sturdy material and reasonable design can make you feel confident to land the plane The whole plane doesn t use any EPS It is stronger than 15E and its wing area is two times larger than 15E which is more suitable for 3D stunt flying ...

Page 4: ...Tape 3 wheels 4 elevator servo horn 5 rudder servo horn 6 aileron servo horns 7 LG base parts 8 The tail and fuselage connection chip 9 pant bracket 10 motor mount 11 servo extention 12 tail skid 13 Adj Link End Sets 14 Z bend 15 screws for servo extension arms 16 axles 17 Screws for LG 18 Control rods ...

Page 5: ... the two wings the elevator and the rudder Fold back and weigh them down for about an hour to lossen up the hinge area Cut the servo slots for the aileron Cut along the rectangle with a hobby knife Cut the slot as pictured above ...

Page 6: ... wing spars First deepen the pre cut slot with the hobby knife and make sure the slit is clear where the wing and fuselage meet Test fit the spar to make sure it sits flush to the surface of the wing Squeeze some glue into the pre cut slot and install the spar and ensure that it is fully seated and flush to a little below the surface the wing ...

Page 7: ...together Make sure the two pieces are fully seated to each other This step is wrong Don t install the lower horizontal fuselage here Please install the lower fuselage after the landing gear installation If so squareness should be really close double check with a tape measure by measuring from elevator tips to the wing tips ...

Page 8: ...Locate all the items pictured above Install the landing gear Apply glue to the wood pant bracket Apply some glue to the inside of the strut Thread the long screw through the pant bracket and the strut ...

Page 9: ... pictured above starting from left to right Long screw wood pant bracket strut hex nut wheel hexnut Assemble the foam pants Apply a dab of glue to the ends of the pant bracket and the mating foam areas Join the pieces together ...

Page 10: ... You should end up with a left and right as pictured above Install the landing gear base parts Squeeze some glue into the four holes and insert the LG base pants Apply a medium coat of glue to the under side of the LG platform ...

Page 11: ...Install the strut and the LG base plate Apply glue to the contact area Tap the screw into the LG base plate and tighten the screw as pictured above ...

Page 12: ... glue Once it is all pressed together wipe away any extra glue and check for squareness along the length of the fuselage As the foam is thick it should be pretty square on it s own Once happy with the squareness and fit of the glue joint Weigh everything down for 20 minutes to ensure it will dry nice and flat ...

Page 13: ...he horn Cut a slit for the horn with the hobby knife Avoid to damage the carbon spars pre installed Install the servo as shown in the picture and notice that the servo should be perpendicular to the pre cut slot ...

Page 14: ...large the second hole in servo horn Put a little dab of glue on the under side of the stock arms and then fasten the extensions with the screws acquired from the servo bags Make the servo arms of elevator and rudder in the same way ...

Page 15: ...od with Z shaped steel wire instead of push rod linkage stopper Fix the Z shaped wire and the carbon rod with heat shrink tubing Make all of the control rods needed in the same way Install aileron control rods Install the push rod linkage stopper apply a dab of glue on the screw ...

Page 16: ...ve Install the motor mount Test fit Once happy with the fitment apply some glue to the horizontal tabs front and back as shown Slide the mount into position working it a little from side to side to get good glue distribution Wipe away any excess glue ...

Page 17: ...uselage piece to ensure the two pieces are fully seated to each other Do this a couple times Wipe away any extra glue and check along the length for squareness As with the bottom it should naturally be really close if not right Tweak a little if needed As shown in the picture above the motor mount and the upper fuselage are installed ...

Page 18: ...is piece with glue wet Make sure that it is in alignment with the fuselage Once the wood piece for the rudder are dry the rudder can be installed Apply some glue and join the two pieces Make sure the rudder aligns with the wood pieces and that it is straight and true with the main part of the fuselage ...

Page 19: ...Install the rudder servo and horn as pictured above Install the SFGs SFG s will be joined to the end of the wings Apply a skim coat of glue to both mating surfaces Pay attention to the orientation ...

Page 20: ...Join the two pieces together as shown Locate the 10mm carbon spars Glue it to the tail of the lower horz fuselage as the tail skid ...

Page 21: ... the motor mount with the wires off to the side in which the ESC will be mounted Connect the extensions with the elevator and rudder servos Once you have determined the general location for all the components stick them down with some low temp hot glue ...

Page 22: ... 10 cm away from the landing gear Draw a rectangle and cut along the frame with the bobby knife Tear the skin of the rectangle as shown apply some glue and stick the Adhesive Hook And Loop Strap Magic Tape Adjust the location of the battery to match the CG point ...

Page 23: ...The CG is at the location of 1 3 of the wing from the leading edge of the wing This is all about the assembly of Super Extra 330 designed by VIGORSHY Enjoy your flying The manual is written by Zhang Lianpo and translated by Jay Chen ...

Reviews: