background image

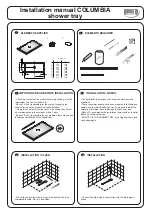
6.  Loosely attach mounting brackets to the countertop, parallel to

     the cutout opening using the supplied mounting screws and
     nuts. Mounting screws with brass inserts are supplied with the
     sink, however, countertop material vary and the correct type of
     fasteners should be recommended by your installer or supplier.

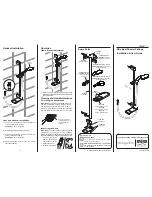
7.  Clean sink flange and underside of cutout area of countertop,

     making sure that the area is smooth and free of grease. MUST
     use 100% silicone for this installation.  Apply continuous bead
     of silicone caulk evenly on top of sink flange. (FIGURE 4)
     NEVER perform this procedure outdoor and under sunlight.
     If performed under an extremely hot and dry climate, the
     caulking of the sink frame should be performed by two
     people at the same time.

8.  Position and align sink over the countertop opening and press

     sink onto countertop. Turn bent end of mounting bracket to
     snug over the sink rim.

9.  Check alignment of sink again and tighten fasteners to secure

     sink.  (FIGURE 5)

10. Wipe away excess silicone caulk with damp cloth. Connect

     drain and water supply according to manufacturer's instruction.

Figure 4

Figure 5

4

Summary of Contents for VG3019B

Page 1: ...2mm 19 483mm 10 255mm 17 430mm 28 711mm TOP VIEW FRONT VIEW FEATURED MODEL VG3019B 9 7 8 BOWL DEPTH FEATURES 16 gauge stainless steel 304 Nickel Bearing Content Zero radius corners Elegant and functional drain grooves Long lasting easy to clean satin finish Sound deadening insulation Rear drain placement PACKING LIST SINK CUT OUT TEMPLATE MOUNTING HARDWARE 9 7 8 250mm 1 ...

Page 2: ...ssories for your protection Long Life Care Vigo Stainless Steel Sinks are easy to keep looking new longer with minimal care For best results always rinse with a mild soap and wipe after each use Rub lightly with soft cloth in the direction of the grain line on a regular basis To avoid damage and discoloration to the sink surface never use a steel wool or scouring pad Tools and Materials needed Tap...

Page 3: ...ount Sink edge is flush with countertop opening FIGURE 1 B Reveal mount Sink rim is exposed approximately 1 4 from the edge of countertop opening FIGURE 2 Figure 1 Figure 2 3 Cut out the appropriate template for your sink model and desired installation option Place template in desired position on countertop locating center of the bowl over cabinet and faucet holes 4 Trace the outline of the templa...

Page 4: ...r this installation Apply continuous bead of silicone caulk evenly on top of sink flange FIGURE 4 NEVER perform this procedure outdoor and under sunlight If performed under an extremely hot and dry climate the caulking of the sink frame should be performed by two people at the same time 8 Position and align sink over the countertop opening and press sink onto countertop Turn bent end of mounting b...

Page 5: ...ver time with a mild solution of vinegar and water followed by a thorough flushing with water grain NOT RECOMMENDED FOR MIRROR FINISH NEVER develop rust spots in the stainless steel surface finish of your sink the finish of your sink sink Silver cleaners can also contain acids that will damage the sink surface 5 ...

Page 6: ...ns supplied by VIGO and all applicable rules regulations and legislation pertaining to such installations This warranty does not apply unless the VIGO Product is installed by fully insured licensed professionals Vigo strongly recommends that such licensed professionals have experience in the installation of bathroom and kitchen products Installation of certain products including without limitation...

Page 7: ...T SPECIFICATIONS Pull Down Spray Kitchen Faucet Model VG02007 MODEL HOLE FAUCET SPOUT DIAMETER HEIGHT REACH VG02007 1 3 8 27 1 4 10 1 8 DIMENSIONS MODEL VG02007 FEATURES PACKING LIST 1 10 1 8 27 1 4 1 8 1 8 ...

Page 8: ...6 2 1 2 1 7 8 4 1 4 VG02007 THE MEASUREMENTS IN INCHES ARE ROUNDED TO THE NEAREST 1 8 8 1 8 27 1 4 10 1 8 3 4 10 1 8 9 3 4 13 3 8 2 3 8 11 1 2 2 ...

Page 9: ... 3 8 COUNTERTOP HOLE FROM BENEATH THE COUNTERTOP HOLE ASSEMBLE THE PLASTIC HOLDER RUBBER RING AND METAL RING IN THE ORDER DEPICTED IN THE DIAGRAM THEN THREAD METAL NUT ONTO HOLLOW PIN TIGHTEN THE METAL NUT UNTIL FAUCET IS SECURE 3 2 1 METAL NUT 4 IF SPRAY HOLDER IS NOT ATTACHED ATTACH THE SPRAY HOLDER AND SPRAY HOSE TO THE FAUCET AND TIGHTEN SCREW UNTIL SPRAY HOLDER IS SECURE 5 FEED SPRAY HOSE THR...

Page 10: ...retighten with an adjustable wrench 2 B Remove sprayer or supply line and flush lines 2 A Remove and soak clean with a non abrasive agent i e vinegar 1 B Contact Vigo Technical Support for replacement 1 A Remove cartridge from housing was thoroughly with hot water and reseat in housing 4 Loosen metal screw lift off the spiral neck and reseat making sure to thread the metal screw into the white was...

Page 11: ...f such access is not available all expenses to provide said access will be the responsibility of the owner This warranty does not apply to Products that have not been installed or operated in accordance with instructions supplied by VIGO and all applicable rules regulations and legislation pertaining to such installations This warranty does not apply unless the VIGO Product is installed by fully i...

Reviews: