


Upgrading The Computer
6 - 6 Upgrading the Hard Disk Drive
6
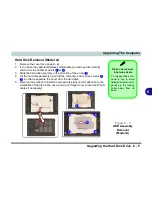
Hard Disk Removal (Model B)
1.
Remove the cover (see page
6 - 4
).
2.
Carefully disconnect the Wireless LAN antenna cable
Note
:
If you do not
see the Mini-PCI board and cables etc. then the WLAN module is located on
the mainboard in your computer’s design. In this case follow steps
3
&
6
.
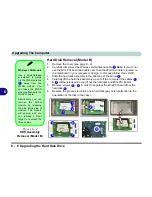
3.
Slide the hard disk assembly in the direction of the arrow
.
4.
Carefully lift the hard disk assembly up out off the computer (the cables
&
will be released as you lift out the hard disk and Mini-PCI board).
5.
Remove screws
-
in order to separate the Mini-PCI board from the
hard disk
.
6.
Reverse the process to install a new hard disk (pay careful attention to the
orientation of the disk in the case).
1
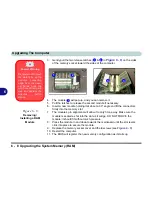
Wireless LAN Module
Use a small flathead
screwdriver to gently
pry the WLAN antenna
away from the
WLAN module. You
can leave the WLAN
module attached to the
Mini-PCI board.
Alternatively you can
remove the WLAN
module by releasing
the pins at the side of
module. The module
will pop-up, and you
can remove it. Don’t
forget to re attach the
three cables.
1
2
3
4
5
8
9
Figure 6 - 4
HDD Assembly
Removal (Model B)
1
2
3
9
4
5
8
6
7
Summary of Contents for Dossier LT
Page 1: ......
Page 2: ......
Page 22: ...XX Preface ...
Page 44: ...Introduction 1 22 1 ...
Page 73: ...Advanced Controls Video Driver Controls 3 7 3 Figure 3 4 Intel Graphics Controller Properties ...
Page 96: ...Advanced Controls 3 30 3 ...
Page 156: ...Wireless PC Camera Modules 7 18 PC Camera 7 Figure 7 5 Audio Setup Windows XP ...
Page 178: ...Troubleshooting 8 20 8 ...