49
4.
Turn on the
NVIDIA Reflex Latency Analyzer
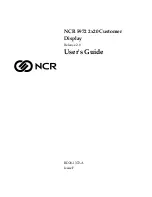
in the monitor’s OSD Menu:
ͫ Press the
[●] key
or
move the joy key
[
◄
]
or
[
▲
]
or
[
▼
]
to display the On-
Screen Display (OSD) Menu.
ͫ Using the joy key, go to:
G-SYNC Processor
>
NVIDIA Reflex Latency
Analyzer
>
PC + Display Latency
>
On
.
G-Sync
Game Modes
ON
NVIDIA Reflex Latency Analyzer
FPS
HUD Location
HUD Color
G-SYNC Esports
PC + Display Latency
Monitoring Sensitivity
Show Monitoring Rectangle
Rectangle Location
Rectangle Size
On
Off
Hz
Custom 1
Max. Refresh Rate
Exit
Navi.
Power
Game Modes
Display
Input Select
Audio Adjust
Setup Menu
240
X G 2 7 1 Q G
G-SYNC®
Processor
5.
Setup the
Monitoring Rectangle
.
The NVIDIA Reflex Latency Analyzer measures flashes or bright changes on the
screen. The measurements are taken within the
Monitoring Rectangle
.
To measure latency, the
Monitoring Rectangle
will need to be moved over a
location on screen where a flash or change in brightness will occur when the
left mouse button is pressed (e.g, placed over the muzzle of a firearm in an FPS
game).
In the OSD Menu:
ͫ Press the
[●] key
or
move the joy key
[
◄
]
or
[
▲
]
or
[
▼
]
to display the On-
Screen Display (OSD) Menu.
ͫ Using the joy key, go to:
G-SYNC Processor
>
NVIDIA Reflex Latency
Analyzer
>
Rectangle Location
to adjust the location of the
Monitoring
Rectangle
.
NOTE:
•
A preset location can be chosen under
Rectangle Preset
.
•
The Monitoring Rectangle’s size can be adjusted under
Rectangle Size.
6.
Now the PC + Display Latency will be able to be measured by pressing the left
mouse button.
To learn more, visit: https://www.nvidia.com/en-us/geforce/news/reflex-latency-