background image

6

ENGLISH

Contact ViewSonic service team at: http://www.ViewSonic.com or call our service team: United States 1-800-688-6688, Canada 1-866-463-4775

ViewSonic

                                                                                                         VT2430

Objects and ventilation holes

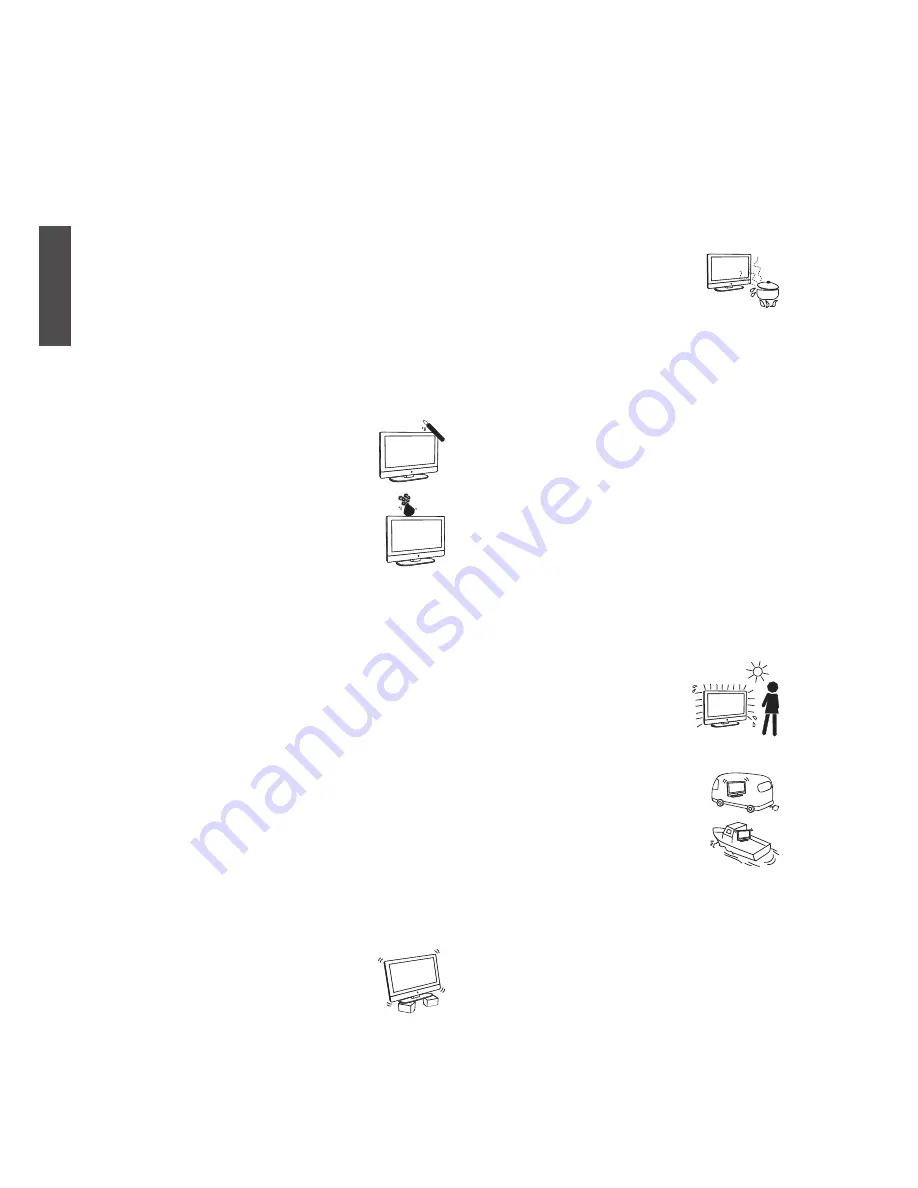
Never push any objects into the slots on the TV 

cabinet as they may touch dangerous voltage points or 

short out parts that could result in a fire or an electric 

shock. Do not place any objects on the TV.

MOISTURE

Moisture and flammable objects

◊ Keep the product away from moisture. Do not 

expose this appliance to rain or moisture. Do not 

place objects filled with liquids, such as vases, on 

the TV.

◊ Do not use power-line operated V sets near water, 

such as in places like a bathtub, washbowl, kitchen 

sink, laundry tub, a wet basement, or near a 

swimming pool, etc. It may cause fire or electric 

shock.

◊ Do not let this TV get wet. Never spill 

liquid of any kind on the TV. If water 

penetrates into the product, unplug the 

power cord and contact ViewSonic.  

Donot operate the TV. It may result in 

electric shock or damage to the TV. 

◊ To prevent fire, keep flammable objects 

or open flame (e.g. candles) away from 

the TV.

INSTALLATION

To do Wall mount installation, you need a Wall-

Mount Bracket. When installing or removing the 

TV using the Wall-Mount Bracket, be sure to use 

qualified contractors. If not properly secured during 

installation or removal from the Wall-Mount Bracket, 

the TV may fall and cause serious injury.

Optional wall mount

◊ When installing the TV using a Wall-Mount Bracket, 

make sure you follow the operating instructions 

supplied with the Wall-Mount Bracket.

◊ Attach the brackets supplied with the Wall-Mount 

Bracket.

◊ The TV is not designed for hanging from the 

ceiling. It may fall and cause serious injury.

Placement

The TV should be installed near an easily accessible 

AC power outlet.

Observe the following to prevent the TV from falling 

from the stand or wall mount.

 Place the TV on a stable, level surface.

 Do not hang anything on the TV. Do 

not allow children to climb on the TV.

Do not install the TV in places subject to extreme 

temperature,  such  as  in  direct  sunlight,  near  a 

radiator, or heating vent. If the TV is exposed to 

extreme temperature, the TV may overheat and cause 

deformation of the enclosure or cause malfunction. 

Do not install the TV in a place exposed to direct air 

conditioning. If the TV is installed in such a location, 

moisture  may  condense  inside  and  may  cause  a 

malfunction.

 Do not place the TV in hot, oily, humid  

or excessively dusty places.

 Do not install the TV where insects 

may enter.

 Do not install the TV where it may be exposed to 

mechanical vibration.

 Do not install the TV in a location where it may 

spear up, such as on or behind a pillar, or where you 

might bump your head on it. It may cause injury.

Preventing the TV from toppling over

To prevent the TV from toppling over, secure the TV 

to a wall or stand.

Placement for watching

We suggest you to watch the TV at a distance of 3-7 

times that of the screen height, and not in excessive 

brightness. It is easy to cause eye fatigue if you watch 

TV for too long or in a dark room. To obtain clear 

picture, do not expose the screen to direct illumination 

or sunlight. Use spot lighting directed down from the 

ceiling if you can.

Use in outdoor

This TV is not designed for outdoors 

installation. Do not expose the TV to 

rain, as it may result in a fire or an 

electric shock. Also, do not expose 

the TV to direct sunlight, as it may 

heat up and become damaged. 

Vehicle, ships and other vessels

Do not install this TV in a vehicle.

Car accidents may cause the TV to fall 

down and cause injury.

Do not install this TV in a ship or vessel. 

If the TV is exposed to seawater, it may 

cause a fire or damage the TV.

Medical institutions

Do  not  place  this  TV  in  a  place  where  medical 

equipment is in use.

It may cause the medical equipment to malfunction.

Summary of Contents for VT2430 - 24" LCD TV

Page 1: ...manner as well as registering your product for future service Warranty information contained in this User Guide will describe your limited coverage from ViewSonic Corporation which is also found on our web site at http www viewsonic com in English or in specific languages using the Regional selection box in the upper right corner of our website Before operating the equipment read the instructions ...

Page 2: ...e 1 800 688 6688 T Toll 1 424 233 2530 F 1 909 468 1202 service us viewsonic com Canada www viewsonic com T Toll Free 1 866 463 4775 T Toll 1 424 233 2533 F 1 909 468 1202 service ca viewsonic com Renta y Datos 29 SUR 721 COL LA PAZ 72160 PUEBLA PUE Tel 01 222 891 55 77 CON 10 LINEAS Electroser Av Reforma No 403Gx39 y 41 97000 Mérida Yucatán Tel 01 999 925 19 16 Other places please refer to http w...

Page 3: ...gisterio 3321 Col Magisterial Chihuahua Chih Tel 4136954 E Mail Cefeo soluglobales com Cuernavaca Compusupport de Cuernavaca SA de CV Francisco Leyva 178 Col Miguel Hidalgo C P 62040 Cuernavaca Morelos Tel 01 777 3180579 01 777 3124014 E Mail aquevedo compusupportcva com Distrito Federal QPLUS S A de C V Av Coyoacán 931 Col Del Valle 03100 México D F Tel 01 52 55 50 00 27 35 E Mail gacosta qplus c...

Page 4: ...Please use the following ViewSonic TVs only with the following wall mount kit ViewSonic TV Model No VT2430 ViewSonic Wall Mount kit model WMK 10 Use with other Wall Mount kit may cause instability and possibly result in injury To find the perfect mount for VT2430 please browse www viewsonic com or call our service team United States 1 800 688 6688 Canada 1 866 463 4775 ...

Page 5: ...d 11 Mounting ViewSonic LCD TV to the wall 12 Wall Mount Kit Specifications VESA 13 Front View of the Product 14 Rear View of the Product 15 Connecting the LCD TV 17 Cable System or VHF UHF Antenna System 17 Cable System and VHF UHF Antenna System 17 HD Cable Box HD Satellite Box 17 Personal Computer 19 Other Equipment 20 Using the TV Features Remote Control and TV Controls 21 Inserting Remote Con...

Page 6: ...ion has determined that this product meets the ENERGY STAR guidelines for energy efficiency Disclaimer ViewSonic Corporation shall not be liable for technical or editorial errors or omissions contained herein nor for incidental or consequential damages resulting from furnishing this material or the performance or use of this product In the interest of continuing product improvement ViewSonic Corpo...

Page 7: ...chnician for help Pursuant to FCC regulations be cautioned that any changes or modifications not expressly approved in this manual could void your authority to operate this equipment Safety Operate the TV only on 120 240 V AC Use the AC power cord specified by ViewSonic and suitable for the voltage where you use it The plug is designed for safety purposes to fit into the wall outlet only one way I...

Page 8: ...any way such as power supply cord or plug is damaged liquid has been spilled or objects have fallen into the apparatus the apparatus has been exposed to rain or moisture or the unit does not operate normally or has been dropped USE AC power Cord Keep the following guidelines to protect the AC power cord from being damaged If the AV power cord is damaged it may result in a fire or an electric shock...

Page 9: ...C in the U S A and Section 54 of the Canadian Electrical Code in Canada provides information with in regard to proper grounding of the mast and supporting structure grounding of the lead in wire to an antenna discharge unit size of grounding conductors location of antenna discharge unit connection to grounding electrodes and requirements for the grounding electrode Antenna grounding according to t...

Page 10: ...ng the TV hold it securely from the bottom Place your palm directly under the panel VENTILATION Slots and openings in TV are provided for ventilation To ensure reliable operation of the TV and to protect it from overheating be sure these openings are not blocked or covered The TV may accumulate dust and get dirty if proper ventilation is not provided For proper ventilation follow the following gui...

Page 11: ...o prevent the TV from falling from the stand or wall mount Place the TV on a stable level surface Do not hang anything on the TV Do not allow children to climb on the TV Do not install the TV in places subject to extreme temperature such as in direct sunlight near a radiator or heating vent If the TV is exposed to extreme temperature the TV may overheat and cause deformation of the enclosure or ca...

Page 12: ...e TV is in use This is a normal condition Spraying insect repellent with volatile material on the screen will cause damage Do not make prolonged contact with rubber or plastic material Broken pieces Do not throw anything at the TV Doing so may break the screen glass and cause serious injury If the surface of the TV cracks unplug the AC power cord before touching the TV Otherwise electric shock may...

Page 13: ...terference to radio or television reception which can be determined by turning the equipment off and on the user is encouraged to try to correct the interference by one or more of the following measures Reorient or relocate the receiving antenna Increase the separation between the equipment and receiver Connect the equipment into an outlet on a circuit different from that to which the receiver is ...

Page 14: ...ry Hg 0 1 0 1 Cadmium Cd 0 01 0 01 Hexavalent Chromium Cr6 0 1 0 1 Polybrominated biphenyls PBB 0 1 0 1 Polybrominated diphenyl ethers PBDE 0 1 0 1 Certain components of products as stated above are exempted under the Annex of the RoHS Directives as noted below Examples of exempted components are 1 Mercury in compact fluorescent lamps not exceeding 5 mg per lamp and in other lamps not specifically...

Page 15: ...ur LCD TV If any items are missing please contact your dealer LCD TV Remote Control with batteries Power Cord ViewSonic User Guide ViewSonic Quick Start Guide List of Features 1 Brilliant HDTV Vibrant PC monitor One innovative display 2 Stylish design for kitchen home office and dorm room 3 Super HD 1920x1080 resolution and 1000 1 contrast typ 4 PC input for computer applications and web surfing 5...

Page 16: ...Figure 1 2 Unpack the stand one hand hold the TV and one hand pull stand with arm together see Figure 2 3 Stand the TV up see Figure 3 Disconnecting the Stand 1 Lay the TV flat on a table with the LCD screen face down To prevent the TV from being scratched put a piece of soft cloth on the table on which the screen will be set see Figure 1 2 Press on four corners of the hinge cover and pull as arro...

Page 17: ... the wall mount bracket to LCD TV safely please use the following guidelines Disconnect the power and any other cables that might hinder moving the LCD TV Set the LCD TV on a table or work surface placing the screen face down on a towel or woolen blanket to protect the screen surface from damage while installing plate Before installing the LCD TV on the wall ensure you have recorded the product se...

Page 18: ...00 mm M6 x L10 6 ViewSonic provides the standard dimensions for wall mount kits as shown in the table above When purchasing our wall mount kit a detailed install manual and all parts necessary for assembly are provided Do not use the screws that longer than the standard dimension as they may cause damage to the inside of the TV set A B C D Caution Please use the following ViewSonic TVs only with t...

Page 19: ...ator Lights up in blue when the TV is turned on Lights up in orange when the TV is in standby mode 3 Remote Control Receiver Receives IR signals from the remote control 4 Volume Down Decrease sound volume or adjust a highlighted control while in OSD menu 5 Volume Up Increase sound volume or adjust a highlighted control while in OSD menu 6 MENU Turn OSD menu ON OFF 7 CH Down Channel down when sourc...

Page 20: ... input on the rear of the LCD TV 4 YPbPr signal input Connect this jack to the YPbPr output of A V device 5 Composite Video input Connect this jack to the composite video output connectors on your A V equipment 6 S Video input Connect the S Video cable from the compatible device to this connector on the rear panel of the LCD TV 7 AV S Video Audio input left right Connect the Audio in cable for AV ...

Page 21: ...put 7 Component YPbPr connection YPbPr provides better picture quality than the S Video or the AV connection For YPbPr connection connect the component video YPbPr and audio jacks to the corresponding output jacks of your A V device VIDEO YPbPr signal input 4 AUDIO YPbPr DVI signal audio input 8 HDMI connection HDMI High Definition Multimedia Interface is a licensable audio video connector interfa...

Page 22: ...VHF UHF Cable System and VHF UHF Antenna System Use an optional A B RF switch not supplied to switch between the cable and antenna programming as shown below Remember to set the TV CATV setting in the TV menu to Air or Cable for the type you choose HD Cable Box HD Satellite Box You can also enjoy high definition programming by subscribing to a high definition cable service or a high definition sat...

Page 23: ...ion If the equipment has a DVI jack and not an HDMI jack connect the DVI jack to the HDMI jack 2 and connect the audio jack to the AUDIO In jacks of HDMI 8 YPbPr or Component Connection CATV Satellite antenna cable DVI to HDMI cable HD cable box HD satellite box Rear of TV Audio cable HD cable box HD satellite box CATV Satellite antenna cable Rear of TV Component video cable Audio cable ...

Page 24: ...ndard Resolution FS Full Screen RGB 720 x 400 70Hz 1920 x 1080 Yes VESA 640 x 480 60Hz 1920 x 1080 Yes VESA 640 x 480 75Hz 1920 x 1080 Yes VESA 800 x 600 60Hz 1920 x 1080 Yes VESA 800 x 600 75Hz 1920 x 1080 Yes MAC 832 x 624 75Hz 1920 x 1080 Yes VESA 1024 x 768 60Hz 1920 x 1080 Yes VESA 1024 x 768 75Hz 1920 x 1080 Yes VESA 1280 x 768 60Hz 1920 x 1080 Yes VESA 1280 x 1024 60Hz 1920 x 1080 Yes VESA ...

Page 25: ...lease refer to the Quick Start Guide supplied when connecting the other equipment to your LCD TV VHF UHF CABLE Digital cable box Digital satellite receiver DVD Player Audio system Blu ray Disc Player PS3 Personal Computer Personal Computer Headphone DVD Player VCD Player Game system DVD Player VCD Player Game system DVD Player Personal Computer AC power socket DVD Player VCD Player Game system ...

Page 26: ...which may pose a risk of fire or lead to personal injury Insert batteries according to and markings Inserting the batteries incorrectly may result in leakage which may pose a risk of fire or lead to personal injury Dispose of the battery in accordance with local laws and regulations Keep the batteries away from children or pets When the remote control will not to be used for an extended period rem...

Page 27: ...PG It contains the program information for the channel you re watching The picture here shows an example of the GUIDE screen in a DTV source 6 LIST Press this button to show a small window showing program list you can scroll through the list to select the channel you want directly without using the button 7 0 9 number buttons Press 0 9 and to select a channel After you input the channel numbers pr...

Page 28: ... have already been stored To preset favorite channels use the Favorite item in the TV menu see page 26 14 MUTE Press to turn off the sound To restore the sound press this button again or press the VOL button 15 INFO Press this button to display the current state of the LCD TV 16 SLEEP Press repeatedly to set the off timer The function is used to automatically shut off the LCD TV after a preset per...

Page 29: ...ns 1 ATV The button has no function in ATV mode Directly press the number buttons to select channels 2 DTV Use button to select the sub channel in DTV Ex Your desired number is 80 3 Press 8 press 0 press press 3 Return to the previous channel press RECALL button Adjusting the Volume Press VOL to adjust volume To turn off the volume press MUTE To restore volume press MUTE again or press VOL directl...

Page 30: ...nnels Digital channel only or Analog channel only and press to perform Auto Scan function To stop scanning press MENU at any time 5 The Auto Scan screen will be shown and after it is done the screen will return to the first found channel Viewing the Menus 1 Press the MENU button to display the OSD main menu There are six top menus on the screen PICTURE AUDIO TIME OPTION LOCK and CHANNEL 2 Press or...

Page 31: ... or PC 3 To confirm the selection press ENTER Favorite Channel Setting To set your favorite channel into memory 1 Press the MENU button to display the OSD main menu 2 Press or to select the CHANNEL menu Press or to select Favorite then press button to enter Favorite setting 3 Press or to select the channel you d like to be your favorite channel Press ENTER to confirm your selection 4 To cancel the...

Page 32: ...Channel Label setting 5 Use or to choose letters or signs or to move forward or backward 6 After you input the channel name press MENU or ENTER to complete the setting 7 Press MENU to exit Adding Erasing Channel When the channel is erased it will not appear on the screen when you browse the channels with CH button To see the channel again you must add the channel or perform the Auto Scan page 25 f...

Page 33: ...to display the OSD main menu 2 Press or to select your desired top Menu 3 Press or to select the control of Picture Mode Color Mode Zoom Mode Noise Reduction Sound Mode MTS Prefer Language in DTV mode Surround Sound Audio Only Sleep Timer Time Zone DST Time Format Auto Sync Clock Menu Language Transparency OSD Time Out DCR Dynamic Contrast Ratio then press or to select your desired option 4 Press ...

Page 34: ...vice1 6 Off Setting up Time menu 1 Press the MENU button to display the OSD main menu 2 Press or to select the TIME menu 3 Press or to select Sleep Timer and press or to set the Sleep Timer from 5 240 min or Off 4 Press or to select Time Zone and select the correct time zone of your area with or The displayed time of Clock will be changed at the same time automatically To adjust Clock select Clock...

Page 35: ...enu 3 Press ENTER or to enter Password 4 Enter the password The default password is 0000 5 Move to System Lock and select On to enable the detailed settings 6 Move to US or Canada rating system For detailed Close Caption setting 1 Press or to select Option then press to enter Option setting 2 Press or to select the Mode to be Custom and then use or to select desired options and use or to adjust de...

Page 36: ...gested 14 strongly cautioned MA mature audience You can also customize the TV ratings for the following content ALL All types content FV fantasy violence V violence S sexual situations L adult language D sexsual dialog 2 Press ENTER to set or reset each area 3 Press MENU to exit 2 MPAA 1 Press or to select MPAA 2 Press or to select your desired MPAA ratings level The MPAA ratings level are defined...

Page 37: ...ed as following C children C8 children eight years and older G general programming suitable for all audiences PG parental guidance 14 viewers and older 18 adult programming EXEMPT exempt 4 Press MENU to exit 2 Canadian French 1 Press or to select Canada Fre 2 Press to enter 3 Press or to select your desired Canadian French rating level The Canadian French rating levels are defined as following G g...

Page 38: ...ect each adjustable setting with or then press or to select the sub selection 3 Press MENU to exit The picture here only shows an example of the content of RRT Setting However the selections and sub selections of RRT Setting may be different in your OSD menu according to the local broadcasting system To reset RRT setting move to Reset RRT and press to reset To Change Password 1 Press or to select ...

Page 39: ...or to select Input Block 2 Press or to select the input source then or to select from Block or UnBlock 3 Press MENU to exit To Restore Factory Setting 1 Press the MENU button to display the OSD main menu 2 Press or to select the OPTION menu 3 Press ENTER or to enter OPTION menu 4 Press or to select Restore Default then press to restore the factory default setting 5 Select Yes and press ENTER to co...

Page 40: ... press or to adjust 4 For advanced PC functions select Advanced only in PC source and press to enter 5 Press or to select Auto Auto adjustment H Pos H Position V Pos V Position Clock or Phase and adjust the level with or When in PC source the other menus are the same as or similar to when in other source When there is no signal in the PC mode No Signal will be displayed on the screen and the TV wi...

Page 41: ... apply a small amount of a non ammonia non alcohol based mild non abrasive detergent onto a clean soft lint free cloth then wipe the surface Disclaimer ViewSonic does not recommend the use of any ammonia or alcohol based cleaners on the LCD TV screen or case Some chemical cleaners have been reported to damage the screen and or case of the LCD TV ViewSonic will not be liable for damage resulting fr...

Page 42: ...o verify that the outlet is supplying the proper voltage No picture The TV station may be experiencing problems Try another channel The Cable TV signal may be scrambled or encoded Please contact your local cable operator Make sure that connection to other components are correct referring to the user guide Make sure that setup has been done correctly after connections Make sure the correct input is...

Page 43: ...ration you want to perform Unit cannot be operated External influences such as lightning or static electricity may cause improper operation In this case operate the unit after first turning on the power of the LCD TV and the AVC System or unplug the AC cord for 1 to 2 minutes then replug again Power is cut off suddenly Is the sleep timer set in advance Is there no signal in PC mode or HDMI mode Th...

Page 44: ...80 x 1024 60 Hz 1280 x 768 60 Hz 1024 x 768 60 75 Hz 800 x 600 60 75 Hz 640 x 480 60 75 Hz Speaker Output 5W x 2 THD 10 Audio Output 1 Headphone jack Power Voltage 100 240 VAC 50 60 Hz auto switch Display area Full Scan 521 28mm H x 293 22mm V 20 5 H x 11 5 V Operating conditions Temperature Humanity Altitude 32 F to 104 F 0 C to 40 C 10 to 65 no condensation To 10 000 feet 3 000m Storage conditio...

Page 45: ... when this product has been mounted on the wall for a long time How to get service 1 For information about receiving service under warranty contact ViewSonic Customer Support You will need to provide your product s serial number 2 To obtain warranted service you will be required to provide a the original dated sales slip b your name c your address d a description of the problem and e the serial nu...

Page 46: ...rges How to get service For information about receiving service under warranty contact ViewSonic Customer Support Please refer to the attached Customer Support page You will need to provide your product s serial number so please record the product information in the space provided below on your purchase for your future use Please retain your receipt of proof of purchase to support your warranty cl...

Page 47: ...ViewSonic ...

Reviews: