background image

ViewSonic

                                                                                                         VT2430

11

ENGLISH

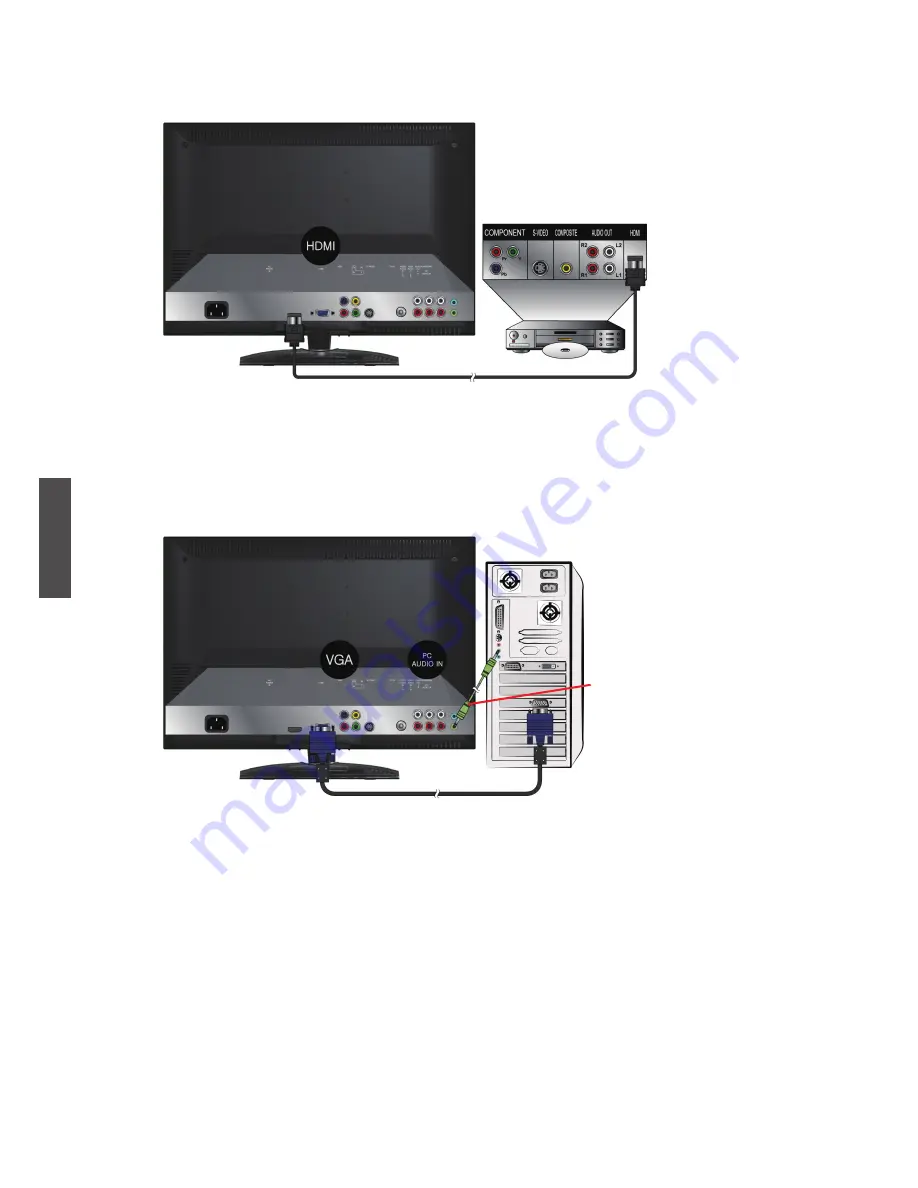
4) With HDMI cable:

HDMI Cable (not supplied)

 VCD or DVD Player

(DVD Player should have  

the HDMI output terminal)

PC

VGA 15 Pin Cable

4. Connecting to a computer 

Connect the VGA cable from VGA output of the computer to the VGA terminal input of 

your LCD TV. Also, connect the Audio In cable (green) from the audio output of your 

computer to the audio input terminal (green) of the LCD TV. 

1) With VGA cable:

PC Audio In Cable 

(not supplied)

Summary of Contents for VS12464-1G

Page 1: ...VT2430 G LCD TV Model No VS12464 1G User Guide...

Page 2: ...ed Package Contents 4 Mounting ViewSonic LCD TV to the wall 4 Front View of the Product 6 Rear View of the product 7 Remote Control 8 Installation 9 Basic Operation 13 OSD Functions Picture Menu 14 So...

Page 3: ...d the third prong are provided for your safety If the plug does not fit into your outlet consult an electrician for replacement of the outlet 10 Protect the power cord from being tread upon or pinched...

Page 4: ...roduced or transmitted by any means for any purpose without prior written permission from ViewSonic Corporation Product Registration To meet your future needs and to receive any additional product inf...

Page 5: ...ated in the vicinity of overhead power lines or other electric light or power circuits or where it can fall into such power lines or circuits When installing an outside antenna system extreme care sho...

Page 6: ...s working If your LCD TV is already set up for free standing operation you need to first remove the stand before mounting the device to the wall To attach the wall mount bracket to LCD TV safely pleas...

Page 7: ...causing the unit to fail The wall mount screw type is M4 x L10 Mount the wall mount bracket to the wall ensuring use of proper screws to support the installation Ensure there is at least 3cm of space...

Page 8: ...ge when the TV is in standby mode 3 Remote Control Receiver Receives IR signals from the remote control 4 VOL Decrease sound volume or adjust a highlighted control while in OSD menu 5 VOL Increase sou...

Page 9: ...r on the rear panel of the LCD TV 7 TV Input Jack Connect this jack to your Cable or VHF UHF antenna 8 AV S Video Audio input left right Connect the Audio in cable for AV S Video from this jack to the...

Page 10: ...us channel 7 POWER Turn power ON or OFF 8 buttons Press these buttons to navigate the OSD menus is for function select and is for function adjustment 9 MENU Press to enter OSD MENU or return to last m...

Page 11: ...th Auto Scan function when using an antenna or cable TV system without a cable connecter box See page 15 Only use the specified AA batteries Do not mix new and old batteries This may result in crackin...

Page 12: ...patible devices into the back panel of your LCD TV 1 With AV cable RCA A V Cable not supplied 2 With S Video cable Audio in Cable not supplied S Video Cable not supplied VCD or DVD Player 3 With YPbPr...

Page 13: ...t terminal PC VGA 15 Pin Cable 4 Connecting to a computer Connect the VGA cable from VGA output of the computer to the VGA terminal input of your LCD TV Also connect the Audio In cable green from the...

Page 14: ...ly image display is supported 2 With HDMI DVI cable HDMI DVI Cable not supplied PC AC wall socket 5 Connecting with the power cord Connect the power cord to the AC inlet at the back of your LCD TV aft...

Page 15: ...L directly Channel Select Press number keys or CH buttons to select the desired channels Ex the desired channel is 8 press 8 only Ex the desired channel is 80 Press 8 then press 0 Return to previous c...

Page 16: ...h Tone To adjust colour of skin Color Temp To select the screen colour temperature between Normal Warm and Cool For China area For Hong Kong area E x i t E x i t E x i t E x i t Balance To adjust left...

Page 17: ...icturemnoise and particularly useful in the area that has trouble in signal receiving Memory Recall Press to restore the default settings Setup Menu To set up OSD window When input source is TV AV S V...

Page 18: ...name for the channel Use to select the desired letter 0 9 A Z and Space and use to move the cursor to enter next letter After the desired name is entered press 2 to confirm 2 To Erase Add channels Us...

Page 19: ...to select channel 06 3 Confirm your selection by pressing 2 4 Press MENU to exit Child Lock To set up if password is needed when accessing to channels Press then enter the password the default passwor...

Page 20: ...l position of video V Position To adjust vertical position of video Clock To adjust delay time of clock in order to reduce the noise of picture Phase To adjust delay time of phase in order to reduce t...

Page 21: ...ge 100 240 VAC 50 60 Hz auto switch Display area Full Scan 521 8 mm H x 293 22 mm V 20 5 H x 11 5 V Operating conditions Temperature Humanity Altitude 32 F to 104 F 0 C to 40 C 20 to 70 no condensatio...

Page 22: ...ure may appear dim in a brightly lit room Adjust brightness contrast saturation color and tint referring to the user guide Check the input signal setting No sound Check your audio connections are prop...

Page 23: ...ance Is there no signal in PC mode or HDMI mode The internal temperature of the unit has increased Remove any objects blocking the vent or clean as necessary No CATV reception CATV is connected improp...

Page 24: ...diphenyl ethers PBDE Outer Casing Circuit Board Power Cord Adaptor External Signal Cable LCD Panel Remote Control battery included The circuit board components include printed circuit board and other...

Page 25: ...service 1 For information about receiving service under warranty contact ViewSonic Customer Support You will need to provide your product s serial number 2 To obtain warranted service you will be requ...

Page 26: ......

Reviews: