background image

4

ViewSonic

VP180m    

Quick Installation

To get connected quickly, follow the Quick Installation instructions below. For more information on 
connections to the VP180m see page 5. For information on the wall mount, see page 6. Contact 
ViewSonic or your dealer for an optional Wall Mounting Kit.

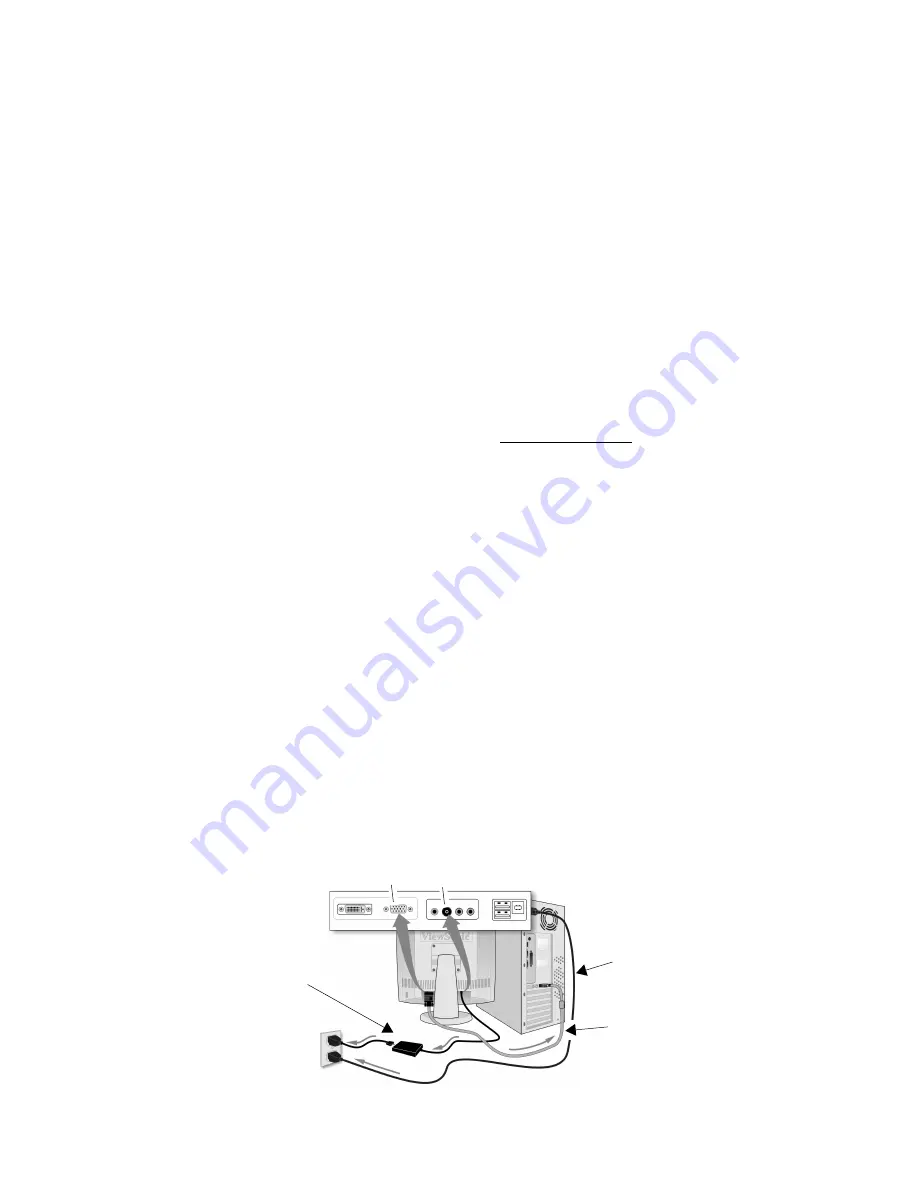
1 Connect video cable

Make sure both the ViewPanel

®

 and 

computer are powered OFF. 

Depending on the signal coming from your 
computer, connect one of the video cables 
(VGA or DVI) that came with your 
VP180m to the back of your computer. 
Connect the other end of the cable to the 
analog and/or the Digital Video Interface 
(DVI) input on the back of the display to 
correspond with the signal of your 
computer(s). If you have both analog and 
digital inputs, see Input Select in Using the 
ViewPanel in this guide to toggle between 
the two ports. 

Macintosh users:

 Models older than G3 

may  require a Macintosh adapter. Attach 
the adapter to the computer and plug the 
video cable into the adapter.

To order a ViewSonic

®

 Macintosh adapter, 

contact ViewSonic 

Customer Support

2 Connect power cord and AC/DC 

adapter

Connect the power and AC/DC adapter 
from the ViewPanel to a properly grounded 
AC outlet.

3 Power-ON ViewPanel and 

computer 

Power-ON the ViewPanel, then power-ON 
the computer. This sequence (ViewPanel 
before computer) is very important.

NOTE: 

Windows


95, 98 or 2000 users may 

receive a message asking them to install the 
VP180m INF file.

4 Insert the ViewSonic Wizard CD 

into the computer’s CD drive.

(1)  Follow the on-screen instructions

If your computer does not have a CD-ROM 
drive, see “Customer Support."
(2)  Wait for the CD-ROM to auto-start.

NOTE:

 If the CD-ROM does not auto-start: 

double-click on the CD-ROM icon in the 
Windows Explorer, then double-click on 

install.exe.

(3)  Follow the on-screen instructions.

5 Windows users: Set the timing 

mode (resolution and refresh 
rate)

Example: 

1280 X 1024 @ 60 Hz.

For instructions on changing the resolution 
and refresh rate, see the user guide for your 
computer's graphics card. 

Installation is complete.


Enjoy your new 

VP180m ViewPanel.


To be best prepared for any future customer 
service needs, write the serial number in 

"For Your Records"

 on page 2. (See back of 

ViewPanel.)
To register your product go online to 

www.viewsonic.com

.

The ViewSonic Wizard CD-ROM also 
provides an opportunity for you to print the 
registration form which you may mail or 
fax to ViewSonic.

Power cord with

to computer

Wall outlet

Computer

VGA video cable

power cord 

VGA (analog)

 DC IN (Power)

AC/DC adapter

Summary of Contents for ViewPanel VP180m

Page 1: ...r Guide Guide de l utilisateur Bedienungsanleitung Gu a del usuario Guida dell utente Guia do usu rio Anv ndarhandbok K ytt opas Podr cznik u ytkownika Full 18 1 Diagonal Viewable Screen VP180m ViewPa...

Page 2: ...onnections 5 Installation Wall Mount optional 6 Using the ViewPanel Setting the Timing Mode 7 OSD and Power Lock Settings 7 Adjusting the Screen Image 8 Other Information Specifications 15 Troubleshoo...

Page 3: ...ial or the performance or use of this product In the interest of continuing product improvement ViewSonic Corporation reserves the right to change product specifications without notice Information in...

Page 4: ...ntegrated Color Management assures accurate on screen colors Precautions For best viewing conditions sit at least 18 from the ViewPanel AVOID TOUCHING THE SCREEN WITH YOUR FINGERS Oils from the skin a...

Page 5: ...properly grounded AC outlet 3 Power ON ViewPanel and computer Power ON the ViewPanel then power ON the computer This sequence ViewPanel before computer is very important NOTE Windows 95 98 or 2000 use...

Page 6: ...98 or 95 OSR 2 1 operating system is installed in your computer you can plug any USB device mouse keyboard etc to any of the downstream rectangular ports as shown below Audio Plug an external audio s...

Page 7: ...he power is turned off and then disconnect the DC power cord from the back of the ViewPanel 2 Lie the ViewPanel face down on a flat surface Be sure nothing sharp can scratch or puncture the LCD surfac...

Page 8: ...the Windows desktop Properties Settings Desktop Area or Screen Area for Windows 98 and newer set the resolution 2 Set the refresh rate See your graphic card s user guide for instructions WARNING Do no...

Page 9: ...rophone MENU NAVI Navigation button does the following also see page 8 1 Displays the Main Menu 2 Scrolls through menu options 3 Acts as a Return Enter key on the keyboard to display a control screen...

Page 10: ...xit and press the NAVI button The following tips may help you optimize your display Adjust your computer s graphic card so that it outputs a video signal 1280 x 1024 60Hz to the VP180m Look for instru...

Page 11: ...Image Adjust sizes and centers the screen image automatically Contrast adjusts the difference between the image background black level and the foreground white level Brightness adjusts background blac...

Page 12: ...nd richer red 5400K Adds green to the screen image for a darker color 5000K Adds blue and green to the screen image for a darker color User Individual adjustments for red R green G and blue B 1 To hig...

Page 13: ...d s user guide for instructions on changing the resolution and refresh rate vertical frequency NOTE VESA 1280 x 1024 60Hz recommended means that the resolution is 1280 x 1024 and the refresh rate is 6...

Page 14: ...t first Sharpness adjusts the clarity and focus of the screen image Scaling adjusts the video input signal to the screen size using the following options Fill All Fill Aspect Ratio or 1 1 Setup Menu S...

Page 15: ...ntrol screens OSD Timeout sets the length of time the on screen display screen is displayed For example with a 30 second setting if a control is not pushed within 30 seconds the display screen disappe...

Page 16: ...85 Hz 832 x 624 75 Hz 720 x 400 70 Hz 640 x 480 60 67 72 75 Hz 640 x 400 70 Hz 640 x 350 70 Hz Power Voltage 90 264 VAC 50 60 Hz auto switch 19V DC 4 7A Display area Full Scan 359 0mm H x 287 2mm V 1...

Page 17: ...output port on the back of the computer If the other end of the video cable is not attached permanently to the ViewPanel tightly secure it to the ViewPanel Adjust brightness and contrast If you are u...

Page 18: ...om support T 800 688 6688 F 909 468 1202 T 800 688 6688 F 909 468 1202 service us viewsonic com service ca viewsonic com United Kingdom viewsoniceurope com T 0800 833 648 F 01293 643910 service eu vie...

Page 19: ...soft lint free cloth and wipe the screen To clean the case 1 Use a soft dry cloth 2 If still not clean apply a small amount of a non ammonia non alcohol based mild non abrasive detergent onto a clean...

Page 20: ...pport You will need to provide your product s serial number 2 To obtain service under warranty you will be required to provide a the original dated sales slip b your name c your address d a descriptio...

Page 21: ...t will appear on the outer sheath or on the insulation of one of the inner conductors AC PLUG CORD PRECAUTIONS FOR THE UNITED KINGDOM FOR YOUR SAFETY PLEASE READ THE FOLLOWING TEXT CAREFULLY IF THE FI...

Page 22: ...equipment into an outlet on a circuit different from that to which the receiver is connected Consult the dealer or an experienced radio TV technician for help FCC Warning To assure continued FCC compl...

Page 23: ...22 ViewSonic VP180m NOTES...

Page 24: ...ViewSonic Corporation...

Reviews: