background image

E
N
G

L

I

S
H

4

ViewSonic

VP150m    

Quick Installation

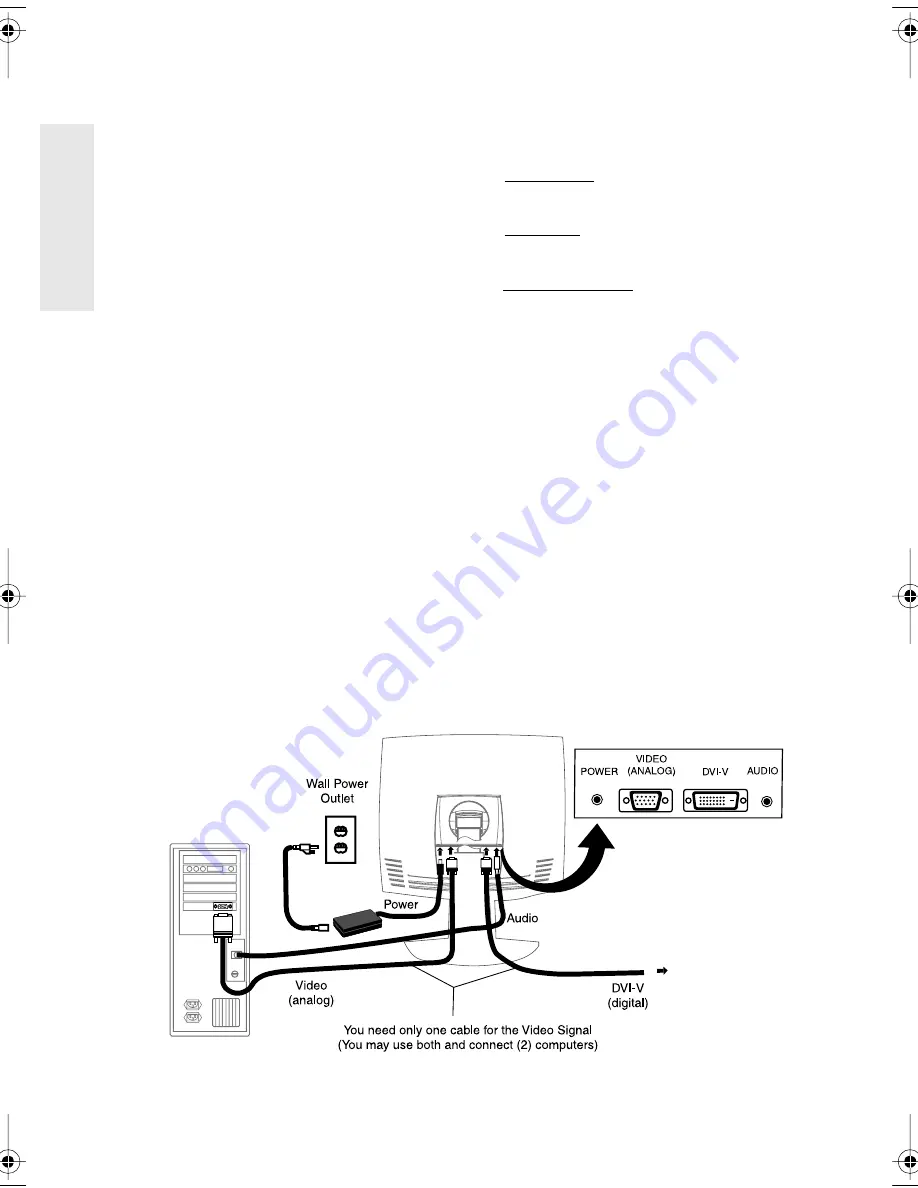
1 Connect video and audio cables

Make sure both the ViewPanel

®

 and 

computer are powered OFF. 

• Rotate the ViewPanel 90-degrees clockwise 

for easy access to the connections.

• Connect a video cable (either digital or 

analog) to the computer, then to the 
ViewPanel. (Refer to the illustration below.)

Macintosh users:

 Models older than G3 

require a Macintosh adapter. Attach the 
adapter to the computer and plug the video 
cable into the adapter.

• Connect the audio cable to the computer, 

then to the ViewPanel.

To order a ViewSonic

®

 Macintosh adapter, 

contact ViewSonic 

Customer Support

2 Connect power cord and AC/DC 

adapter

Connect the power cord and AC/DC adapter 
from the ViewPanel to a properly grounded 
AC outlet. 

3 Power-ON ViewPanel and 

computer 

Power-ON the ViewPanel, then power-ON 
the computer. This sequence (ViewPanel 
before computer) is very important.

NOTE: 

Windows


95, 98 or 2000 users may 

receive a message asking them to install the 
VP150m INF file.

4 Install INF and ICM files

For CD-ROM: Insert your ViewSonic     
CD-ROM, select “Monitor Drivers,” and 
follow the on-screen instructions.
For diskette: Insert your diskette and run 

install.exe. 

Follow the on-screen 

instructions.

5 Windows users: Set the timing 

mode (resolution and refresh 
rate)

Example: 

1024 X 768 @ 60 Hz.

For instructions on changing the resolution 
and refresh rate, see the user guide for your 
computer's graphics card. 

Installation is complete. 

Enjoy your new VP150m ViewPanel.


To be best prepared for any future customer 
service needs: 

• Write the serial number (see back of the 

ViewPanel) in 

"For your Records" 

on page 2 

of this guide. 

• Register the warranty of your ViewPanel on 

the Internet at:


www.viewsonic.com

VP150m.book  Page 4  Monday, June 26, 2000  5:06 PM

Summary of Contents for ViewPanel VP150m

Page 1: ...gsanleitung Intl Spanish Italian Brazilian Portuguese Swedish Russian Polish Japanese Traditional Chinese Taiwan Simplified Chinese China Korean Arabic With Landscape Portrait Display Modes Full 15 0...

Page 2: ...ptional 6 Landscape Portrait Modes 6 To Raise and Lower the display 6 Using the ViewPanel Setting the Timing Mode 7 Adjusting the Screen Image 8 LCD Adjust Sub menu 11 Miscellaneous Sub menu 12 Other...

Page 3: ...Disclaimer ViewSonic Corporation shall not be liable for technical or editorial errors or omissions contained herein nor for incidental or consequential damages resulting from furnishing this mate ria...

Page 4: ...ou install both files To install these files see the Quick Installation section Precautions For best viewing conditions sit at least 18 from the ViewPanel AVOID TOUCHING THE SCREEN WITH YOUR FINGERS O...

Page 5: ...3 Power ON ViewPanel and computer Power ON the ViewPanel then power ON the computer This sequence ViewPanel before computer is very important NOTE Windows 95 98 or 2000 users may receive a message as...

Page 6: ...wel or blanket 3 Remove the plastic cover from the back panel to expose the screw heads 4 Remove the 4 screws 5 Attach the ViewPanel to the wall using the wall mounting kit and instructions It is easi...

Page 7: ...lly As you face the front of the display take hold of each side of the head and pull up or down The panel should move easily Special slots have been added to the front panel of your VP150m to enable y...

Page 8: ...e the OnView controls pages 10 14 to adjust the screen image The recommended timing mode for this ViewPanel is VESA 1024 x 768 60 Hz To set the Timing Mode 1 Set the resolution Right click on the Wind...

Page 9: ...the next page and are further explained on pages 10 14 Main Menu with OnView controls The status line at the bottom of the menu shows what to do next Button 1 Exits the menu Button 2 Selects the highl...

Page 10: ...elp you optimize your display Adjust your computer s graphic card so that it outputs a video signal 1024 x 768 60Hz to the VP150m Look for instructions on changing the refresh rate in your graphic car...

Page 11: ...uto Contrast Contrast adjusts the difference between the image background black level and the foreground white level Brightness adjusts the background black level of the screen image ViewMatch Color S...

Page 12: ...d Spanish Control Explanation PC Mac selects the type of computer that will be used with the ViewPanel Press button 2 then select PC or Mac H Size Horizontal Size adjusts the horizontal size width of...

Page 13: ...ft to filter the midrange frequencies for a softer sound Select Mute to turn off the sound NOTE The up and down buttons are hot keys You can press these keys anytime to immediately display the Volume...

Page 14: ...izontal scan and refresh rate coming from the graphics card in your computer as shown below For further information refer to your graphics card user guide Recall returns control settings back to their...

Page 15: ...720 x 400 70 Hz 640 x 350 70 Hz Power Voltage 90 264 VAC 50 60 Hz auto switch Display area Full Scan 304 1mm H x 228 1 mm V 12 0 H x 9 0 V Operating conditions Temperature Humidity Altitude 32 F to 10...

Page 16: ...trast If you are using an Macintosh older than G3 you need a Macintosh adapter Horizontal lines streak across the screen Set the refresh rate vertical frequency to 60 Hz See your graphic card user gui...

Page 17: ...t Country Region T Telephone F FAX Email United States Canada T 800 688 6688 F 909 468 1202 T 800 688 6688 F 909 468 1202 vstech viewsonic com vstech viewsonic com United Kingdom T 0800 833 648 F 0044...

Page 18: ...a clean soft lint free cloth and wipe the screen To clean the case 1 Use a soft dry cloth 2 If still not clean apply a small amount of a non ammonia non alcohol based mild non abrasive detergent onto...

Page 19: ...omer Support You will need to provide your product s serial number 2 To obtain service under warranty you will be required to provide a the original dated sales slip b your name c your address d a des...

Page 20: ...plug which is marked with the letter L or coloured RED IMPORTANT NOTICE CONCERNING POWER CORD SELECTION The power cord set for this unit has been enclosed and has been selected according to the count...

Page 21: ...TV technician for help FCC Warning To assure continued FCC compliance the user must use grounded power supply cord and the provided shielded video interface cable with bonded ferrite cores If a BNC c...

Page 22: ...ViewSonic Corporation 381 Brea Canyon Road Walnut CA 91789 Tel 909 869 7976 Tel 800 688 6688 Fax 909 468 1202 7 2000...

Reviews: