background image

10

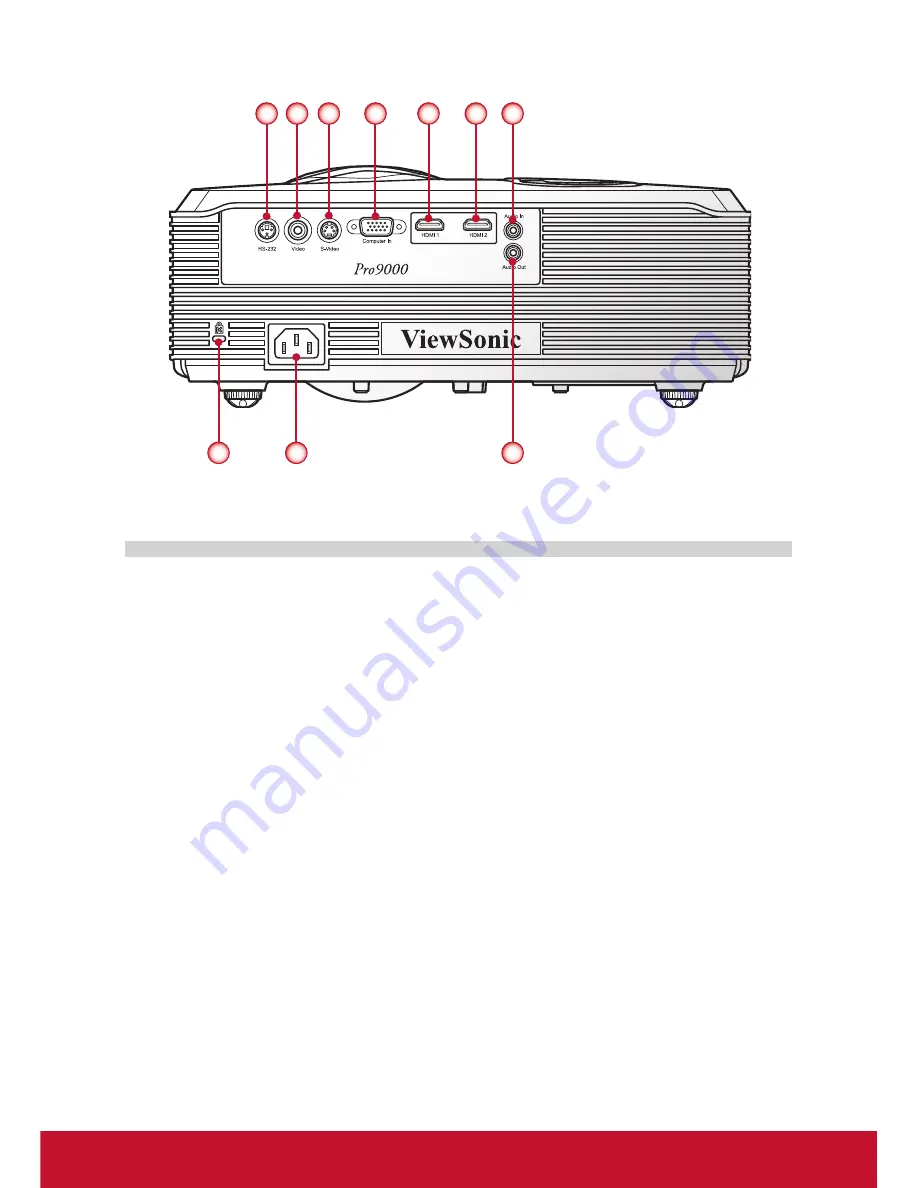
1.  RS232 Connector
2.  Composite Video Input Connector
3.  S-Video Connector
4.  VGA Connector (PC analog signal/HDTV/component video input)
5.  HDMI 1 Connector
6.  HDMI 2 Connector
7.  Audio Input Connector
8.  Kensington™ Lock Port
9.  Power Socket
10. Audio Output Connector

3

2

1

4

5

7

8

9

Connection Ports

6

10

Summary of Contents for Pro9000

Page 1: ...ng your product for future service Warranty information contained in this User Guide will describe your limited coverage from ViewSonic Corporation which is also found on our web site at http www viewsonic com in English or in specific languages using the Regional selection box in the upper right corner of our website Antes de operar su equipo lea cu idadosamente las instrucciones en este manual M...

Page 2: ... separation between the equipment and receiver y y Connect the equipment into an outlet on a circuit different from that to which the receiver is connected y y Consult the dealer or an experienced radio TV technician for help Warning You are cautioned that changes or modifications not expressly approved by the party responsible for compliance could void your authority to operate the equipment For ...

Page 3: ...sult an electrician for replacement of the obsolete outlet 10 Protect the power cord from being walked on or pinched particularly at plugs Convenience receptacles and the point where they exit from the unit Be sure that the power outlet is located near the unit so that it is easily accessible 11 Only use attachments accessories specified by the manufacturer 12 Use only with the cart stand tripod b...

Page 4: ...dmium Cd 0 01 0 01 Hexavalent Chromium Cr6 0 1 0 1 Polybrominated biphenyls PBB 0 1 0 1 Polybrominated diphenyl ethers PBDE 0 1 0 1 Certain components of products as stated above are exempted under the Annex of the RoHS Directives as noted below Examples of exempted components are 1 Lead in glass of cathode ray tubes electronic components fluorescent tubes and elec tronic ceramic parts e g piezoel...

Page 5: ...of this document may be copied reproduced or transmitted by any means for any purpose without prior written permission from ViewSonic Corporation Product Registration To meet your future needs and to receive any additional product information as it becomes available please register your product on the Internet at www viewsonic com The ViewSonic Wizard CD ROM also provides an opportunity for you to...

Page 6: ... please contact your sales dealer This projector is equipped with a grounding type AC line plug Please ensure that your outlet fits the plug Do not defeat the safety purpose of this grounding type plug We highly recommend using a video source device also equipped with a grounding type AC line plug to prevent signal interference due to voltage fluctuations Ground Ground Ground Ground For Australia ...

Page 7: ...orts 10 Remote Control 11 Installation 13 Connecting to Computer Notebook 13 Connecting to Video Sources 14 Powering On Off the Projector 15 Powering On the Projector 15 Powering off the projector 16 LED Indicator Messages 16 Adjusting the Projected Image 17 Adjusting the Projector s Height 17 Adjusting the Projector s Focus 18 Adjusting Projection Image Size 18 User Controls 21 Using the Control ...

Page 8: ...ith lens cap Introduction Package Overview Due to different applications in each Country some regions may have different accessories HDMI Cable Soft Carrying Bag Remote Control AAA AAA OFF ON POWER Default User1 User2 Over Scan Magnify Lock RGB CMY Color Temp Gamma Freeze Blank Pattern Color mode Sleep Timer S Video Video PC Source HDMI1 HDMI2 Aspect Eco mode Auto Sync Menu Exit Keystone Memory Vo...

Page 9: ... Receiver 2 Zoom Lens Lens Cover 3 Control Panel 4 Zoom Ring 5 Focus Ring Main Unit 4 8 1 2 6 Connectors Panel 7 Kensington Lock 8 Power Socket 9 Security Bar 10 Rubber Elevator Feet Front View Rear View Bottom View 10 3 6 10 5 7 9 ...

Page 10: ...9 Control Panel 1 Power key Power LED 2 Top IR Receiver 3 Four directional select keys Keystone 4 Source key 5 Enter key 6 Lamp LED 7 Temp Temperature LED 8 Menu Exit key 1 6 3 4 7 5 8 2 ...

Page 11: ...nector 3 S Video Connector 4 VGA Connector PC analog signal HDTV component video input 5 HDMI 1 Connector 6 HDMI 2 Connector 7 Audio Input Connector 8 Kensington Lock Port 9 Power Socket 10 Audio Output Connector 3 2 1 4 5 7 8 9 Connection Ports 6 10 ...

Page 12: ...ources or select the input source manually 7 HDMI 1 Switch to HDMI 1 source 8 HDMI 2 Switch to HDMI 2 source 9 Aspect Select the display aspect ratio Auto 4 3 16 9 Wide Anamorphic 10 Eco mode Select to operate under economic mode Press it again to switch to normal mode 11 Keystone Adjust image distortion vertically this can help make the image rectangular 12 Volume Keys Increase decrease audio vol...

Page 13: ...2 color mode setting 23 Overscan Adjust overscan level This function is only available in Video signal 24 Magnify Zoom in and out the image 25 Lock Keypad lock Lock the keypad function in Projector control panel excluding the Power key 26 RGBCMY Enter the setting page of color management 27 Color Temp Select the color temperature 28 Gamma Select the Gamma applied 29 Freeze Press to freeze the imag...

Page 14: ... Connecting to Computer Notebook Installation Due to the difference in applications for each country some regions may have different accessories Optional accessory Notebook Computer Power socket 1 2 3 2 4 5 4 VGA to DVI A Cable 5 Audio Cable ...

Page 15: ...e Due to the difference in applications for each country some regions may have different accessories Optional accessory 4 VGA to HDTV RCA Cable 5 Audio Cable 6 Audio Cable DVD player Set top box HDTV receiver S Video output DVD player Audio output 1 5 3 4 2 6 Power socket ...

Page 16: ...essing button on the control panel The Power LED will turn blue 4 Turn on your source that you want to display on the screen computer note book video player etc The projector will detect the source automatically and will display on the screen 5 If you connected multiple sources at the same time press the Source button to switch between inputs Powering On Off the Projector 2 1 ...

Page 17: ... safe to unplug the power cord LED Indicator Messages Message Lamp LED Red Temp LED Red Power LED Blue Power Plug Flash On Off 100ms one time Flash On Off 100ms one time Flash On Off 100ms one time Standby Flash On 1sec Off 6sec Power Button On Always On Power Button Off Cooling completed Standby Mode off Fimware download Always On off Always On Thernal Sensor error Always On Always On Fan Lock er...

Page 18: ... image height y y To raise the image Use screw in foot to raise the image to the desired height angle and fine tune the display angle y y To lower the image Use screw in foot to lower the image to the desired height angle and fine tune the display angle Adjusting the Projected Image 1 2 Rubber Feet ...

Page 19: ...e when the projector is positioned at a desired distance from the screen Example If the projector is 2 5 m from the screen good image quality is possible for image sizes between 63 and 75 Max screen size 75 Min screen size 63 A B C Follow the figure the space of 109 cm height is required when located at 2 5 m distance Height 109 cm From base to top of image Height 91 cm 2 5 m Desired Distance Figu...

Page 20: ...4 187 X 105 122 3 75 167 X 94 109 90 200 X 113 131 3 2 80 178 X 100 116 96 213 X 120 139 3 5 88 194 X 109 127 105 233 X 131 152 3 8 95 211 X 119 138 114 253 X 143 165 4 100 222 X 125 145 120 267 X 150 174 4 2 105 233 X 131 152 126 280 X 158 183 4 5 113 250 X 140 163 136 300 X 169 196 4 8 120 267 X 150 174 145 320 X 180 209 5 125 278 X 156 181 151 333 X 188 218 Zoom Ratio 1 2x How to get a preferre...

Page 21: ... Distance m Top cm Diagonal inch A W cm x H cm Max zoom B Min zoom C From base to top of image D 30 66 x 37 1 0 1 2 43 40 89 x 50 1 3 1 6 58 50 111 x 62 1 7 2 72 60 133 x 75 2 2 4 87 70 155 x 87 2 3 2 8 101 80 117 x 100 2 7 3 2 116 90 199 x 112 3 0 3 6 130 100 221 x 125 3 3 4 0 144 110 247X 139 3 7 4 4 161 120 266 x 149 4 4 8 173 130 287 x 161 4 3 5 2 187 140 311 x 175 4 7 5 6 204 150 332 X187 5 6...

Page 22: ...tem Source Select an input signal Four Directional Select Keys 1 Use to select items or make adjustments to your selection 2 act as short hot keys for Keystone adjustment 3 act as a short hot key for auto sync adjustment 4 act as a short hot key for panel key lock function Lamp LED Indicate the projector s lamp status Temp LED Indicate the projector s temperature status ...

Page 23: ...ng a selection on a particular page press the button to enter sub menu 3 Use the buttons to select the desired item and adjust the settings by the buttons 4 If the setting has icon you could press the button to enter another sub menu Press the Menu button to close the sub menu after adjustment 5 After adjusting the settings press the Menu button to go back to the main menu 6 To exit press the Menu...

Page 24: ...50 Gamma 0 7 VIDEO AUDIO Frequency 0 100 Phase 0 100 H Position 10 10 V Position 10 10 Saturation 0 100 Sharpness 0 15 Tint 0 100 Overscan 0 10 Noise Reduction Off Low Mid High Volume 0 100 Mute On Off SETTING V Keystone 15 15 Aspect Ratio Auto 4 3 16 9 Wide Anamorphic Projection Front Table Front Ceiling Rear Table Rear Ceiling Sleep Timer Off 30 min 1hr 2hr 3hr 4hr 8hr 12hr Power Saving Off 5 Mi...

Page 25: ...OSD Setting Menu Position Top Left Bottom Left Center Top Right Bottom Right OSD Timeout 20 25 30 35 40 45 50 55 60 OSD Transparency 0 10 20 30 40 50 60 70 80 90 Closed Caption Off CC1 CC2 CC3 CC4 T1 T2 T3 T4 PIP PIP Off On PIP Source Video S Video PIP Location Top Left Bottom Left Top Right Bottom Right Size Large Small Others Status Message On Off Digital Zoom 1 0X 1 2X 1 4X 1 6X 1 8X 2 0X 4 0X ...

Page 26: ...preferred Game Increase the brightness and response time level for enjoying video games Sport Use high contrast display for clear cut images ideal for viewing sports events User1 User2 User defined settings Brightness Adjust the brightness of the image Press the button to darken image Press the button to lighten the image Contrast The contrast controls the degree of difference between the lightest...

Page 27: ... select the item To manually set the setting press to enter the submenu Refer to page 27 Color Management Change the intensity of the colors Press to enter the submenu Refer to page 28 Gamma Affects the representation of dark scenery With greater gamma value dark scenery looks brighter Press the button to decrease gamma Press the button to increase gamma ...

Page 28: ...e screen looks colder at lower temperature the screen looks warmer Select User if you want to customize the color temperature settings Red Gain Press the buttons to lighten or darken the red color Green Gain Press the buttons to lighten or darken the red color Blue Gain Press the buttons to lighten or darken the blue color ...

Page 29: ...tton to increase the amount of red in the image Saturation Adjust a video image from black and white to fully saturated color Press the button to decrease the amount of saturation in the image Press the button to increase the amount of saturation in the image Gain Adjust the gain setting of the projector Lower gain reflects light more uniformly from the center to the edge of the viewing area Press...

Page 30: ...nt of saturation in the image Tint Adjust the color balance of red and green Press the button to decrease the tint level Press the button to increase the tint level Overscan Overscan function removes the noise in a video image Overscan the image to remove video encoding noise on the edge of video source Noise Reduction Press the or button to reduce the noise level Volume Adjust the volume level Pr...

Page 31: ... If the image appears to be unstable or flickers use this function to correct it H Position Press the button to move the image left Press the button to move the image right V Position Press the button to move the image down Press the button to move the image up H Position and V Position ranges will depend on input source Sharpness Adjust the sharpness of the image See page 29 Volume Adjust the vol...

Page 32: ... non linear scaling formula to transfer conventional 4 3 video input sources to an optimum16 9 widescreen Anamorphic This should work with an external fisheye lens transferring the 2 35 1 movie screen in 16 9 video format to display a real 2 35 1 movie wide screen Projection Adjust the picture to match the orientation of the projector Front Table This is the default selection The image is projecte...

Page 33: ...lost Off The projector will only search current input connection Signal Type Specify the input source that you wish to project Auto Automatically detect the input signal type RGB For VGA signal YPbPr For component signal ECO Mode Choose On to dim the projector lamp which will lower power consumption and extend the lamp life Choose Off to return to normal mode High Altitude Use this function to all...

Page 34: ...he password Refer to page 35 Blank Screen Use this feature to select the screen color when Blank button is activated in Remote Control Available options Black Red Green Blue Cyan Yellow Magenta White OSD Settings Configure the on screen display OSD settings Refer to page 36 Closed Caption Use this function to enable close caption and activate the closed caption menu Available options Off CC1 CC2 C...

Page 35: ...n time Factory Default Choose Yes to return the parameters on all menus to the factory default settings When Factory Default activated certain customer setting value will be kept and not be changed including Projection in Setting Language in Option Keystone in Setting User1 User2 in Picture Color Mode Password in Option High Altitude in Setting Memory 1 4 in Setting ...

Page 36: ...ssword and Confirm Password match a Password setting is completed message appears on the screen Change Password y y Select Change Password and press Enter to enter the submenu y y Enter a new password using the number buttons on the remote control then press Enter to confirm it y y Enter the new password again and press Enter to confirm it If the incorrect password is entered for 3 times the proje...

Page 37: ...enu is displayed on the bottom left of the screen Center The OSD menu is displayed on the center of the screen Top Right The OSD menu is displayed on the top right of the screen Bottom Right The OSD menu is displayed on the bottom left of the screen OSD Timeout Set the duration where the OSD menu stays visible on the screen OSD Transparency Set the OSD transparency level ...

Page 38: ...CVBS S Video Component HDMI1 HDMI2 PIP Location Specify the smaller window location on the screen Top Left The smaller window is displayed on the top left of the screen Bottom Left The smaller window is displayed on the bottom left of the screen Top Right The smaller window is displayed on the top right of the screen Bottom Right The smaller window is displayed on the bottom left of the screen PIP...

Page 39: ...images Press the Magnify button on the remote control to magnify the image of the projection screen When Digital Zoom is larger than x1 0 then users can use the 4 direction buttons on the remote control to adjust the magnified image position Adjusting the magnified image position is only available in remote control not available in Project Control Panel Pattern Display a test pattern ...

Page 40: ...ed on Partial scrolling or incorrectly displayed image Press the left direction button on the control panel or the Auto Sync button on the remote control to auto synchronizing for the analog PC signal y y If you are using a PC For Windows 95 98 2000 XP Windows 7 1 Open the My Computer icon the Control Panel folder and then double click on the Display icon 2 Select the Settings tab 3 Verify that yo...

Page 41: ... Brand Function Keys Acer Fn F5 Asus Fn F8 Dell Fn F8 Gateway Fn F4 IBM Lenovo Fn F7 HP Compaq Fn F4 NEC Fn F3 Toshiba Fn F5 Mac Apple System Preference Display Arrangement Mirror display y y If you experience difficulty changing resolutions or your monitor freezes restart all equipment including the projector The screen of the Notebook or PowerBook computer is not displaying your presentation Som...

Page 42: ...e projector will show the best image in 16 9 format on projector side If you play 4 3 format DVD title please change the format as 4 3 in projector OSD If the image is still stretched you will also need to setup the display format as 16 9 wide aspect ratio type on your DVD player Image is too small or too large Move the projector closer to or further from the screen Press Menu on the control panel...

Page 43: ...42 Projector Problems The projector stops responding to all controls If possible turn off the projector then unplug the power cord and wait at least 20 seconds before reconnecting power ...

Page 44: ...43 y y Power off confirm y y Fan lock error y y No source found y y Out of display range y y Mute y y Thermal sensor error On Screen Messages ...

Page 45: ...0 60 37 9 800x600 72 48 1 800x600 75 46 9 800x600 85 53 7 XGA 1024x768 60 48 4 1024x768 70 56 5 1024x768 75 60 0 1024x768 85 68 7 1080P Native 1920x1080 60 67 5 WXGA 1280x800 60 49 6 SXGA Compressed 1280x1024 60 64 0 1280x1024 75 80 0 SXGA Compressed 1400x1050 60 65 3 Mac II Apple 640 480 67 35 832x624 75 49 1 1152x870 75 68 7 Others 1280x960 60 60 1280x720 60 44 8 1440x900 60 55 9 1600x1200 60 75...

Page 46: ...5 1080p 1920x1080 50 56 26 1080p 1920x1080 30 74 25 1080p 1920x1080 25 74 25 1080p 1920x1080 24 74 25 1080i 1920x1080 60 33 8 1080i 1920x1080 50 28 1 720p 1280x720 60 45 720p 1280x720 50 37 5 480p 720x480 60 31 5 480i 720x480 60 15 4 576i 720x576 50 15 6 576p 720x576 50 31 3 ...

Page 47: ... Re sync input source timing 0 1 3 Enter Enter to selected item 0 1 4 Exit Exit OSD 0 1 5 VGA Switch to VGA source 0 1 6 S Video Switch to S Video source 0 1 7 Video Switch to Video source 0 1 8 HDMI2 Switch to HDMI2 source 0 1 9 16 9 Switch to aspect ratio 16 9 0 2 0 4 3 Switch to aspect ratio 4 3 0 2 1 Anamorphic Switch to aspect ratio Anamorphic mode 0 2 2 Wide Switch to aspect ratio Wide mode ...

Page 48: ...ne adjustment int negative direction 0 4 2 Zoom Digital zoom in out 0 4 3 Color RGB Color RGB gain control 0 4 4 Language Switch language 0 4 5 HDMI1 Switch to HDMI 1 source 0 4 6 ECO mode Set unit operating at economic mode 0 4 7 Get ECO Status Economic mode query Read back the value 0 Eco mode off 1 Eco mode on 0 4 8 Get LD Status Laser didode status query Read back the value 0 LD is off 1 LD is...

Page 49: ...which are used to attach a mount to the projector meet the following specifications y y Screw type M3 y y Diameter 3 mm Please note that damage resulting from incorrect installation will invalidate the warranty Ceiling Mount Installation 14 30 111 65 118 88 55 00 82 30 82 30 55 00 ...

Page 50: ...6 98mm tele Projection screen size 38 150 Diagonal Projection distance 1m to infinity mechanism travel 1 5m to 5m full optical performance range Throw ratio 1 5 1 8 Horizontal scan rate 15 k 100 kHz Vertical refresh scan rate 24 85 Hz Keystone correction 15 degrees 7 degrees 1600x1200 input Weight 4 26 kgs 9 38 lbs Dimensions W x D x H 321 0mm W x 260 2mm D x 133 3 H mm 12 64 W x 10 24 D x 5 26 H ...

Page 51: ...ut x 1 y y Audio output x 1 Standard package contents y y AC power cord x 1 y y VGA cable x 1 y y Soft carrying bag x 1 y y ViewSonic Wizard DVD x 1 y y Quick start card x 1 y y Warranty card x 1 y y Remote Control x 1 y y AAA batteries x 2 Design and specifications are subject to change without prior notice ...

Page 52: ...ca Columbia www viewsonic com la T 01800 9 157235 soporte viewsonic com Latin America Mexico www viewsonic com la T 001 8882328722 soporte viewsonic com Renta y Datos 29 SUR 721 COL LA PAZ 72160 PUEBLA PUE Tel 01 222 891 55 77 CON 10 LINEAS Electroser Av Reforma No 403Gx39 y 41 97000 Mérida Yucatán Tel 01 999 925 19 16 Other places please refer to http www viewsonic com la soporte index htm Mexico...

Page 53: ...ys for the original lamp from the date of the first consumer purchase Europe One 1 year warranty for all parts excluding the lamp one 1 year for labor and ninety 90 days for the original lamp from the date of the first consumer purchase Other regions or countries Please check with your local dealer or local ViewSonic office for the warranty information Lamp warranty subject to terms and conditions...

Page 54: ...product damages based upon inconvenience loss of use of the product loss of time loss of profits loss of business opportunity loss of goodwill interference with business relationships or other commercial loss even if advised of the possibility of such damages 2 Any other damages whether incidental consequential or otherwise 3 Any claim against the customer by any other party Effect of state law Th...

Page 55: ... service charges How to get service For information about receiving service under warranty contact ViewSonic Customer Support Please refer to the attached Customer Support page You will need to provide your product s serial number so please record the product information in the space provided below on your purchase for your future use Please retain your receipt of proof of purchase to support your...

Page 56: ...obales com Cuernavaca Compusupport de Cuernavaca SA de CV Francisco Leyva 178 Col Miguel Hidalgo C P 62040 Cuernavaca Morelos Tel 01 777 3180579 01 777 3124014 E Mail aquevedo compusupportcva com Distrito Federal QPLUS S A de C V Av Coyoacán 931 Col Del Valle 03100 México D F Tel 01 52 55 50 00 27 35 E Mail gacosta qplus com mx Guadalajara Jal SERVICRECE S A de C V Av Niños Héroes 2281 Col Arcos S...

Page 57: ......

Reviews: