background image

14


2.7. Content configuration 

– AppStart


User can assign the URL and App after system start up.


1.  Click on the 

Advanced 

button. The advanced configuration menu will be


launched. (Fig. 2.6.1)


2.  Click on 

Content

, and then click 

AppStart

.


3.  Enter the valid URL of HTML/SMIL in AppStart. (Fig. 2.7.1)


4.  Auto run can be disabled from here. Auto run will automatically be 

enabled when content is played.


In most cases, the network needs to be re-configured on site, so this 
prevents the device from starting playback automatically when powered 
up for the first time on-site.


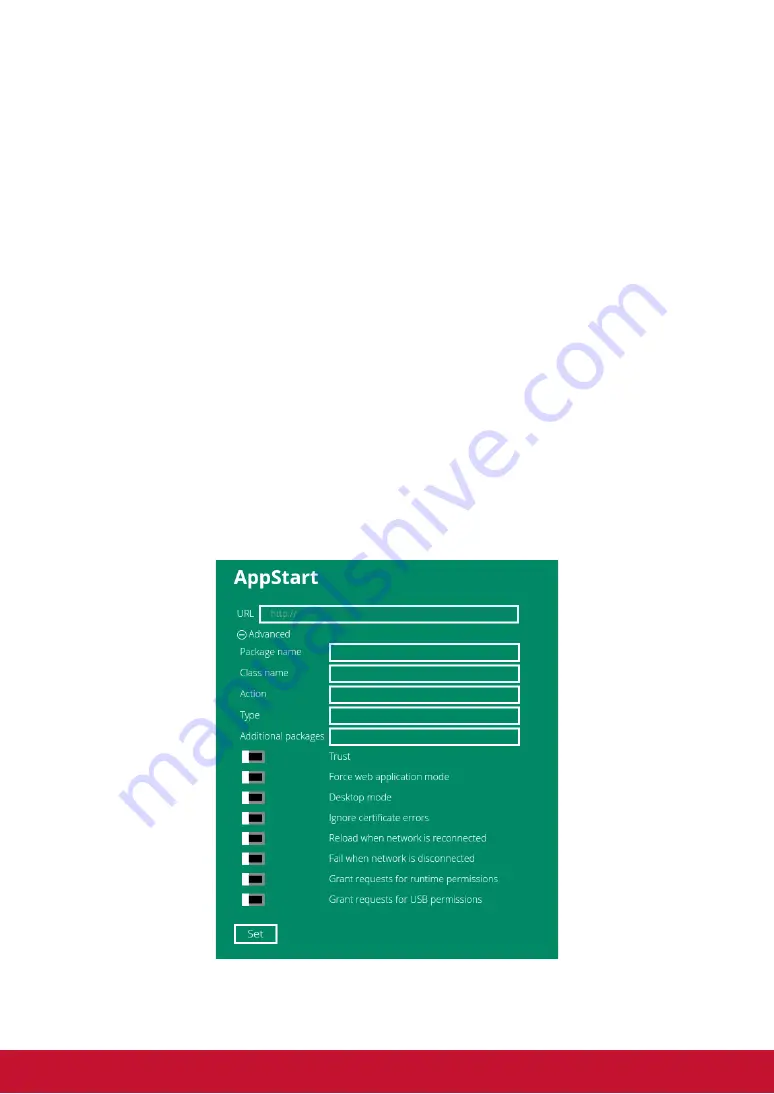
5.  The Advanced option is used for the 3rd-party App configurations only.


Trust:  

Switch to

 Enabled 

to set whether the content can access sensitive data: 

such as intent extras, client credentials, access token..., etc.


Desktop mode:  

Switch to

 Enabled

 to force player to play content in Desktop 

mode. Please note: not all the contents are created for Desktop mode, please 
ask your content provider for details. 

Ignore certificate errors:  

Switch to

 Enabled

 to ignore the certificate on HTML5 

contents; if there is a certificate on HTML5 content, it will cause a playback error. 

Reload when network is reconnected: 

Switch to

 Enabled 

to reload web page 

as soon as network connection becomes available. 

Trigger failover when network is disconnected:

 Switch to

 Enabled 

to


load 

failover content when network is disconnected. 


 (Fig. 2.7.1)


Summary of Contents for NMP589-W

Page 1: ...t for future service Warranty information contained in this User Guide will describe your limited coverage from ViewSonic Corporation which is also found on our web site at http www viewsonic com in E...

Page 2: ...d to exceeding the world s expectations for technological evolution innovation and simplicity At ViewSonic we believe that our products have the potential to make a positive impact in the world and we...

Page 3: ...enna Increase the separation between the equipment and receiver Connecttheequipmentintoanoutletonacircuitdifferentfromthattowhichthereceiveris connected Consult the dealer or an experienced radio TV t...

Page 4: ...r the Annex III of the RoHS2 Directives as noted below Examples of exempted components are 1 Mercury in cold cathode fluorescent lamps and external electrode fluorescent lamps CCFL and EEFL for specia...

Page 5: ...this document may change without notice No part of this document may be copied reproduced or transmitted by any means for any purpose without prior written permission from ViewSonic Corporation Produ...

Page 6: ...gs 10 2 6 Player information 11 2 7 Content configuration AppStart 12 2 8 Content configuration FailSafe 13 2 9 Content configuration EasyPlay 14 2 10 Display settings 16 2 11 Sound settings 20 2 12 S...

Page 7: ...v 3 Content Management 25 4 Authoring in HTML5 26 5 Working with SMIL 26 5 1 Introduction 26 5 2 www a smil org for developers 26 6 Technical Data 27 6 1 Specifications 27 7 Troubleshooting 29...

Page 8: ...dio and video output via HDMI Built in wireless b g n network and Ethernet Supports full POPAI Screen Media Formats Standardsprofiles S1 to S12 and E1 to E8 Multiple 3rd party software solution compat...

Page 9: ...then screw antenna clockwise onto the post Attach the player on the back of the monitor using Velcro 1 Separate the Velcro pads and stick one of them to the bottom of player 2 Stick the other Velcro...

Page 10: ...he Basic settings menu if no content service has been configured i e first boot up for a brand new unit or after a factory reset Plug in a USB mouse to start configuring the signboard If you have alre...

Page 11: ...nage application settings Network Time zone and Content Each time the Basic settings menu is entered the signboard will start playback automatically after 15 seconds if content services have been set...

Page 12: ...1 Click the Wireless LAN setting and the wireless configuration UI will be launched Fig 2 3 1 2 Click the ON OFF button as indicated below to turn the Wireless interface on Ethernet will be disconnec...

Page 13: ...scan for wireless signals nearby and available AP stations will be listed Fig 2 3 3 4 Click on the station name to connect If the network requires authentication you will be asked to provide the passw...

Page 14: ...UI will be launched Fig 2 3 1 2 Click the ON OFF button as indicated below to turn the Wireless interface off Fig 2 3 2 DHCP automatically assign network IP address 3 Turn on the Ethernet interface F...

Page 15: ...8 5 Under IP settings change DHCP to Static Fig 2 3 7 6 Fill the form and click Connect to complete the setting Scroll down swipe to see the rest of the menu if needed Fig 2 3 8...

Page 16: ...9 2 4 Time zone settings 1 Click Time zone to launch the configuration menu Fig 2 4 1 2 Click Select time zone Fig 2 4 2...

Page 17: ...10 3 Choose the correct time zone from the available options Fig 2 4 3...

Page 18: ...he player will check the availability of SMIL HTML5 content URL with the Play button showing Checking The checking action can be canceled by clicking Checking button it will change back to Play NOTE I...

Page 19: ...button will change to a 15 second countdown and the playback will start after the countdown The countdown can be canceled by clicking the button If it keeps showing Checking for a long time please go...

Page 20: ...ID 1 Click Advanced and the advanced configuration menu will belaunched Fig 2 6 1 2 Click on Information to view Health Status definitions Green Normal Device connection to the content source URL ser...

Page 21: ...ed for the 3rd party App configurationsonly Trust Switch to Enabled to set whether the content can access sensitive data such as intent extras client credentials access token etc Desktop mode Switch t...

Page 22: ...ed to play the assigned content 1 Click on the Advanced button The advanced configuration menu will be launched Fig 2 6 1 2 Click on Content and then click on FailSafe 3 Enter the URL of HTML SMIL Med...

Page 23: ...USB drive that has been inserted to the player the player will download the content to the internal storage and playback automatically Fig 2 9 1 2 10 Display settings Resolution Settings for Media Pl...

Page 24: ...und and then click on Display The Display Settings page will be launched Fig 2 10 1 3 Click on Resolution and select a suitable resolution from the popup menu Default configuration is Auto Detect play...

Page 25: ...vanced button The advanced configuration menu will be launched Fig 2 6 1 2 Click on the Display sound button and then click on Display The Display Settings page will be launched Fig 2 10 1 3 Click on...

Page 26: ...ration menu will be launched Fig 2 6 1 2 Click on Display sound and then click on Display The Display Settings page will be launched Fig 2 10 1 3 Click on Screen orientation as marked in red below Fig...

Page 27: ...figuration menu will be launched Fig 2 6 1 2 Click on Display sound and then click on Sound The Sound Settings page will be launched 3 Fig 2 11 1 4 Click on Sound the Sounds settings page will be laun...

Page 28: ...ck on Access and click on Player name 3 Input a name for the field and click Set 2 13 Access configuration Security A password can be set to provide authentication for player access If the password is...

Page 29: ...24 2 14 System configuration Time and Date This will bring up Date and time configuration panel as shown below user can set time as auto or manual set time zone and time format from here Fig 2 14 1...

Page 30: ...AppStart URL as time server button to enable disable the time server function bled Player don t synchronize with any server 4 Disabled Player does not synchronize with any server Default Player synchr...

Page 31: ...ton The advanced configuration menu will be launched Fig 2 6 1 2 Click on Schedule and then click on Scheduled Reboot 3 Click on the Enable daily reboot button to enable disable the daily reboot funct...

Page 32: ...ing the changes that will be made to your signboard before applying the upgrade IMPORTANT DO NOT unplug the USB drive or turn off the signboard while the system is performing a firmware update Check l...

Page 33: ...3 Plug in a USB mouse to the device to enter the Basic settings menu 4 Click on the Advanced button The advanced configuration menu will be launched Fig 2 6 1 5 Click on System and then choose Firmwar...

Page 34: ...he status LED flashes 4 RELEASE the reset button and wait for system to initialize Using a USB mouse System reset will re initialize the system clear passwords and return settings to their default val...

Page 35: ...s the signboard to power off automatically from the Basic settings page if no actions occur after 10 minutes 1 Click on the Advanced button The advanced configuration menu will be launched Fig 2 6 1 2...

Page 36: ...add extra MicroSD card to replace the internal storage please note when internal storage is being replaced player can only use the storage from the MicroSD card as main storage Auto Expansion 1 In th...

Page 37: ...30 3 Content Management The NMP589 W is designed to work with 3rd party management solutions Please refer to the printed guide for related set up instructions...

Page 38: ...guage created by W3C for multimedia communications the media player understands the language spoken by professional tools from companies such as Adobe Apple Microsoft and Real Networks What this means...

Page 39: ...2 720p 12Mbps CBR S11 MPEG 4 AVC 480p 6Mbps CBR S12 MPEG 4 AVC 720p 10Mbps CBR E4 VC 1 WMV9 MP ML 720p E7 MPEG 4 ASP 480p 10Mbps CBR E8 MPEG 4 AVC 1080p 10Mbps CBR Image format support POPAI Screen M...

Page 40: ...plies HDMI cable Wireless antenna Velcro 2 sets Micro SD card slot bracket screw x1 Power jack bracket screw x1 Hardware Quick Start Guide Software Quick Start Power requirement 12V 1 5A DC Power cons...

Page 41: ...used What is the maximum file size for a single video file The maximum video file size for the NMP589 W is 2GB We recommend reserving a safety margin to avoid exceeding the limit i e limiting files t...

Page 42: ...images Progressive images are downloaded and displayed progressively being rendered more clearly as more data is received over the internet Progressive images are primarily supported on PCs For media...

Page 43: ...America Columbia www viewsonic com la C http www viewsonic com la soporte servicio tecnico soporte viewsonic com Latin America Mexico www viewsonic com la C http www viewsonic com la soporte servicio...

Page 44: ...nown as image burn in which results whena static image is displayed on the product for an extended period of time How to get service 1 For information about receiving service under warranty contact Vi...

Page 45: ...33...

Reviews: