background image

36

ENGLISH

Contact ViewSonic service team at: http://www.ViewSonic.com or call our service team: United States 1-800-688-6688, Canada 1-866-463-4775

ViewSonic

                                                                                                        N2635w

Using the TV Features

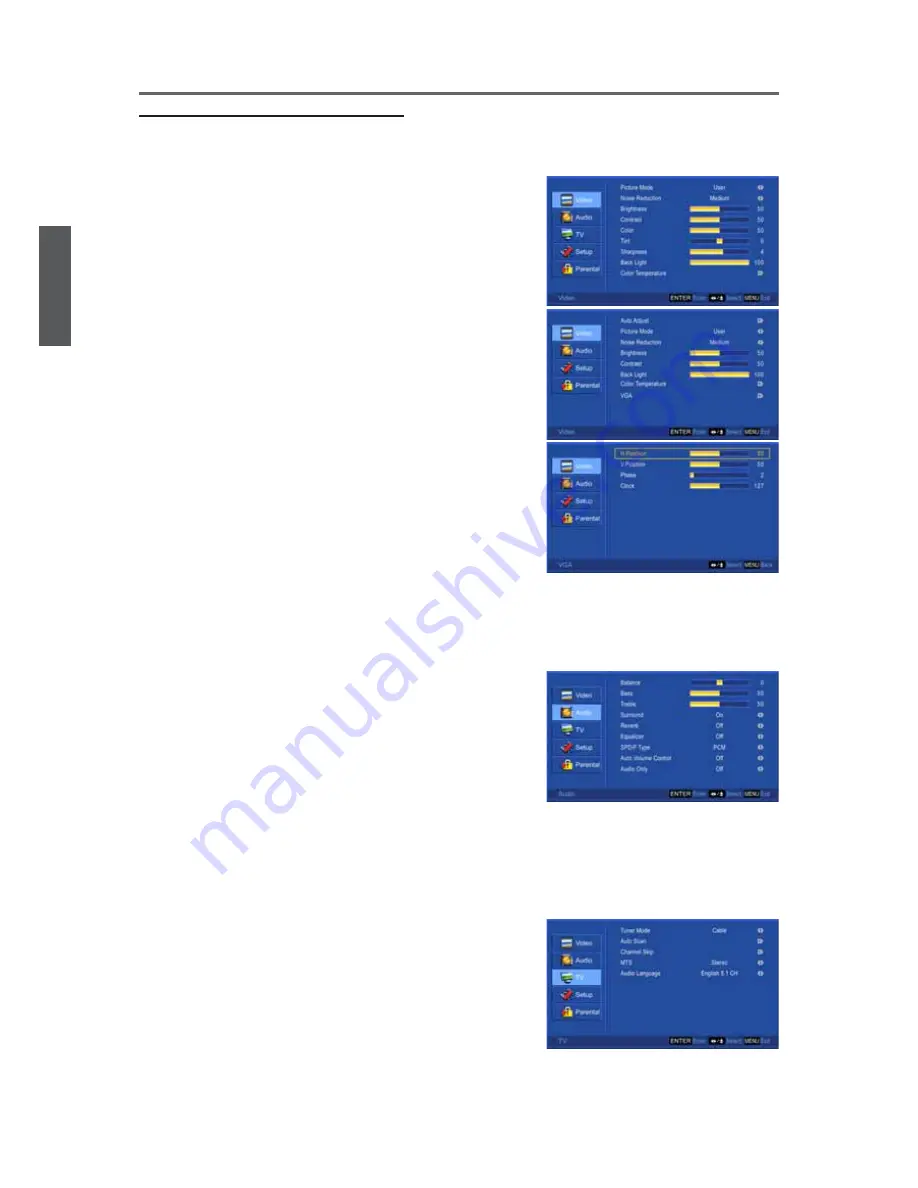
Annotations for OSD Menu Items

See below for meanings of the control items in each menu.

Video menu

‡

Picture Mode:

 To select picture mode.

‡

Noise Reduction:

 To reduce the noise level of connected 

equipment.

‡

Brightness:

 To adjust luminance of video.

‡

Contrast:

 To adjust contrast of video.

‡

Color:

 To adjust color.

‡

Tint:

 To adjust tint level.

‡

Sharpness:

 To adjust picture sharpness.

‡

Back Light:

 To brighten or darken the backlight.

‡

Color Temperature:

 To select color temperature.

‡

Auto Adjust:

 To auto adjust picture’s horizontal 

SRVLWLRQYHUWLFDOSRVLWLRQ¿QH6L]HRQO\

enabled in VGA source)

‡

VGA:

7R¿QHWXQHWKHLPDJHRQO\HQDEOHGLQ9*$

source)

Ŏ

H. Position:

 To adjust the horizontal position of the 

picture.

Ŏ

V. Position:

 To adjust the vertical position of the 

picture.

Ŏ

Phase:

 To adjust delay time of phase in order to 

reduce the noise of picture.

Ŏ

Clock:

 To adjust delay time of clock in order to 

reduce the noise of picture.

$XGLRPHQX

‡

Balance:

 To adjust left and right audio balance.

‡

Bass:

 To adjust bass.

‡

Treble:

 To adjust the treble.

‡

Surround:

 To select concert hall effect “On” or “Off”.

‡

Reverb:

 To select the reverb sound effect.

‡

Equalizer:

 To select equalizer modes.

‡

SPDIF Type:

 To select audio for SPDIF out.

‡

Auto Volume control:

 To turn On or Off Auto volume 

control.

‡

Audio Only:

 To turn off the screen picture but keep the 

sound on.

TV menu

‡

Tuner Mode:

 To select TV source. Select “Cable” to 

watch cable TV channels, and select “Air” to watch air 
TV channels.

‡

Auto Scan:

 To auto scan TV and DTV channels.

‡

Channel Skip:

 To skip channels.

‡

MTS:

 To select audio mode.

‡

Audio Language:

 To select available audio language.

Summary of Contents for N2635W

Page 1: ...egistering your product for future service Warranty information contained in this User Guide will describe your limited coverage from ViewSonic Corporation which is also found RQ RXU ZHE VLWH DW KWWS ZZZ YLHZVRQLF FRP LQ QJOLVK RU LQ VSHFL F ODQJXDJHV using the Regional selection box in the upper right corner of our website Before operating the equipment read the instructions in this manual carefu...

Page 2: ...88 T Toll 1 424 233 2530 F 1 909 468 1202 service us viewsonic com Canada www viewsonic com T Toll Free 1 866 463 4775 T Toll 1 424 233 2533 F 1 909 468 1202 service ca viewsonic com Renta y Datos 29 SUR 721 COL LA PAZ 72160 PUEBLA PUE Tel 01 222 891 55 77 CON 10 LINEAS Electroser Av Reforma No 403Gx39 y 41 97000 Mérida Yucatán Tel 01 999 925 19 16 Other places please refer to http www viewsonic c...

Page 3: ...gisterio 3321 Col Magisterial Chihuahua Chih Tel 4136954 E Mail Cefeo soluglobales com Cuernavaca Compusupport de Cuernavaca SA de CV Francisco Leyva 178 Col Miguel Hidalgo C P 62040 Cuernavaca Morelos Tel 01 777 3180579 01 777 3124014 E Mail aquevedo compusupportcva com Distrito Federal QPLUS S A de C V Av Coyoacán 931 Col Del Valle 03100 México D F Tel 01 52 55 50 00 27 35 E Mail gacosta qplus c...

Page 4: ...m at http www ViewSonic com or call our service team United States 1 800 688 6688 Canada 1 866 463 4775 Caution 7R QG WKH SHUIHFW PRXQW IRU 1 Z SOHDVH EURZVH www viewsonic com or call our service team United States 1 800 688 6688 Canada 1 866 463 4775 iii ...

Page 5: ...tand 11 Installing the Stand 11 Mounting ViewSonic LCD TV to the wall 12 DOO 0RXQW LW 6SHFL FDWLRQV 9 6 13 Front View of the Product 14 Rear View of the Product 15 Connecting the LCD TV 18 Cable System or VHF UHF QWHQQD System 18 DEOH 6 VWHP DQG 9 8 QWHQQD 6 VWHm 18 HD Cable Box HD Satellite Box 18 Personal Computer 20 Other Equipment 22 Using the TV Features Remote Control and TV Controls 23 Inse...

Page 6: ...ation has determined that this product meets the ENERGY STAR JXLGHOLQHV IRU HQHUJ HI FLHQF Disclaimer ViewSonic Corporation shall not be liable for technical or editorial errors or omissions contained herein nor for incidental or consequential damages resulting from furnishing this material or the performance or use of this product In the interest of continuing product improvement ViewSonic Corpor...

Page 7: ...ULHQFHG radio TV technician for help Pursuant to FCC regulations be cautioned that any changes or PRGL FDWLRQV QRW H SUHVVO DSSURYHG LQ this manual could void your authority to operate this equipment Safety 2SHUDWH WKH 79 RQO RQ 9 8VH WKH SRZHU FRUG VSHFL HG E ViewSonic and suitable for the voltage where you use it 7KH SOXJ LV GHVLJQHG IRU VDIHW SXUSRVHV WR W LQWR WKH ZDOO RXWOHW RQO RQH ZD I you ...

Page 8: ...amaged in any way such as power supply cord or plug is damaged liquid has been spilled or objects have fallen into the apparatus the apparatus has been exposed to rain or moisture or the unit does not operate normally or has been dropped USE AC power Cord Keep the following guidelines to protect the AC power cord from being damaged If the AV power FRUG LV GDPDJHG LW PD UHVXOW LQ D UH RU DQ HOHFWUL...

Page 9: ...ode NEC in the U S A and Section 54 of the Canadian Electrical Code in Canada provides information with in regard to proper grounding of the mast and supporting structure grounding of the lead in wire to an antenna discharge unit size of grounding conductors location of antenna discharge unit connection to grounding electrodes and requirements for the grounding electrode Antenna grounding accordin...

Page 10: ...QJ RU PRYLQJ WKH 79 KROG LW VHFXUHO IURP from the bottom Place your palm directly under the panel VENTILATION Slots and openings in TV are provided for ventilation To ensure reliable operation of the TV and to protect it from overheating be sure these openings are not blocked or covered The TV may accumulate dust and get dirty if proper ventilation is not provided For proper ventilation follow the...

Page 11: ...t the TV from falling from the stand or wall mount Place the TV on a stable level surface Do not hang anything on the TV Do not allow children to climb on the TV Do not install the TV in places subject to extreme temperature such as in direct sunlight near a radiator or heating vent If the TV is exposed to extreme temperature the TV may overheat and cause deformation of the enclosure or cause malf...

Page 12: ... use This is a normal condition 6SUD LQJ LQVHFW UHSHOOHQW ZLWK YRODWLOH PDWHULDO RQ the screen will cause damage R QRW PDNH SURORQJHG FRQWDFW ZLWK UXEEHU RU plastic material Broken pieces Do not throw anything at the TV Doing so may break the screen glass and cause serious injury If the surface of the TV cracks unplug the AC power cord before touching the TV Otherwise electric shock may result Han...

Page 13: ... can be determined by turning the equipment off and on the user is encouraged to try to correct the interference by one or more of the following measures 5HRULHQW RU UHORFDWH WKH UHFHLYLQJ DQWHQQD QFUHDVH WKH VHSDUDWLRQ EHWZHHQ WKH HTXLSPHQW DQG UHFHLYHU RQQHFW WKH HTXLSPHQW LQWR DQ RXWOHW RQ D FLUFXLW GLIIHUHQW IURP WKDW WR ZKLFK WKH UHFHLYHU is connected RQVXOW WKH GHDOHU RU DQ H SHULHQFHG UDGLR...

Page 14: ... 1 Mercury Hg 0 1 0 1 Cadmium Cd 0 01 0 01 Hexavalent Chromium Cr6 0 1 0 1 Polybrominated biphenyls PBB 0 1 0 1 Polybrominated diphenyl ethers PBDE 0 1 0 1 Certain components of products as stated above are exempted under the Annex of the RoHS Directives as noted below Examples of exempted components are 0HUFXU LQ FRPSDFW ÀXRUHVFHQW ODPSV QRW H FHHGLQJ PJ SHU ODPS DQG LQ RWKHU ODPSV QRW VSHFL FDOO...

Page 15: ...native image resolution 2 ClearPictureTM technology for high contrast and realistic video 6XSHU EULJKW KLJK FRQWUDVW 79 ÀDW VFUHHQ 4 HDMI input compatible with the latest HD devices 5 Built in digital tuners HDTV NTSC and Clear QAM digital cable 6 Displays multiple TV formats including 480i 480p 720p and 1080i 7 Multiple video computer inputs HDMI 2x component 2x CVBS S video composite PC 8 Powerf...

Page 16: ...5w Getting Started Installing the LCD TV Disconnecting the Stand Base 1 Place the TV face down on a soft cloth or cushion on a table 2 Remove the 4 screws connecting the stand base to the TV 3 Remove the stand base Installing the Stand Base 1 Place the TV face down on a soft cloth or cushion on a table 2 Connect the stand base to the back of TV with 4 screws ...

Page 17: ...all mount bracket to LCD TV safely please use the following guidelines Disconnect the power and any other cables that might hinder moving the LCD TV Set the LCD TV on a table or work surface placing the screen face down on a towel or woolen blanket to protect the screen surface from damage while installing plate Before installing the LCD TV on the wall ensure you have recorded the product serial n...

Page 18: ... M4 x L10 4 26 27 200 x 100 mm M4 x L10 6 32 37 400 x 200 mm M6 x L10 6 42 47 600 x 200 mm M6 x L10 10 52 400 x 200 mm M6 x L10 6 ViewSonic provides the standard dimensions for wall mount kits as shown in the table above When purchasing our wall mount kit a detailed install manual and all parts necessary for assembly are provided Do not use the screws that longer than the standard dimension as the...

Page 19: ...OSD menu 3 MENU Turn OSD menu ON OFF 4 CH Down Channel down when source is TV or select a control while in OSD menu 5 CH Up Channel up when source is TV or select a control while in OSD menu 6 ENTER Display Input source selection menu enter a menu or enable the function while in OSD menu 7 Power ON OFF button Turn the power on from standby mode or turn the power off to return to the standby mode 8...

Page 20: ...HDMI output of A V device 4 HDMI 2 Input Terminal Connect this port to the HDMI output of A V device 5 VGA signal input Connect a 15 pin D sub RGB cable to the RGB output of your computer and the other end to the RGB input on the rear of the LCD TV 6 YPbPr 2 signal input Connect this port to the YPbPr output of A V device 7 YPbPr 1 signal input Connect this port to the YPbPr output of A V device 8...

Page 21: ... line out jack 17 Audio output Connect this port to your A V device with audio in RCA FRQQHFWRUV RU WR DXGLR DPSOL HU 18 SPDIF Optical output Connect this port to the SPDIF input of A V device Note There is a Service jack next to the HDMI Input Terminal 3 It is for service technician s use AV connection Connect the composite video and audio input jacks to the corresponding output jacks of your A V...

Page 22: ...t has a DVI jack and not an HDMI jack connect the DVI jack to the HDMI Input Terminal with DVI to HDMI cable or adapter and connect the Audio cable to the Audio In jacks 1 With HDMI cable HDMI 1 Input Terminal 3 or HDMI 2 Input Terminal 4 2 With HDMI DVI cable VIDEO HDMI 1 Input Terminal 3 AUDIO HDMI 1 Audio input 11 or VIDEO HDMI 2 Input Terminal 4 AUDIO VGA HDMI 2 signal Audio input 16 Computer ...

Page 23: ... DEOH 6 VWHP DQG 9 8 QWHQQD 6 VWHP Use an optional A B RF switch not supplied to switch between the cable and antenna programming as shown below Ɓ 5HPHPEHU WR VHW WKH Tuner Mode setting in the TV menu to Air or Cable for the type you choose HD Cable Box HD Satellite Box You can also enjoy high definition programming by subscribing to a high definition cable service or a high definition satellite s...

Page 24: ...DV D 9 MDFN DQG QRW DQ 0 MDFN FRQQHFW WKH 9 MDFN WR WKH HDMI 1 3 or HDMI 2 4 jack and connect the audio jack to the AUDIO In jacks of HDMI 1 11 or HDMI 2 16 YPbPr or Component Connection HD cable box HD satellite box CATV Satellite antenna cable Rear of TV Component video cable Component video cable Audio cable CATV Satellite antenna cable DVI to HDMI cable HD cable box HD satellite box Audio cabl...

Page 25: ... your computer The picture below shows the connection for PC The LCD TV can also be connected to PC with DVI or HDMI output Ɓ RQQHFW WKH 3 1 MDFN WR WKH 3 XVLQJ D SLQ FDEOH DQG DXGLR FDEOH I WKH 3 LV FRQQHFWHG WR 79 DQG QR VLJQDO KDV EHHQ LQSXW IURP 3 IRU PRUH WKDQ VHFRQGV the TV will enter standby mode automatically Rear of TV Audio cable stereo mini plugs VGA 15 Pin cable Connect to an HDMI comp...

Page 26: ...366 x 768 Yes VESA 800 x 600 56Hz 1366 x 768 Yes VESA 800 x 600 60Hz 1366 x 768 Yes VESA 800 x 600 72Hz 1366 x 768 Yes VESA 800 x 600 75Hz 1366 x 768 Yes MAC 832 x 624 75Hz 1366 x 768 Yes VESA 1024 x 768 60Hz 1366 x 768 Yes VESA 1024 x 768 70Hz 1366 x 768 Yes VESA 1024 x 768 75Hz 1366 x 768 Yes VESA 1280 x 768 60Hz 1366 x 768 Yes VESA 1280 x 960 60Hz 1366 x 768 Yes VESA 1280 x 1024 60Hz 1366 x 768...

Page 27: ...r VCD Player Game system DVD Player VCD Player Game system VHF UHF CABLE Digital cable box Digital cable box Digital satellite receiver Digital satellite receiver DVD Player DVD Player Audio system Audio system Blu ray Disc Player PS3 Blu ray Disc Player PS3 Personal Computer Personal Computer DVD Player VCD Player Game system Ɓ 3OHDVH UHIHU WR WKH 4XLFN 6WDUW XLGH VXSSOLHG ZKHQ FRQQHFWLQJ WKH RWK...

Page 28: ... PDUNLQJV QVHUWLQJ WKH EDWWHULHV LQFRUUHFWO PD UHVXOW LQ OHDNDJH ZKLFK PD SRVH D ULVN RI UH RU OHDG WR SHUVRQDO LQMXU LVSRVH RI WKH EDWWHU LQ DFFRUGDQFH ZLWK ORFDO ODZV DQG UHJXODWLRQV HHS WKH EDWWHULHV DZD IURP FKLOGUHQ RU SHWV KHQ WKH UHPRWH FRQWURO ZLOO QRW WR EH XVHG IRU DQ H WHQGHG SHULRG UHPRYH WKH EDWWHULHV 5HPRWH RQWURO DQG 79 RQWUROV Buttons located at the top of the LCD TV will operate t...

Page 29: ... automatically shut off the LCD TV after a preset period of time passed There are several times IRU FKRLFH 2II 0LQXWHV 0LQXWHV 0LQXWHV 60 Minutes 90 Minutes 120 Minutes 6 0 9 number buttons Press 0 9 and to select a channel After you input the channel numbers press ENTER button to direct to the channel immediately or wait for 3 seconds to change automatically 7 VOL Press to adjust the volume 8 GUI...

Page 30: ... the VRXUFH ZLWK Ÿ ź EXWWRQV 7R FRQ UP WKH VHOHFWLRQ press ENTER 12 MUTE Press to turn off the sound To restore the sound press this button again or press the VOL button 13 TV CATV Press to switch between TV CATV or press to direct to TV source when in any other source 14 PICTURE Press this button to select between the picture modes of User Cinema Sport Vivid Hi Bright 15 RETURN Press to return to...

Page 31: ... ODQJXDJH WKHQ SUHVV Ź WR FRQWLQXH QH W VWHS 7R UHWXUQ WR WKH SUHYLRXV SDJH SUHVV Ż VHH LJXUH 6HOHFW RXU GLVSOD PRGH IURP RPH RU 5HWDLO WKHQ SUHVV Ź WR FRQWLQXH ŎFor normal home use we suggest that you select Home to achieve energy saving However if you prefer better brightness select Retail see Figure 3 6HOHFW RXU WXQHU PRGH IURP LU RU DEOH WKHQ SUHVV Ź WR FRQWLQXH RQQHFW FDEOH DQG RU DQWHQQD DQG...

Page 32: ... the number buttons to select channels 2 DTV Use button to select the sub channel in DTV Ex Your desired number is 80 3 Press 8 ĺ SUHVV 0 ĺ SUHVV ĺ SUHVV 3 ŎReturn to the previous channel press RETURN button Adjusting the Volume Press VOL to adjust volume To turn off the volume press MUTE To restore volume press MUTE again or press VOL directly Viewing the Displayed Information To display the curr...

Page 33: ...o the previous page or exit from the OSD menu Selecting the Input Source To select the TV or other external input sources connected to the TV 1 Press the INPUT button on the remote control 3UHVV Ÿ RU ź WR VHOHFW WKH UHTXLUHG LQSXW VRXUFH between TV AV S Video YPbPr 1 YPbPr 2 VGA HDMI 1 or HDMI 2 7R FRQ UP WKH VHOHFWLRQ SUHVV ENTER Storing Channels into Memory 1 Press the MENU button to display the...

Page 34: ... VHOHFW WKH FRQWURO RI ULJKWQHVV Contrast Color Tint Sharpness Back Light DODQFH DVV 7UHEOH WKHQ SUHVV Ż RU Ź WR adjust the level 5 Press MENU to exit 2 1 Press the MENU button to display the OSD main menu 3UHVV Ÿ RU ź WR VHOHFW RXU GHVLUHG WRS 0HQX 3 Press ENTER RU Ź WR HQWHU WKH PHQX 3UHVV Ÿ RU ź WR VHOHFW WKH FRQWURO RI 3LFWXUH 0RGH Noise Reduction Surround Reverb Equalizer SPDIF Type Auto Volu...

Page 35: ...and select On Then move the cursor down to set the beginning and ending time of timer Select Off if you want to cancel the timer function Note Auto Synchronization should be set to Off before Timer is enabled 7 Press MENU to return to the previous menu Select Sleep Timer to set the off timer and the TV will shut down automatically after the preset time Set the Auto Sleep function and the TV will s...

Page 36: ...enu 3UHVV Ÿ RU ź WR VHOHFW WKH 6HWXS PHQX Press ENTER RU Ź WR HQWHU WKH PHQX 3UHVV Ÿ RU ź WR VHOHFW ORVH DSWLRQ WKHQ SUHVV ENTER RU Ź WR HQWHU ORVH DSWLRQ VHWWLQJ 3UHVV Ÿ RU ź WR VHOHFW QDORJ ORVHG DSWLRQ RU LJLWDO ORVHG DSWLRQ DQG XVH Ż RU Ź WR VHOHFW caption information To perform custom digital caption style settings select LJLWDO DSWLRQ 6W OH WR XVWRP WKHQ XVH Ÿ RU ź WR VHOHFW GHVLUHG FRQWUROV...

Page 37: ...r unblock it 3 Press MENU to exit Program Block 1 Move to Program Block and press ENTER RU Ź 2 Move to Rating Enable and select On to enable the detailed settings 3 Move to U S TV Ratings U S Movie Ratings Canadian English Ratings Canadian French Ratings Open V Chip or Block Unrated 1 U S TV Ratings 3UHVV Ÿ RU ź WR VHOHFW 8 6 79 5DWLQJV WKHQ SUHVV ENTER RU Ź The following screen will allow you to ...

Page 38: ...ENU to exit 3 Canadian English Ratings 3UHVV Ÿ RU ź WR VHOHFW DQDGLDQ QJOLVK 5DWLQJV then press ENTER RU Ź 7KH DYDLODEOH VHOHFWLRQ DUH GH QHG DV IROORZLQJ C children C8 children eight years and older G general programming suitable for all audiences PG parental guidance 14 viewers and older 18 adult programming 2 Press ENTER to set or reset the rating level 3 Press MENU to exit 4 Canadian French Ra...

Page 39: ...sessions then press ENTER RU Ź 3UHVV Ÿ RU ź WR VHOHFW WKH EORFNLQJ LWHP WKHQ SUHVV ENTER RU Ź 4 Press ENTER to set or reset the rating 5 Press MENU to exit 6 Block Unrated 3UHVV Ÿ RU ź WR VHOHFW ORFN 8QUDWHG WKHQ SUHVV Ż RU Ź WR VHOHFW 2Q RU 2II KHQ 2Q LV VHOHFWHG all programs that are not rated will be blocked 2 Press MENU to exit Input Block 3UHVV Ÿ RU ź WR VHOHFW QSXW ORFN WKHQ SUHVV Ÿ RU ź WR ...

Page 40: ... that some controls are disabled ŎWhen there is no signal in the VGA mode No signal The power will be turned off will be displayed on the screen and the TV will automatically turn into power saving mode after a few seconds idleness Press any key on the remote control at any time and the TV will return to VGA mode To Restore Factory Setting 1 Press the MENU button to display the OSD main menu 3UHVV...

Page 41: ...QH WKH LPDJH RQO HQDEOHG LQ 9 source ŎH Position To adjust the horizontal position of the picture ŎV Position To adjust the vertical position of the picture ŎPhase To adjust delay time of phase in order to reduce the noise of picture ŎClock To adjust delay time of clock in order to reduce the noise of picture XGLR PHQX Balance To adjust left and right audio balance Bass To adjust bass Treble To ad...

Page 42: ...me ŎSleep Timer To set the off timer ŎAuto Sleep To set the auto sleep time ŎDaylight Saving To turn on off daylight saving Close Caption To set close caption options ŎAnalog Closed Caption To set basic analog closed caption options ŎDigital Closed Caption To select closed caption signal formats and set up caption modes for digital TV channels ŎDigital Caption Style To select caption style Font Si...

Page 43: ...U S TV Ratings To set TV blocking level in the US ŎU S Movie Ratings To set movie blocking level in the US ŎCanadian English Ratings To set blocking level in English speaking region of Canada ŎCanadian French Ratings To set blocking level in French speaking region of Canada ŎOpen V Chip To set TV blocking level for DTV programs ŎBlock Unrated To block unrated movie or TV programs Input Block To se...

Page 44: ...ly a small amount of non ammonia non alcohol based glass cleaner onto a clean soft lint free cloth and wipe the screen To clean the case 1 Use a soft dry cloth 2 If still not clean apply a small amount of a non ammonia non alcohol based mild non abrasive detergent onto a clean soft lint free cloth then wipe the surface Disclaimer ViewSonic does not recommend the use of any ammonia or alcohol based...

Page 45: ...et to verify that the outlet is supplying the proper voltage No picture 7KH 79 VWDWLRQ PD EH H SHULHQFLQJ SUREOHPV 7U DQRWKHU channel 7KH DEOH 79 VLJQDO PD EH VFUDPEOHG RU HQFRGHG 3OHDVH contact your local cable operator 0DNH VXUH WKDW FRQQHFWLRQ WR RWKHU FRPSRQHQWV DUH FRUUHFW referring to the user guide 0DNH VXUH WKDW VHWXS KDV EHHQ GRQH FRUUHFWO DIWHU connections 0DNH VXUH WKH FRUUHFW LQSXW LV ...

Page 46: ...FW RQH IRU the operation you want to perform Unit cannot be operated WHUQDO LQÀXHQFHV VXFK DV OLJKWQLQJ RU VWDWLF HOHFWULFLW PD cause improper operation In this case operate the unit after UVW WXUQLQJ RQ WKH SRZHU RI WKH 79 DQG WKH 9 System or unplug the AC cord for 1 to 2 minutes then replug again Power is cut off suddenly V WKH VOHHS WLPHU VHW LQ DGYDQFH V WKHUH QR VLJQDO LQ 3 PRGH RU 0 PRGH 7KH...

Page 47: ...0 60 75 Hz 640 x 480 60 75 Hz Speaker Output 10W x 2 THD 10 Audio Output 1 stereo RCA jack 1 SPDIF optical 1 Headphone jack Power Voltage 100 240 VAC 50 60 Hz auto switch Display area Full Scan 575 769mm H x 575 769mm V 22 67 H x 12 74 V Operating conditions Temperature Humanity Altitude 32 F to 104 F 0 C to 40 C 20 to 65 no condensation To 6 562 feet 2 000m Storage condition Temperature Humanity ...

Page 48: ... this product has been mounted on the wall for a long time How to get service 1 For information about receiving service under warranty contact ViewSonic Customer Support You will need to provide your product s serial number 2 To obtain warranted service you will be required to provide a the original dated sales slip b your name c your address d a description of the problem and e the serial number ...

Page 49: ... get service For information about receiving service under warranty contact ViewSonic Customer Support Please refer to the attached Customer Support page You will need to provide your product s serial number so please record the product information in the space provided below on your purchase for your future use Please retain your receipt of proof of purchase to support your warranty claim For You...

Page 50: ...ViewSonic ...

Reviews: