background image

7

ViewSonic 

G655

E

N

G

L

I

S

H

Operation

Adjust your 

ViewSonic 

G655


monitor using the buttons on the front control

panel as shown below. The buttons scroll down the OnView

®

 Main Menu

(page 8) and adjust each control (pages 8 through 10).
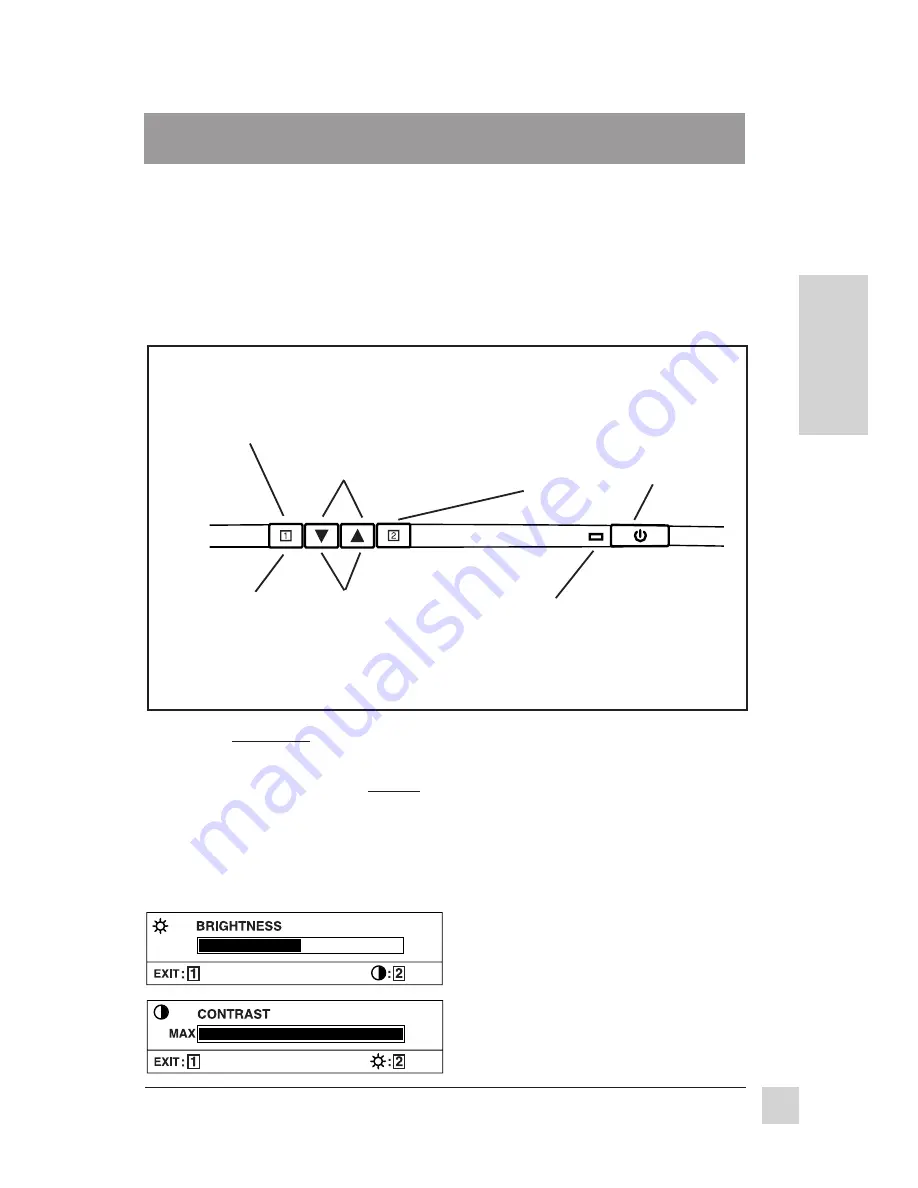
Front Control Panel

To adjust the monitor, follow the numbered steps in sequence as shown below.

Power light:

Green = on
Orange = power saving

mode

[

] and [

]

decreases or
increases value
of the selected
control

[

] and [

] scrolls

up and down the
Main Menu; highlight
the control you want
to adjust (see below)

Button [1] exits
control screen
or menu and
saves all
adjustments

Button [2]
activates the
control screen
for the
highlighted
control

 ➌

Button [1]
displays the
Main Menu

Power
On/Off

*

Operation

* The monitor automatically 

degausses each time you turn it on, removing the buildup of magnetic

fields that can affect color purity and convergence. To prevent possible damage, if you turn the
monitor off, then immediately on again, wait 20 minutes before doing this again. 

Do not turn the

monitor on and off repeatedly. 

To manually degauss the monitor, see the instructions on page 9.

Using the [2] button

One of the uses of the [2] button is to switch between controls shown in pairs
on the Main Menu (see page 8).

Example: Press the [2] button to
switch between the CONTRAST
and BRIGHTNESS controls.

NOTE: In the CONTAST example
"MAX" indicates the maximum
value for CONTRAST.

Summary of Contents for G655

Page 1: ......

Page 2: ...rporationreservestherighttochangeproductspecificationwithoutnotice Informationin this document may change without notice No part of this document may be copied reproduced or transmitted by any means f...

Page 3: ...m whom you have purchased your monitor Power Cord Safety Guidelines continued AC PLUG CORD PRECAUTIONS FOR THE UNITED KINGDOM FOR YOUR SAFETY PLEASE READ THE FOLLOWING TEXT CAREFULLY IF THE FITTED MOU...

Page 4: ...ses and can radiate radio frequency energy and if not installed and used in accordance with the instructions may cause harmful interference to radio communications However there is no guarantee that i...

Page 5: ...allation 6 Operation Front Control Panel 7 Using the 2 button 7 OnView Main Menu 8 Other Information Specifications 11 Troubleshooting 12 Cleaning the Monitor 13 Warranty 14 Customer Support back cove...

Page 6: ...monitor to direct sunlight or another heat source The monitor should be facing away from direct sunlight to reduce glare Always handle your monitor with care when moving it Precautions Choose a well...

Page 7: ...E N G L I S H 6 ViewSonic G655...

Page 8: ...ts Button 2 activates the control screen for the highlighted control Button 1 displays the Main Menu Power On Off Operation The monitor automatically degausses each time you turn it on removing the bu...

Page 9: ...to adjust H V POSITION Press button 2 to select Horizontal or Vertical Position H POSITION Horizontal Position moves screen image left or right moves screen image left moves screen image right V POSI...

Page 10: ...rning the monitor on or manually by selecting the Degauss control from the OnView Main Menu Important Do not degauss repeatedly Doing so can be harmful to the monitor Wait at least 20 minutes before s...

Page 11: ...ent screen up down left or right Press button 2 to selectVertical OSD or Horizontal OSD H OSD POSITION Horizontal OSD Position Press or to move the OSD left or right V OSD POSITION Vertical OSD Positi...

Page 12: ...Dimensions Physical 360mm W x 374mm H x 390mm D monitor 14 2 W x 14 7 H x 15 4 D Weight Net 12 0 kgs 26 4 lbs monitor only Regulations UL CSA FCC B DHHS DOC B TUV Ergo MPR II CE PTB ISO9241 3 DOC NOM...

Page 13: ...ection Make sure graphics card in your computer can use non interlaced mode at desired frequencies To enable your graphics card to support higher refresh rates try selecting fewer colors or running lo...

Page 14: ...ft lint free cloth and wipe the screen To clean the case 1 Use a soft dry cloth 2 If still not clean apply a small amount of a non ammonia non alcohol based mild non abrasive detergent onto a clean so...

Page 15: ...service under warranty contact ViewSonic Customer Support See the back cover of this user s guide 2 To obtain warranted service you will be required to provide a the original dated sales slip b your...

Page 16: ...Canada only 1 800 688 6688 From outside U S and Canada 909 869 7976 From Europe 44 1293 643 900 FromAsian Pacific Rim countries 886 22 248 4072 Other Options Technical Support Questions vstech viewso...

Reviews: