background image

26

7.  Input Mode

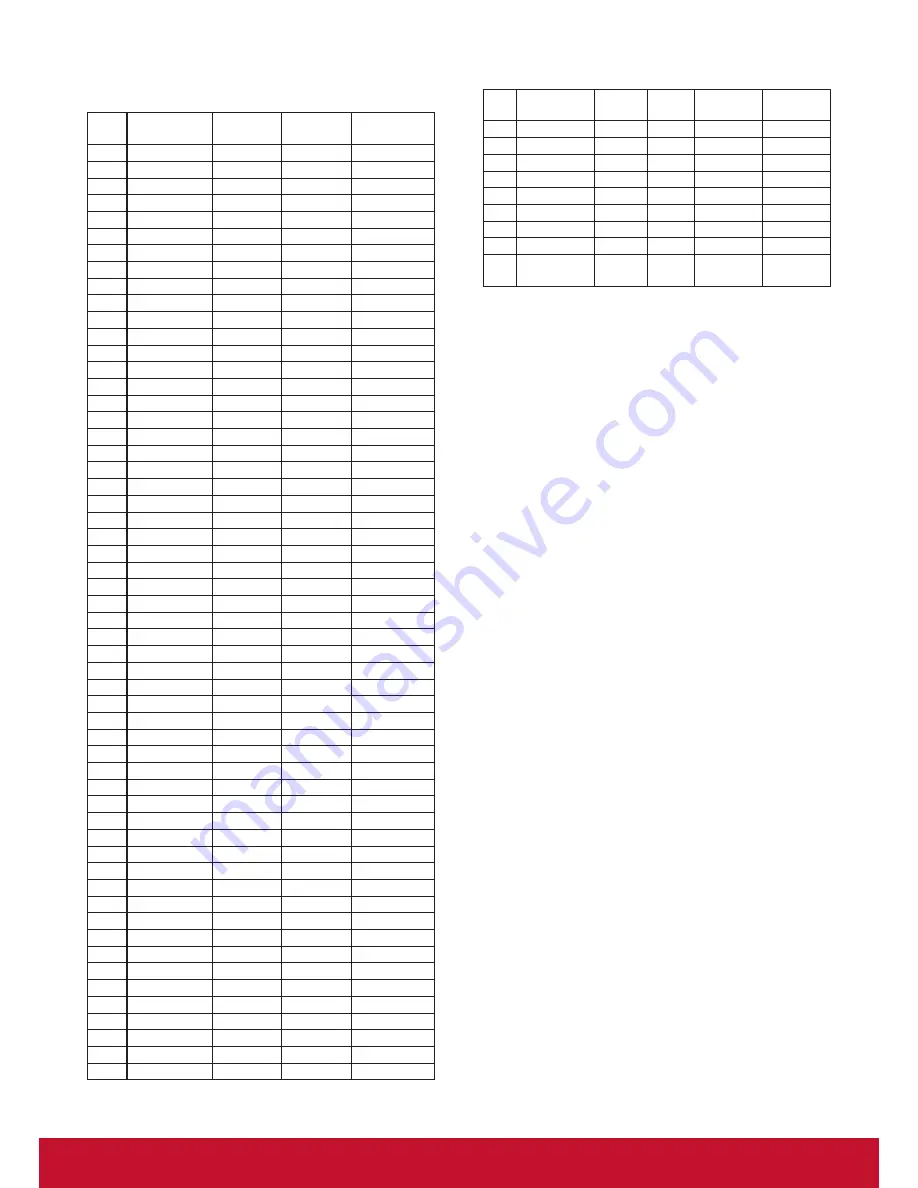
FHD Preset Mode (VGA/DVI timing support):

Item Resolution

H.Freq. 

(KHz)

V.Freq. 

(Hz)

BW (MHz)

1

640x350

31.469

70.086

25.175

2

640x480

31.469

59.94

25.175

3

640x480

35

66.67

30.240

4

640x480

37.861

72.809

31.500

5

640x480

37.5

75

31.500

6

720x400

31.469

70.087

28.322

7

800x600

35.156

56.25

36.000

8

800x600

37.879

60.317

40.000

9

800x600

48.077

72.188

50.000

10

800x600

46.875

75.000

49.500

11

832x624

49.726

74.551

57.284

12

848x480

31

60.000

33.750

13

960x720

56.4

75.000

72.420

14

960x720

44.74

59.973

57.580

15

1024x768

48.363

60.004

65.000

16

1024x768

56.476

70.069

75.000

17

1024x768

60.023

75.029

78.750

18

1024x768

61.08

75.781

86.000

19

1024x768

35.5

43.000

44.900

20

1152x864

53.986

59.985

79.900

21

1152x864

53.783

59.959

81.750

22

1152x864

63.851

70.012

94.499

23

1152x864

67.5

75.000

108.000

24

1152x870

68.681

75.062

100.000

25

1152x900

61.846

66.004

94.500

26

1152x900

71.809

76.149

108.000

27

1280x720

44.772

60.000

74.500

28

1280x720

52.5

70.000

89.040

29

1280 x768

47.776

59.870

79.500

30

1280 x768

60.289

74.893

102.250

31

1280x800

49.7

59.810

83.500

32

1280x800

62.8

74.930

106.500

33

1280x960

60

60.000

108.000

34

1280x960

75.171

75.021

129.895

35

1280x1024

63.981

60.020

108.000

36

1280x1024

71.691

67.189

117.000

37

1280x1024

76.02

71.448

130.223

38

1280x1024

79.976

75.025

135.000

39

1280x1024

81.13

76.110

135.000

40

1360x768

47.712

60.015

85.500

41

1366x768

47.712

59.790

85.500

42

1440x900

55.469

59.901

88.750

43

1440x900

55.935

59.887

106.500

44

1440x900

70.635

74.984

136.750

45

1400x1050

64.744

59.948

101

46

1440x1050

65.3

60.000

121.750

47

1400x1050

82.278

74.867

156

48

1600x900

55.54

60.000

97.750

49

1600x1200

75

60

162

50

1680x1050

65.29

59.954

146.250

51

1680x1050

64.674

59.883

119.000

52

1920x1080

66.587

59.934

138.500

53

1920x1080

67.5

60.000

148.500

54

1920x1080

67.1584

59.963

173.000

55

1920x1080

67.08

60

172.798

56

1920x1200

74.038

59.950

154.000

UHD Preset Mode (DP/HDMI timing support):

Item Resolution H.Freq. 

(KHz)

V.Freq. 

(Hz) BW (MHz)

1

3840x2160 53.946 23.900 296.703

For HDMI

2

3840x2160

54

24.000 297.000

For HDMI

3

3840x2160

56.25 25.000 297.000

For HDMI

4

3840x2160 67.432 29.900 296.703

For HDMI

5

3840x2160

67.5

30.000 297.000

For HDMI

6

4096x2160

54

24.000 297.000

For HDMI

7

3840x2160

135

60.000 594.000

For HDMI

8

3840x2160 133.312 59.997

533.25

For DP

9

3840x2160 65.688 29.981

262.75

For DP/

HDMI

Video timing support (HDMI/DVD HD/DVI):

480i, 480p, 576i, 576p, 720p, 1080i, 1080p, 4Kx2K 

(except DVI & DVD HD).

NOTES:

• 

The PC text quality is optimum in HD 1080 

mode (1920 x 1080, 60Hz).

• 

Your PC display screen might appear different 

depending on the manufacturer (and your par 

ticular version of Windows).

• 

Check your PC instruction book for information 

about connecting your PC to a display.

• 

If a ver tical and horizontal frequency-select 

mode exists, select 60Hz (ver tical) and 

31.5KHz (horizontal). In some cases, abnormal 

signals (such as stripes) might appear on the 

screen when the PC power

• 

is turned off (or if the PC is disconnected). 

If so, press the [

INPUT

] button to enter the 

video mode. Also, make sure that the PC is 

connected.

• 

When horizontal synchronous signals seem 

irregular in RGB mode, check PC power saving 

mode or cable connections.

• 

The display settings table complies to the IBM/

VESA standards, and based on the analog 

input.

• 

The DVI suppor t mode is regarded as same to 

the PC suppor t mode.

• 

The best timing for the ver tical frequency to 

each mode is 60Hz.

• 

When the input source is Component or Video, 

the Information

• 

OSD will be displayed slowly than other input 

sources.

• 

No matter the resolution of Component source 

or Video source input, the result of Zoom mode 

setting is the same as 1080P resolution.


Summary of Contents for CDP9800-CN

Page 1: ...ring your product for future service Warranty information contained in this User Guide will describe your limited coverage from ViewSonic Corporation which is also found on our web site at http www vi...

Page 2: ...nce with the instructions may cause harmful interference to radio communications Operation of this equipment in a residential area is likely to cause harmful interference in which case the user will b...

Page 3: ...210 To prevent radio interference to the licensed service this device is intended to be operated indoors and away from windows to provide maximum shielding Equipment or its transmitting antenna that...

Page 4: ...r the Annex III of the RoHS2 Directives as noted below Examples of exempted components are 1 Mercury in cold cathode fluorescent lamps and external electrode fluorescent lamps CCFL and EEFL for specia...

Page 5: ...n the LCD monitor contains mercury Please follow the laws or rules of your municipality to dispose of the tube properly Do not bend power cord Do not use monitor in high temperature humid dusty or oil...

Page 6: ...nk often Position the monitor at a 90 angle to windows and other light sources to minimize glare and reflections Clean the LCD monitor surface with a lint free nonabrasive cloth Avoid using any cleani...

Page 7: ...2 3 Command Message Reference 31 1 Unpacking and Installation 1 1 1 Unpacking 1 1 2 Package Contents 1 1 3 Installation Notes 1 1 4 Mounting on a Wall 2 1 4 1 VESA Grid 2 1 5 Mounting in Portrait Posi...

Page 8: ...Protocol 32 10 3 1 Set Function Listing 32 10 3 2 Get Function Listing 36 10 3 3 Remote Control Pass through mode 41 11 Other Information 44 Customer Support 44 Limited Warranty 45 Mexico Limited War...

Page 9: ...this document may be copied reproduced or transmitted by any means for any purpose without prior written permission from ViewSonic Corporation Product Registration To meet your future needs and to re...

Page 10: ...e The supplied power cord varies depending on destination NOTES For all other regions apply a power cord that conforms to the AC voltage of the power socket and has been approved by and complies with...

Page 11: ...g kit use M8 mounting screws having a length 15 mm longer than the thickness of the mounting bracket and tighten them securely 5 The eye bolt is for usage in short time maintenance and installation We...

Page 12: ...When facing the display at the back rotate 90 degrees anticlockwise the input output terminals should at the top and right side 90 90 NOTE When installing the display on a wall please consult a profe...

Page 13: ...ight bar up to adjust the selected item while OSD menu is on 7 button Move the highlight bar down to adjust the selected item while OSD menu is on 8 MENU button Return to previous menu while OSD menu...

Page 14: ...ES This display s remote control sensor will stop working if the jack IR IN is connected To remotely control your A V device via this display refer to page 11 for IR Pass Through connection 12 SPDIF O...

Page 15: ...mute function on off 9 COLOR buttons Choose tasks or options 10 NORMAL button Switch to normal mode 11 ID button Switch to ID mode 12 FORMAT button Change zoom mode 13 BACK button Return to the previ...

Page 16: ...not intend to use the remote control for a long period remove the batteries 2 3 3 Handling the remote control Do not subject to strong shock Do not allow water or other liquid to splash the remote con...

Page 17: ...t DVD VCR VCD 3 1 1 Using COMPONENT video input DVD VCR VCD AUDIO IN R L COMPONENT OUT YPbPr Audio Out COMPONENT IN YPbPr 3 1 2 Using Video Source input DVD VCR VCD Y CVBS Out Audio Out Y CVBS IN Audi...

Page 18: ...3 2 Connecting a PC 3 2 1 Using VGA input PC Audio Out VGA IN VGA AUDIO IN VGA Out D Sub 15 pin 3 2 2 Using DVI input PC DVI Out VGA AUDIO IN Audio Out DVI IN 3 2 3 Using HDMI input PC HDMI Out HDMI I...

Page 19: ...layPort input PC DisplayPort IN DisplayPort Out 3 3 Connecting Audio Equipment 3 3 1 Connecting external speakers External speakers 3 3 2 Connecting an external audio device Stereo Amplifier AUDIO OUT...

Page 20: ...ector of DISPLAY 1 to the RS232C IN connector of DISPLAY 2 PC RS 232C RS 232C IN RS 232C IN RS 232C OUT DISPLAY 1 DISPLAY 2 3 4 2 Digital video connection Connect the DP OUT connector of DISPLAY 1 to...

Page 21: ...12 3 6 IR Pass through Connection optional DVD VCR VCD DVD VCR VCD FORMAT SOURCE INFO LIST OPTIONS ADJUST VOL NORMAL ID ID SET ENTER IR OUT IR IN Remote Control...

Page 22: ...se one music track and press OK button To play all the tracks in a folder choose one music file Then press to Play All To skip to the next or previous track press or button To pause the track press OK...

Page 23: ...MENU button several times to exit the OSD menu 5 2 OSD Menu Overview 5 2 1 PICTURE menu PIP 1 2 3 SET MENU Move Select Brightness Contrast Sharpness Black level Tint Color Gamma selection Native Nois...

Page 24: ...ensor function is to adjust brightness automatically when ambient light changed Scan mode Change the display area of the image Over scan Display about 95 of the original size of the image The rest of...

Page 25: ...scaling the original image size 21 9 The picture is enlarged to 21 9 format This mode is recommended when displaying pictures that have black bands at the top and bottom letterbox format Custom Choos...

Page 26: ...n Off PIP POP Quick swap PBP 2Win PBP 3Win PBP 4Win Switch main on top or sub on top Sub Win1 Input Sub Win1 Input Sub Win1 Input Sub Win2 Input Sub Win2 Input Sub Win3 Input PIP SIZE Select the size...

Page 27: ...ignal is detected from the PC mode RGB color space inputs after 10 seconds Video Select On to enter power saving mode when no signal is detected from the VIDEO mode YUV color space inputs after 10 sec...

Page 28: ...2 3 SET MENU 2 Move Select OSD turn off OSD H position OSD V position Information OSD Monitor ID Heat status DP version DP 1 1 10 Sec 3 Monitor information Configuration 2 Exit 50 50 45 OSD TURN OFF...

Page 29: ...t only The options are 1024x768 1280x768 1360x768 1366x768 1400x1050 1680x1050 1600x1200 1920x1200 Auto Determines the resolution automatically The selected settings will become effective after turnin...

Page 30: ...splays are connected The options are Off Auto 2 255 NOTE If sub mode is enabled then it would be disabled by tiling function on Date and time Adjust the current date and time for the display s interna...

Page 31: ...ll be take effect and then press the OK button 5 When Input source select to USB enable to access USB play list setting 0001 0002 Options Exit Photo Photo Video Press buttons to choose files Press but...

Page 32: ...b 1 Sub 2 Sub 3 Audio source PIP audio Input reset USB Media Card OPS audio Input Exit Video source Select a video input source Choose from Displayport DVI D VGA HDMI 1 HDMI 2 HDMI 3 Component Video U...

Page 33: ...30 MVC 1920x1080i field rate 50 60Hz 1920x1080p frame rate 24 25 30Hz 1280x720p frame rate 50 60Hz 30 ts m2ts mts AVCHD MPEG 2 1920x1080 25p 30p 50i 60i 30 MPEG 1 L1 L2 MPEG 1 2 2 5 L3 AAC HE AAC v1 v...

Page 34: ...M aif mac aiff mac LPCM 192 768 LPCM aac mp4 m4a AAC 48 1024 AAC HE AAC v1 v2 pls m3u Playlists m4a M4A 48 1024 AAC HE AAC v1 v2 USB Photo file format type JPEG BMP PNG GIF NOTES Sound or video may no...

Page 35: ...883 119 000 52 1920x1080 66 587 59 934 138 500 53 1920x1080 67 5 60 000 148 500 54 1920x1080 67 1584 59 963 173 000 55 1920x1080 67 08 60 172 798 56 1920x1200 74 038 59 950 154 000 UHD Preset Mode DP...

Page 36: ...cloth If the surface becomes dirty soak a soft lint free cloth in a mild detergent solution Wring the cloth to remove excess liquid Wipe the surface of the display to remove dirt Then use a dry cloth...

Page 37: ...Zoom mode is not correctly set Use the Zoom mode or Custom zoom function in the Screen menu to fine tune display geometry and time frequency parameter Can hear sound but no picture Improperly connecte...

Page 38: ...2C 2 5mm Phone jack x 2 RS232C in RS232C out RJ 45 RJ 45 Jack x 1 8 pin 10 100 LAN Por t HDMI Input HDMI Jack x 3 Type A 19 pin Digital RGB TMDS Video Audio MAX Video 720p 1080p 1920 x 1080 60 Hz WUXG...

Page 39: ...Gross Weight Without Stand 134 5 Kg Environmental Condition Item Specifications Temperature Operational 0 40 C Storage 20 60 C Humidity Operational 20 80 without condensation Storage 5 95 without cond...

Page 40: ...DSUB 9 Pin outside view Pin Signal Remark 1 NC 2 RXD Input to Commercial TV or DS 3 TXD Output from Commercial TV or DS 4 NC 5 GND 6 NC 7 NC 8 NC 9 NC frame GND Use of crossover null modem cable requi...

Page 41: ...e Value 1 3 Three bytes ASCII that defines the value CR 0x0D Set Function format Send Command Type s Name Length ID Command Type Command Value1 Value2 Value3 CR Byte Count 1 Byte 2 Byte 1 Byte 1 Byte...

Page 42: ...PbPr 004 HDMI 014 HDMI2 024 HDMI3 005 DVI 006 VGA1 PC 016 VGA2 007 OPS 008 Internal Mem 009 DP 1 No need for USB 2 For the case of two more same sources the 2nd digital is used to indicate the extensi...

Page 43: ...itor and all RCU command codes are transmitted to PC via the RS232 port Date 8 s V 56 0xx Year 1xx Month Day See example in Note For specific models only Tiling Mode 8 s P 50 000 OFF 001 ON for DS Til...

Page 44: ...ean the POWER lock will be released under this case 3 Can not be unlocked by reset in OSD setting 4 Will auto AC power on in power lock 5 Under power lock the set will not enter power saving when no P...

Page 45: ...6 42 b 62 58 x 78 11 1 31 27 G 47 43 c 63 59 y 79 12 2 32 28 H 48 44 d 64 13 3 33 29 I 49 45 e 65 14 4 34 30 P 50 46 f 66 15 5 35 31 Q 51 47 g 67 Month 1 12 Day 1 31 Hour 00 23 Min 00 59 Sec 00 59 5 S...

Page 46: ...eply Command Type r or If the Command is valid Command Type r Name Length ID Command Type Command Value1 Value2 Value3 CR Byte Count 1 Byte 2 Byte 1 Byte 1 Byte 1 Byte 1 Byte 1 Byte 1 Byte Bytes order...

Page 47: ...nt value Get Volume 8 g f 66 000 100 Gets Volume value Get Mute 8 g g 67 000 OFF unmuted 001 ON muted Gets Mute ON OFF status Get Input select 8 g j 6A 000 See Set function table Get Power status ON S...

Page 48: ...only Get Date 8 g 2 32 000 See the Set Date command For specific models only Get Time 8 g 3 33 000 See the Set Time command For specific models only NOTE 1 Power on off log data is replied as 6 seque...

Page 49: ...26 F 46 42 b 62 58 x 78 11 1 31 27 G 47 43 c 63 59 y 79 12 2 32 28 H 48 44 d 64 13 3 33 29 I 49 45 e 65 14 4 34 30 P 50 46 f 66 15 5 35 31 Q 51 47 g 67 Month 1 12 Day 1 31 Hour 00 23 Min 00 59 3 Get...

Page 50: ...e Control Pass through mode the TV DS will send a 7 byte packet followed by CR in response to RCU button activation Note that in this mode the RCU shall have no effect on the TV DS function For exampl...

Page 51: ...ASPECT ZOOM SIZE 0F VOLUME UP 10 VOLUME DOWN 11 MUTE 12 CHANNEL PAGE UP BRIGHTNESS 13 CHANNEL PAGE DOWN BRIGHTNESS 14 POWER 15 SOURCES INPUTS 16 17 18 SLEEP 19 MENU 1A UP 1B DOWN 1C LEFT 1D RIGHT 1E...

Page 52: ...code TV DS will turn itself on then forward the POWER code to the host via RS232 2 2 When TV DS is ON and receives the IR POWER code TV DS will forward the POWER code to the host via RS232 then turn o...

Page 53: ...com Latin America Columbia www viewsonic com la C http www viewsonic com la soporte servicio tecnico soporte viewsonic com Latin America Mexico www viewsonic com la C http www viewsonic com la soporte...

Page 54: ...uct d Causes external to the product such as electrical power fluctuations or failure e Use of supplies or parts not meeting ViewSonic s specifications f Normal wear and tear g Any other cause which d...

Page 55: ...er by any other party 4 Repair or attempted repair by anyone not authorized by ViewSonic Effect of state law This warranty gives you specific legal rights and you may also have other rights which vary...

Page 56: ...ct s serial number so please record the product information in the space provided below on your purchase for your future use Please retain your receipt of proof of purchase to support your warranty cl...

Page 57: ...oluglobales com Cuernavaca Compusupport de Cuernavaca SA de CV Francisco Leyva 178 Col Miguel Hidalgo C P 62040 Cuernavaca Morelos Tel 01 777 3180579 01 777 3124014 E Mail aquevedo compusupportcva com...

Page 58: ......

Reviews: