background image

11

Using the Display Features

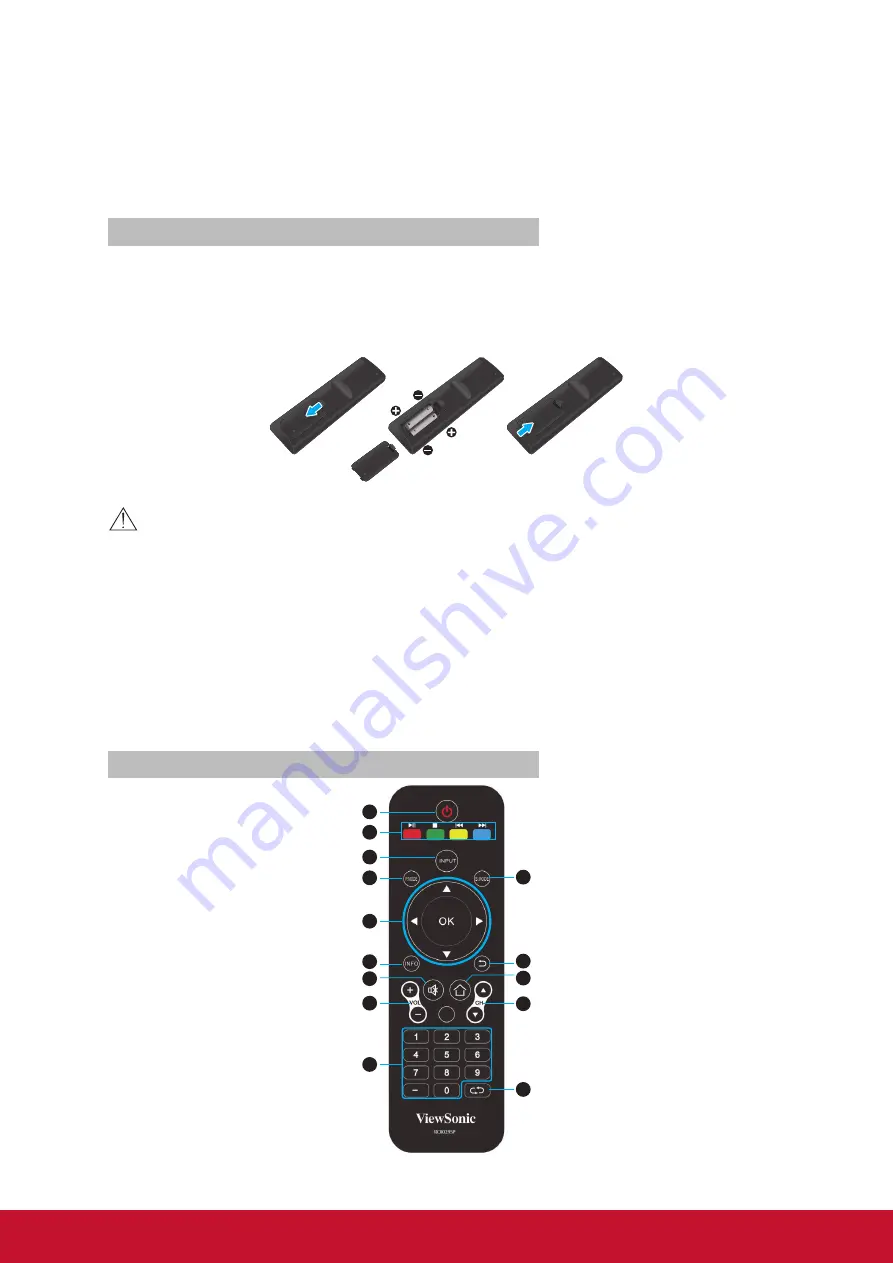
Remote Control and Display Controls

Inserting Remote Control Batteries

1. Remove the battery cover by pulling then lifting the knob on the cover.

2.  Insert the batteries, corresponding to the (+) and (-) markings on the battery 

compartment.

3. Reattach the battery cover.

 CAUTION

• 

Only use the specified AAA batteries.

• 

Do not mix new and old batteries. This may result in creaking or leakage, which 

may pose a risk of fire or lead to personal injury.

• 

Insert batteries according to (+) and (-) markings. Inserting the batteries incorrectly 

may result in leakage, which may pose a risk of fire or lead to personal injury.

• 

Dispose of the battery in accordance with local laws and regulations.

• 

Keep the batteries away from children or pets.

• 

When the remote control will not to be used for an extended period, remove the 

batteries.

Remote Control and Display Controls

1
2

3
4

5

6
7

8

9

10

12

13

14

11

Summary of Contents for CDE3204

Page 1: ...ng your product for future service Warranty information contained in this User Guide will describe your limited coverage from ViewSonic Corporation which is also found on our web site at http www view...

Page 2: ...ding the world s expectations for technological evolution innovation and simplicity At ViewSonic we believe that our products have the potential to make a positive impact in the world and we are confi...

Page 3: ...isconnecting the Stand 2 Mounting ViewSonic display to the wall 3 Wall Mount Kit Specifications VESA 4 Front View Key Pad of the Product 5 Rear Side View of the Product 6 Connecting the Display 7 HD C...

Page 4: ...and can radiate radio frequency energy and if not installed and used in accordance with the instructions may cause harmful interference to radio communications However there is no guarantee that inte...

Page 5: ...means that the battery has a heavy metal content of more than 0 0005 Mercury or more than 0 002 Cadmium or more than 0 004 Lead ENERGY STAR Information ENERGY STAR is a set of power saving guidelines...

Page 6: ...0 1 Certain components of products as stated above are exempted under the Annex III of the RoHS2 Directives as noted below Examples of exempted components are 1 Mercury in cold cathode fluorescent la...

Page 7: ...hout prior written permission from ViewSonic Corporation Product Registration To fulfill possible future product needs and to receive additional product information as it becomes available please visi...

Page 8: ...sed to rain or moisture or the unit does not operate normally or has been dropped USE AC power Cord Keep the following guidelines to protect the AC power cord from being damaged If the AC power cord i...

Page 9: ...S ALMOST INVARIABLY FATAL Be sure the antenna system is grounded so that it can provide some protection against voltage surges and built up static charges Section 810 of the National Electrical Code N...

Page 10: ...m moisture Do not expose this appliance to rain or moisture Do not place objects filled with liquids such as vases on the display Do not use power line operated display sets near water such as in plac...

Page 11: ...ace objects on top of the display The image may be uneven or the panel may be damaged If the display is used in a cold place a smear may occur in the picture or the picture may become dark It is not c...

Page 12: ...i 720p 480p 480i Both HD and SD content 480i SD content only AV Connect your PC to your ViewSonic LCD Display RU WKH 6XE FRQQection you need to apply D Sub cable and mini 3 5mm audio cable RU WKH 9 FR...

Page 13: ...surface Then insert the neck onto the bottom stand and secure the parts by inserting the screws and tightening them with the screwdriver Note Attaching the stand requires two people Disconnecting the...

Page 14: ...power and any other cables that might hinder moving the display Set the display on a table or work surface placing the screen face down on a towel or woolen blanket to protect the screen surface from...

Page 15: ...as shown in the table above To find the perfect mount please browse www viewsonic com or call our service team United States 1 800 688 6688 Canada 1 866 463 4775 Europe 44 0 207 382 8250 When purchasi...

Page 16: ...the setting on the OSD menu VOL Decrease the volume Move to the left or adjust the setting on the OSD menu 4 Up Down CH Move upward to scroll through menu options CH Move downward to scroll through m...

Page 17: ...es 4 YPbPr signal input Connect to the YPbPr output of YPbPr device 5 SPDIF Optical output Connect to the SPDIF input of Audio amplifier 6 DVI D Connect to the DVI D of PC 7 HDMI 1 input with MHL Conn...

Page 18: ...rear side of your display HDMI Connection HDMI cable HDMI cable HD cable box HD satellite box CATV Satellite antenna cable Rear side of the display DVI Connection AUDIO cable DVI cable DVI to HDMI cab...

Page 19: ...12 480P60 Yes Yes 13 576P50 Yes Yes 14 720P50 Yes Yes 15 720P60 Yes Yes 16 1080I50 Yes Yes 17 1080I60 Yes Yes 18 1080P50 Yes Yes 19 1080P60 Yes Yes 20 1080P24 Yes Yes 21 1080P30 Yes NA YPbPr or Compon...

Page 20: ...er to the user manual from your service provider to determine the setting If it requires 3 digits please try 566 565 556 or 688 It usually works with DISHNetwork 4 digits please try 0054 It usually wo...

Page 21: ...x 600 37 88 60 32 40 P P Yes 4 VESA DMT 1024 x 768 48 36 60 65 N N Yes 5 VESA DMT 1280 x 768 47 77 59 8 79 5 N P Yes 6 VESA DMT 1280 x 800 49 7 59 81 83 5 N P Yes 7 VESA DMT 1280 x 1024 63 98 60 02 1...

Page 22: ...w and old batteries This may result in creaking or leakage which may pose a risk of fire or lead to personal injury Insert batteries according to and markings Inserting the batteries incorrectly may r...

Page 23: ...ownward to select menu options move to the right left to select the main menu or adjust the set tings You can also use to enter the corresponding submenu OK Confirm the selection or enter the correspo...

Page 24: ...OL to adjust volume To turn off the volume press MUTE To restore volume press MUTE again or press VOL directly Viewing the Displayed Information To display the current information of the display Press...

Page 25: ...cess the LOCK CONTROL menu The default is 0000 Changing Password To change a new password 1 Press MENU to display the OSD main menu 2 Press or to select LOCK menu then press OK to enter the menu 3 Ent...

Page 26: ...K or button to enter specific submenu 3 Press MENU again to exit or back to parent menu 4 Press button to select among Picture Mode Contrast Brightness Sharpness Tint Color Blue Light Filter Color Tem...

Page 27: ...of the picture Brightness Controls the overall brightness of the picture Sharpness Increase this setting to see crisp edges in the picture decrease it for soft edges Tint Controls the difference betw...

Page 28: ...Press OK or button to enter 6 Press button to adjust 7 Press MENU again back to parent menu The Audio menu includes the following options Sound Mode Standard Music Movie Sports and Personal Select a s...

Page 29: ...e Zone DST Time Format Clock TimeManagement 5 Press OK or button to enter 6 Press button to adjust 7 Press MENU again back to parent menu The TIME menu includes the following options Sleep Timer Set a...

Page 30: ...g options Menu Language Select an OSD menu language can be displayed Default English is selected as menu language Transparent Adjust the transparency of the OSD on screen display menu OSD Time Out Adj...

Page 31: ...rent menu 4 Press button to select among System Lock Change Password Input Block 5 Press OK or button to enter 6 Press button to adjust 7 Press MENU again back to parent menu The Lock menu includes th...

Page 32: ...ress button to select among H Pos V Pos Clock Phase Auto 7 Press button to adjust 8 Press MENU again back to parent menu The PC menu includes the following options H POS Adjust the horizontal position...

Page 33: ...en press INPUT button to set the Input Source to Media Press button to select USB in the source menu then press OK button to enter AV USB 2 Press button to select the option you want to adjust in the...

Page 34: ...utton to start playback The tool bar will pop up then 5 For cycling playback set the Repeat Mode on tool bar to be ALL R_ALL Press EXIT to close the tool bar 6 Press to pause or to stop the playback P...

Page 35: ...onfig From USB Load the hospitality configuration from USB drive Hospitality Turn on or off the Hospitality function Hospitality Function Enter the hospitality sub menu Power ON Mode D cider comment a...

Page 36: ...ment Ensure that the video cable is securely connected The picture may appear dim in a brightly lit room Adjust the display settings Check the input signal setting No sound Check your audio connection...

Page 37: ...replug again Power is cut off suddenly Make sure the sleep timer is turned off Make sure the PC or video signal cable is connected properly The internal temperature of the unit has increased Remove a...

Page 38: ...communication Remote Control Out Remote control out RC5 38KHz Power Voltage AC 100 240V 50 60Hz Operating conditions Temperature 0 C to 40 C Humidity 20 to 90 no condensation Storage condition Tempera...

Page 39: ...the rear side 1 Connector type DSUB 9 Pin Male 2 Pin Assignment Male DSUB 9 Pin outside view Pin Signal Remark 1 NC 2 RXD Input to Commercial TV or DS 3 TXD Output from Commercial TV or DS 4 NC 5 GND...

Page 40: ...ion command code One byte ASCII code Value 1 3 Three bytes ASCII that defines the value CR 0x0D Set Function format Send Command Type s Name Length ID Command Type Command Value1 Value2 Value3 CR Byte...

Page 41: ...AV 002 S Video 003 YPbPr 004 HDMI 014 HDMI2 024 HDMI3 034 HDMI4 005 DVI 006 VGA1 016 VGA2 026 VGA3 007 OPS PC 017 Android 008 Internal memory 009 DP 1 No need for USB 2 For the case of two more same...

Page 42: ...003 Right for DS PIP Input 8 s 7 37 000 TV 001 AV 002 S Video 003 YPbPr 004 HDMI 014 HDMI2 024 HDMI3 005 DVI 006 VGA 007 OPS PC for DS For the case of two more same sources the 2nd digital is used to...

Page 43: ...For specific models only Restore default 8 s 7E 000 Resets HDTV to factory setting Note 1 Behavior at lock modes Lock Mode Behavior Button Lock 1 Lock all buttons of front panel and RCU except for Pow...

Page 44: ...1512 3 0x 46 31 62 3 Tiling definition of H Monitors V Monitors and Position 4 Date Time format definition Value 1 Value 2 Value 3 Date 0 Year Year code of the first 2 digis Year code of the last 2 d...

Page 45: ...38 X 58 54 t 74 7 27 23 C 43 39 Y 59 55 u 75 8 28 24 D 44 40 60 56 v 76 9 29 25 E 45 41 a 61 57 w 77 10 0 30 26 F 46 42 b 62 58 x 78 11 1 31 27 G 47 43 c 63 59 y 79 12 2 32 28 H 48 44 d 64 13 3 33 29...

Page 46: ...ue3 CR Byte Count 1 Byte 2 Byte 1 Byte 1 Byte 1 Byte 1 Byte 1 Byte 1 Byte Bytes order 1 2 3 4 5 6 7 8 9 NOTE Get Power STBY status is the exception for VT2405LED 1 and VT3205LED Reply Command Type r o...

Page 47: ...ee ASCII bytes Comments Code ASCII Code Hex Get Contrast 8 g a 61 000 100 Get Brightness 8 g b 62 000 100 Get Sharpness 8 g c 63 000 100 Get Color 8 g d 64 000 100 Get Tint 8 g e 65 000 100 Get Volume...

Page 48: ...on to identified display Get ACK 8 g z 7A 000 This command is used to test the communication link Get Thermal 8 g 0 30 000 100 0 100 deg C 01 99 1 99 deg C For specific models only Get Power on off lo...

Page 49: ...79 12 2 32 28 H 48 44 d 64 13 3 33 29 I 49 45 e 65 14 4 34 30 P 50 46 f 66 15 5 35 31 Q 51 47 g 67 Month 1 12 Day 1 31 Hour 00 23 Min 00 59 3 Get Time log data example Assumed the power on off record...

Page 50: ...on Note that in this mode the RCU shall have no effect on the TV DS function For example Volume will not change the volume in the LCD but only sends Volume code to PC over the RS232 port IR Pass Throu...

Page 51: ...F4 2F Note 1 This IR pass through code is different with RCU key code 2 Special control sequence for POWER key under IR pass through mode 2 1 When display is OFF and receives the POWER code The displa...

Page 52: ...om www viewsoniceurope com uk support call desk Latin America Argentina www viewsonic com la C http www viewsonic com la soporte servicio tecnico soporte viewsonic com Latin America Chile www viewsoni...

Page 53: ......

Reviews: