background image


display will show (‘ ‘), then use the 
volume knob (26) to list all songs
under this directory and   select the 
title. Press  BND/LOUD 

Repeat the above steps if the newly 
selected title is again a directory. 

4) DISPLAY INFORMATION 

Press DISP button (20) to show the 
following information, such as the track 
number, the clock and other information. 
For the disc with MP3 ID3 function 
version only: ID3 TAG (if available: song 
title, directory name, artist name, other 
contents…) will be displayed on the 
screen without pressing DISP button. 
 

USB PLAY OPERATION


In  the  front  panel  of  the  unit,  there  is  an 
USB  interface  (16).  You  can  connect  an 
USB device through this interface (16).   

When you connect an USB device through 
the interface, the unit will search the MP3 
files or WMA files in the USB driver and 
start to play MP3 files or WMA files 
automatically.   

If in other mode, you can also press MOD 
button (5) to select USB mode. 
When playing the MP3 files or WMA files in 
the  device,  the  operation  is  the  same  with 
the MP3/WMA operation described above. 

 
Note


    The  main  unit  can  only  support  the 

standard USB-memory disc. 

    USB  MP3  player  is  not  a  standard 

which  means  different  brand  name  or 

different  models  have  their  own 

standard.  So  our  product  cannot 

support every MP3 player. 

    When  connecting  an  MP3  player  and 

there  has  normal  battery  in  the  player 

(non rechargeable battery), you should 

remove  the  battery  from  the  MP3 

player then connect it to the USB   


interface.  Otherwise,  it  may  cause 

battery burst. 

    When in USB play mode, be sure not to 

remove  the  USB  driver  from  the  USB 

interface. 


CAUTION 

When  there  are  important  files  in  the  USB 
device, do not connect it to the main unit to 
play. And don’t play the CD-R/RW disc that 
has important files in it. Because any wrong 
operation  may  cause  files  loss.  And  our 
company assumes no responsibility for this. 
 

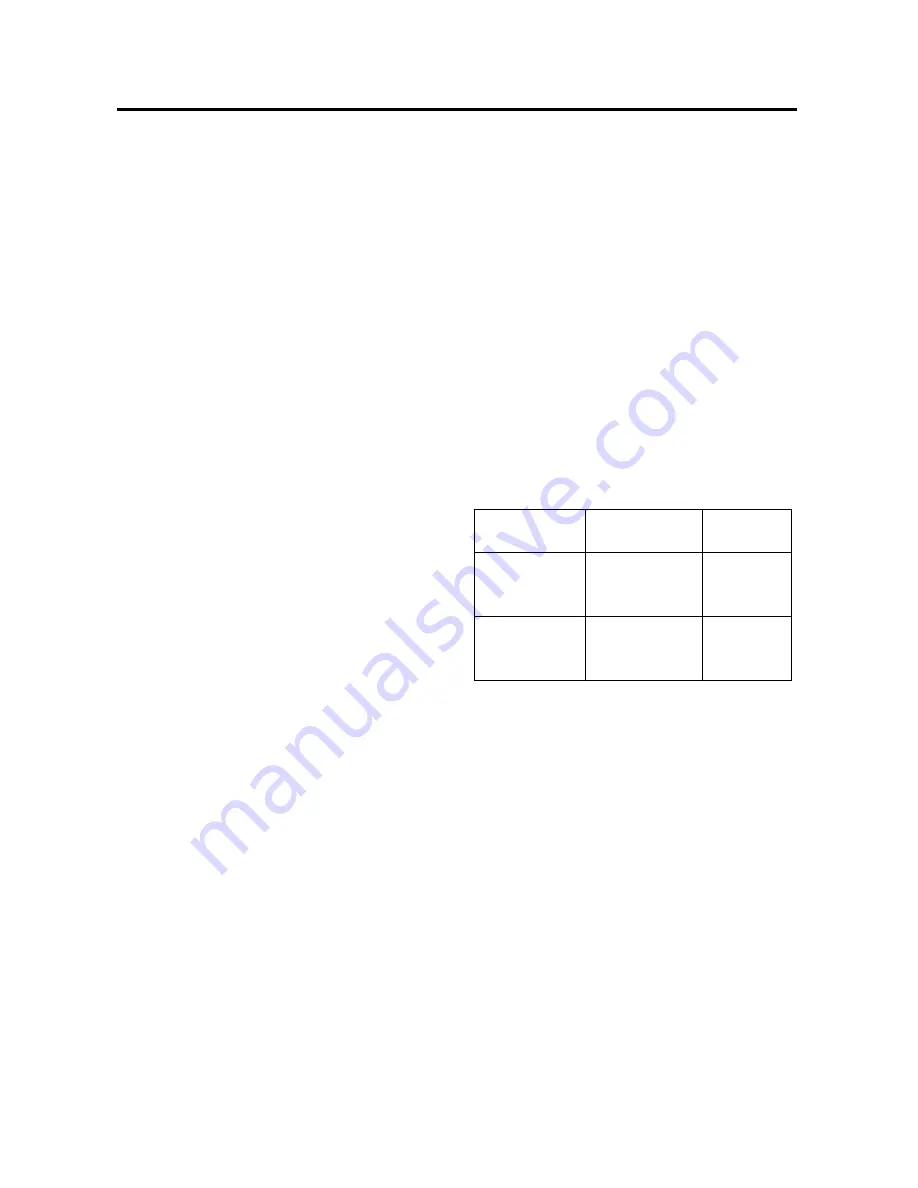
SUPPORTED 

MP3/WMA 

DECODING MODES 

The 

main 

unit 

supports 

MP3/WMA 

(Windows  Media  Audio)  decoding  modes 
as below.   
 

Standard 

Bit Rate 

(kbps) 

Supports 

Mode 

MPEG1 Audio 

Layer 3 

(44.1kHz) 

16~ 320 Kbps 

& VBR 

Stereo 

Windows 

Media Audio 

(44.1kHz) 

16~ 320 Kbps 

& VBR 

Stereo 

The USB solution can support: 
1.  Folder: 256 max. 
2.  File: 30000 max. 
 

SD/MMC OPERATION 

The  SD/MMC  interface  (27)  is  on  the 
housing  of  the  unit.  When  you  press  the 
release button to fold down the front panel, 
you will see the SD/MMC interface. 

When you insert a SD/MMC card in the 

SD/MMC interface, the unit will search the 

MP3 files or WMA files in the card and start 

to play MP3 files or WMA files 

automatically.   

The operation is the same with the MP3   

13

OPERATION 

operation described above. If in other mode, 

you can also press MOD button (5) to 

select SD/MMC mode.   

onfirm and start the play. 

button to 

c

Summary of Contents for VPC750BT

Page 1: ...OWNER S MANUAL RADIO CD PLAYER WITH BLUETOOTH VPC750BT ...

Page 2: ...ecting station 10 Automatic memory storing program scanning 10 Mono stereo 10 Scan 10 Station storing 10 RDS operation 10 CD MP3 WMA operation 11 Switching to CD mode 11 Selecting tracks 11 Pausing playing 12 Previewing all tracks 12 Repeating the same track 12 Playing all tracks in random 12 Ejecting a disc 12 Special function for MP3 WMA disc 12 USB play operation 13 Support MP3 WMA decoding mod...

Page 3: ...ject to dust dirt or excessive vibration DIN FRONT REAR MOUNT This unit can be properly installed either from Front conventional DIN Front mount or Rear DIN Rear mount installation utilizing threaded screw holes at the sides of the unit chassis For details refer to the following illustrated installation methods TAKEOUTSCREWBEFOREINSTALLATION Before install the unit please remove the two screws DIN...

Page 4: ... to the mounting bolt on the back of the unit If necessary bend the metal strap to fit your vehicle s mounting area Then use the supplied hardware Tapping Screw and Plain Washer to attach the other end of metal strap to a solid metal part of the vehicle under the dashboard This strap also helps ensure proper electrical grounding of the unit Note to install the short threading terminal of the mount...

Page 5: ...ew holes marked T Toyota N Nissan located on both sides of the unit to fasten the unit to the factory radio mounting brackets supplied with your vehicle Dashboard or Console Screw Factory Radio Mounting Bracket Side View showing Screw Holes marked T N Screw To fasten the unit to the factory radio mounting brackets Align the screw holes on the bracket with the screw holes on the unit and then tight...

Page 6: ...nel fails to lock in position properly pressing control button may not function and the display may be missing some segments Press the release button and then reinstall the front panel again Precautions when handling 1 Do not drop the front panel 2 Do not put pressure on the display or control buttons when detaching or re installing the front panel 3 Do not touch the contacts on the front panel or...

Page 7: ...WIRING CONNECTION FOR 4X40W SYSTEM 7 ...

Page 8: ... 1 6 preset buttons 12 2 SCN 13 3 RPT 14 MUTE 15 6 DIR 16 USB interface 17 9 PTY 18 SCAN CON 19 0 DISP 20 AS PS Navi SCH 21 7 AF MON 22 8 EQ TA 23 AUX IN 24 hang up BND LOUD CLR 25 Reset button 26 Volume knob when rotated 27 SD MMC interface 28 disc slot 29 eject button 8 11 12 13 4 5 23 15 10 9 8 7 2 3 1 14 26 17 22 21 20 19 18 24 6 16 28 29 27 25 SEL MENU when pressed ...

Page 9: ...tly press MUTE button 14 will mute the sound instantly press it again will resume the sound LOUDNESS Press LOUD button 24 for several seconds to switch loudness function on and LOUD will appear on the LCD Press it for several seconds again to release this function and LOUD will disappear SET THE CLOCK Press the DISP button 19 shortly until the clock is shown on the LCD display Then hold down DISP ...

Page 10: ...CH will appear on LCD the radio will search from the current frequency and checks the signal strength until one cycle search is finished And then 6 strongest stations are stored into the corresponding preset number button Program scanning Press AS PS button 20 shortly to scan preset station And the corresponding station number P1 P6 will flash on LCD MONO STEREO Press MON button 21 for several sec...

Page 11: ...TY data PI Program Identification code Code for identifying programs PS Program Service Name Broadcast station name data expressed in alphanumerically characters AF Alternative Frequencies Frequency list of broadcasting stations transmitting the same program TP Traffic Program Identification Identification data for traffic information broadcasting station TA Traffic Announcement Identification Ide...

Page 12: ... by volume knob Searching Track Directly Press AS PS Navi SCH button 20 for one time It enters into Searching track in Digital Audio CD You can use the volume knob 26 to select the track number in a a sequence The corresponding track number such as Press BND LOUD button 24 to confirm and start the play Searching Directory or File Name Press AS PS Navi SCH button 20 for two times It enters into Sea...

Page 13: ...every MP3 player When connecting an MP3 player and there has normal battery in the player non rechargeable battery you should remove the battery from the MP3 player then connect it to the USB interface Otherwise it may cause battery burst When in USB play mode be sure not to remove the USB driver from the USB interface CAUTION When there are important files in the USB device do not connect it to t...

Page 14: ...R CD RW software for more information on finalization process 3 Depending on the recording status conditions of the disc and the equipment used for the recording some CD Rs CD RWs may not be played on this unit see 1 1 To have more reliable play back please see following recommendations a Use CD RWs with speed 1x to 4x and write with speed 1x to 2x b Use CD Rs with speed 1x to 8x and write with sp...

Page 15: ... PAIR MOD button 5 unit LCD appears PAIR END RE CONNECTING This unit is built in auto reconnection function In some conditions the unit will auto reconnect with the mobile phone note the mobile phone must have been paired with the unit before Before dialing you need to confirm the Bluetooth sign is displayed on LCD Within ten seconds in the following conditions a when you turn off the unit and the...

Page 16: ...to select the speed dial number and shortly press button 4 to confirm the dialing 4 Edit the speed dial list Select the number you want to edit from the speed dial list then shortly press SEL MENU button 26 to enter the edit interface RECEIVED Display the last call you have received You can use volume knob to scan the last received numbers And you can shortly press button 4 to confirm the dialing ...

Page 17: ...king mode pressing button 4 can interrupt the call temporally then press button 4 again to continue the call This function needs the mobile phone support TRANSFER THE CALL BETWEEN MOBILE PHONE AND THE UNIT During the talking mode you can press and hold T MENU button 6 to transfer the phone call between the mobile phone and the unit Note If you transfer the call to mobile phone the mute of the pres...

Page 18: ...n Y 15 Ampere max CD PLAYER Signal to Noise Ratio More than 55 dB Channel Separation More than 50 dB Frequency Response 40Hz 18 kHz RADIO For 2 Bands FM Frequency Coverage 87 5 to 108 MHz IF 10 7 MHz Sensitivity S N 30dB 10dBu Stereo Separation 25dB MW Frequency Coverage 522 to 1620 kHz IF 450 kHz Sensitivity S N 20dB 36 dBu Note Specifications and design are subject to modification without notice...

Page 19: ...or try to play a new one Temperature inside the car is too high Cool off or until the ambient temperature return to normal Condensation Leave the player off for an hour or so then try again No sound Volume is in minimum Adjust volume to a desired level Wiring is not properly connected Check wiring connection Sound skips The installation angle is more than 30 degree Adjust the installation angle le...

Page 20: ......

Reviews: