


37
ENGLISH
DVD/Bluetooth/NFC Radio 7”
36
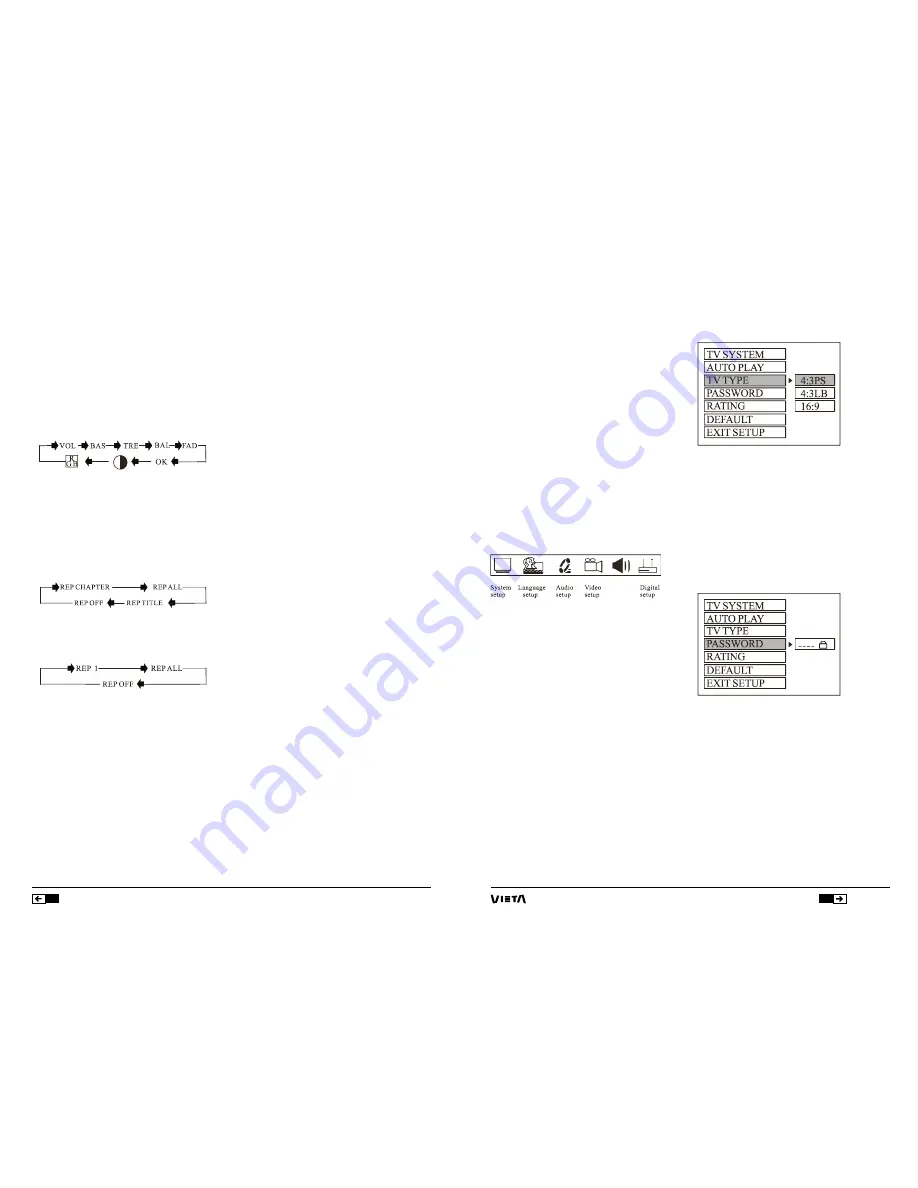
A. SYSTEM SETUP
(A) TV Type
1
. 4:3 PS
Played back in the PAN & SCAN style. (If connected to
wide-screen TV, the left and right edges are cut off).
2
. 4:3 LB
Played back in LETERBOX style. (If connected to wide-
screen TV, black bands appear at top and bottom of
the screen).
3
. 16:9
Select when a wide-screen TV set is connected.
(B) Password
Enter the password and press
ENTER
button.
Type the old password (The initial factory code is 0000)
and key in 4 characters password now you want to
use, and type again to confirm.
(C) Rating
Select suitable guidance rating by the cursor button
6
and confirmed by pressing
6
key. Rating 1:[ KID SAFE]
Select this when the program are safe for all kids to
view.
Rating 1:[ KID SAFE ]
Select this when the program are safe for all kids to
view.
On-Screen Display
During CD, VCD, DVD mode, press
10
button. The
display shows single track elapsed time, single track
remaining or entire disc remaining, and the track being
played with the content of the whole disc.
Note: During MP3 mode, only single track elapsed time
is displayed in OSD mode.
VOL/BAS/TRE/BAL/FAD Selector
Repeatedly press
11
button to select the Desired mode
in the following order:
Note: After selecting your desired mode, you Can
adjust the current mode being displayed by using
(VOL+or VOL-) buttons.
Repeat Playing/AMS
During DVD mode, first , press
12
to repeat the current
track being played; Press it again to repeat playing
all the tracks. Pressing it the third Time will cancel the
repeating function. (LCD will display different designs)
During CD, MP3, VCD mode. Press
12
to Repeat the
current track being played; press It again to cancel the
repeating function.
Note: In VCD, MP3, CD mode. The initial setting is
repeat playing all the tracks.
Note:In radio mode. Press
12
to scan each stored
station for 10 seconds.
Random Playing
During playback mode, press
13
button to play any
track at random.
Number buttons
During radio mode, you can select one of the 6 stored
stations on each band by pressing any one of the
number button
14
.
During the playing mode, you can select any track
directly by using
14
number button (0~9). For
example, if you need the fifteenth track, you can
first press button 1 and then press 5 button, the
corresponding track (
15
) will be played.
Left/Right/Stereo Selector
During playback mode, continuously press
15
can
change the sound to left/right speaker or stereo mode.
Note: There are 5 different surrounding effect in
surround mode. During VCD mode. You can see the
different pictures indicating different effects on the
television.
Playing PBC (menu)
During VCD mode only, when pressing
16
Button at
the first time, PBC playback starts and the menu of
entire disc appears on the television. And then you can
select your favourite track by using number button
14
.
When a track is playing, you can press
20
button to
return to the menu if you want to stop to select other
tracks. To cancel PBC playing, press
16
button again.
Subtitle Selector
During DVD mode, press
17
button to select desire
subtitle language.
Setting CD Playback Time
In VCD, CD mode, press
18
key and set the track, and
the display will show the time --:-- . Enter your desired
time by pressing number button
14
(0~10+). For
example, enter: 2 5 : 0 0 , and press
6
to confirm. It will
automatically start playing the track from the point of
twenty-fifth minutes in the disc.
In DVD playing mode, press
18
key once and input
a desired track number. Then press
6
key to play the
DVD from the position corresponding to the track
number selected.
In DVD playback mode, press
18
key once and input
a desired time to play the DVD from the position
corresponding to the time Selected. Fox example,
press
18
key onces and the display will show the time
--:--:-- .
Enter your desired time by pressing number button
14
(0~10+). And
4
direction button, Then press
6
button,
it will automatically start playing the track from the
point of your desired time in the disc.
Note: No time play function for MP3.
Mode Switch
Press
19
button to switch to radio mode or playback
mode.
Stop the Playback
In DVD mode, press
20
button to suspend the playback
and press “Play” to continue.
Press it again to stop the playback.
MULTI-ANGLEKEY
In DVD playback mode, press
21
button to watch the
DVD content from different angle.
SLOW KEY
In DVD/CD playback mode, press
21
key once for 1/2
slow, twice for 1/3 slow, thrice for 1/4 slow, and so no.
When the key is pressed the seventh time, it will return
to normal playback.
Note: Not applicable in MP3 and CD playback.
SETUPKEY
1. Press
23
of remote control in the stop mode. (Press
the
20
key twice to ensure the player is under STOP
mode.)
2. The main page of setup menu is dis-played.
3. Select the preferred item by using the
4
Key.
4. Press
6
key.
A. System Setup.
This setup page includes all items of TV system,
Screen saver, TV type, pass-word, Rating & Default
features. For detail please refer to SYSTEM SETUP
MENU.
B. Language Setup.
This setup page includes all items of OSD language
features. For details please refer to LANGUAGE SETUP
MENU.
C. Audio Setup
This setup page includes all items for AUDIO. Please
refer to AUDIO SETUP MENU.
D. Video Setup
This setup page includes all items for VIDEO. Please
refer to VIDEO SETUP MENU.
Summary of Contents for VC-HD9700BT
Page 24: ...www vieta es ...


