9
!
Please note
The thermal insulation must not come into con-
tact with naked flames.
Exercise caution when welding and brazing
!
Please note
To prevent material damage, install the buffer
cylinder in a draught-free room free from the risk
of frost.
Otherwise the buffer cylinder will have to be
drained if there is a risk of frost and it is not in
use.
■
Provide adequate clearance from the wall so that the
thermostat can be operated (if supplied).
■
Placing the cylinder on a plinth will make the room
easier to clean.
■
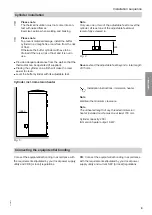
Level the buffer cylinder with its adjustable feet.
Note
Only use one or two of the adjustable feet to level the
cylinder. At least one of the adjustable feet must
remain fully screwed in.
≤
35
Fig. 4
Never
extend the adjustable feet beyond a total length
of 35 mm.
Cylinder incl. immersion heater
650
Fig. 5
Installation instructions, immersion heater
Note
Maintain the minimum clearance.
Note
The unheated length of any threaded immersion
heater installed on site must be at least 100 mm.
Cylinder capacity: 200 l.
Immersion heater output: 6 kW.
Connecting the equipotential bonding
Connect the equipotential bonding in accordance with
the requirements stipulated by your local power supply
utility and VDE [or local] regulations.
CH
: Connect the equipotential bonding in accordance
with the requirements stipulated by your local power
supply utility and current SEV [or local] regulations.
Installation sequence
Cylinder installation
6150632
Installation


