background image

5. Configuring Your System 

56 

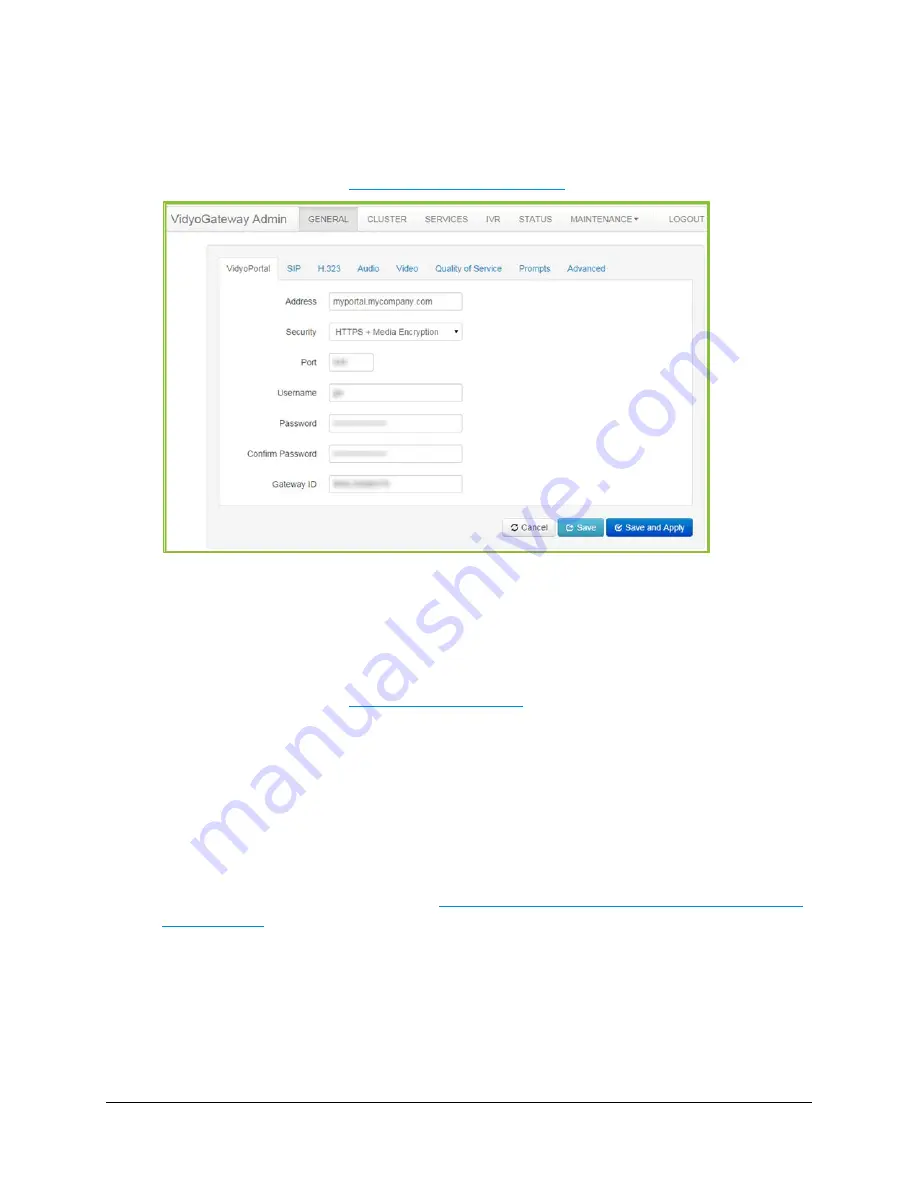
To configure the VidyoPortal settings: 

1.


Log in to the Admin portal using your System Console account. 

For more information, see 

Logging in to the Admin Portal


2.


Enter the IP or FQDN address of the VidyoPortal tenant to which your VidyoGateway will be 
connected. 

3.


Select None, HTTPS, or HTTPS + Media Encryption from the Security drop-down. 

HTTPS or HTTPS + Media Encryption must be selected for TLS protocol fields to display 

on the 

General > SIP

 tab. 

For more information, see 

Configuring SIP Settings

4.


Enter the port number on which your VidyoGateway listens. 

Default port numbers for HTTP and HTTPS are 80 and 443, respectively. You can change 

these values as necessary. The port number in your VidyoGateway must match the value 

set in your VidyoPortal. You can also configure these ports to match the firewall port range 

required by Legacy systems, as necessary. 

5.


Enter your user name in the Username field. 

This is the username you created when adding your VidyoGateway component on your 

VidyoPortal. For more information, see 

Making Configurations on Your VidyoPortal for Your 

VidyoGateway

6.


Enter and confirm your password. 

This is the password you created when adding your VidyoGateway component on your 

VidyoPortal. 

7.


Enter the Gateway ID for your VidyoGateway. 

A default value is provided. 

Summary of Contents for VidyoGateway

Page 1: ...Product Version 3 2 Document Version E October 2015 VidyoGateway Administrator Guide ...

Page 2: ...t Calls of Different Types and Resolutions 4 Discontinued VidyoGateway Model Capacities 4 VidyoGateway Physical Setup Guidelines 5 2 Understanding the VidyoGateway Configuration Procedure 6 Making Configurations on Your VidyoGateway 6 Making Configurations on Your VidyoPortal for Your VidyoGateway 6 Making Additional VidyoGateway Configurations 7 3 Configuring Your Server 8 Logging in to the Syste...

Page 3: ...ing RADIUS 45 Disabling FIPS Mode 45 Enabling RADIUS 46 Viewing the Current RADIUS Configuration 47 Modifying the RADIUS Configuration 48 Creating a RADIUS Enabled Account 49 Viewing a RADIUS Enabled Account 50 Removing a RADIUS Enabled Account 51 Disabling RADIUS Authentication 51 Creating a Local System Console Account 52 5 Configuring Your System 55 Configuring the General Settings 55 Configuri...

Page 4: ...de 80 Managing Services 81 Adding a Service 82 Activating and Deactivating Services 86 Deleting a Service 87 Editing a Service 88 Understanding Call Types and Service Examples 90 H 323 Outgoing Call Examples 90 H 323 Incoming Call Examples 90 SIP Incoming Call Using a Prefix Example 91 SIP Incoming URI Dialing Example 91 Dialing From a Legacy H 323 Endpoint into a Vidyo PIN Protected Room 92 TCS4 ...

Page 5: ...d Viewing an SSL CSR 121 Certificates Received from Your Certificate Authority 123 Uploading or Editing Your Server Certificate 125 Deploying Your Server CA Certificates Intermediates 129 Configuring HTTPS Port Settings for Your Admin Pages 131 Importing Client Root CA Certificates from the Advanced Tab 132 Enabling HTTPS on Your Vidyo Server 139 Configuring Your Vidyo Server s Management Interfac...

Page 6: ...Provisioning Requirements 157 Example Configurations 158 Understanding VidyoGateway VE Support of VMware Features 158 Installing VidyoGateway VE 159 Appendix A Definitions 167 Appendix B Legacy TCS4 Delimiters 169 Appendix C Deployment Examples 170 Appendix D NAT Firewall Traversal 173 Appendix E Reliability 178 Limitations of Reliability Prediction Models 178 General Prediction Methodology 178 El...

Page 7: ...you must have Admin access to your VidyoGateway and Super Admin access to your VidyoPortal Terms used in this guide are defined in a separate section For more information see Appendix A Definitions For more standard VidyoConferencing definitions refer to the VidyoConferencing Administrator Guide Conventions Used in This Guide Items marked with Tip indicate that the information is useful and practi...

Page 8: ...lowing The discontinued VidyoGateway MKII looks like the following You can identify your VidyoGateway model by checking the hardware Current VidyoGateway hardware version numbers contain 31230 or 5645 combinations Current VidyoGateway hardware labels contain an 02 0A combination Previous VidyoGateway hardware labels contain 00 0A 01 0B or 01 0A combinations Starting with software version 2 1 3 22 ...

Page 9: ...er Concurrent Calls of the Same Type Capacity VidyoGateway VidyoGateway VidyoGateway MKII VidyoGateway VidyoGateway XL Hardware Label xxxx 00 0A xxxx 01 0A xxxx 01 0B xxxx 00 0A xxxx 01 0A xxxx 01 0B xxxx MKII 00 0A xxxx MKII 01 0A xxxx 02 0A xxxx 02 0A Status Previous model Previous model Previous model Current model Current model H 235 Encryption Off On On Off On Off On Off HD 1080P Calls 30 fps...

Page 10: ...andle with software version 2 1 3 22 and later HD SD HD SD CIF SD CIF HD CIF 1 HD 12 SD 1 HD 6 SD 6 CIF 3 SD 18 CIF 3 HD 6 CIF 2 HD 9 SD 2 HD 3 SD 6 CIF 7 SD 10 CIF 3 HD 6 SD 3 HD 1 SD 4 CIF 4 HD 3 SD Note When a Legacy device attempts to join a conference whose VidyoGateway is operating at full capacity the call fails to connect Discontinued VidyoGateway Model Capacities These tables show the max...

Page 11: ...ay Physical Setup Guidelines When physically setting up your VidyoGateway Vidyo recommends the following guidelines Locate the VidyoGateway as close as possible to your Legacy system s preferably on the same LAN If the Legacy systems are in dispersed locations install the VidyoGateway on the same LAN as your VidyoRouter If the VidyoGateway is on a QoS network give high priority to the traffic betw...

Page 12: ...e VidyoReplay System Console The following criteria should be met a Set your production and management interfaces with IP addresses b Rack your machine properly c Successfully Ping your server before proceeding For more information see Configuring Network Settings at the System Console 2 Secure your VidyoGateway server if applicable For more information see Securing Your VidyoGateway System with S...

Page 13: ...ons as needed To connect to an NTP server see Configuring Network Settings at the System Console To upload image files for video loopback see Configuring Video Loopback Settings To view the network settings see Viewing Your VidyoGateway Network Settings To check the status of your VidyoGateway see Checking the Status of Your VidyoGateway To upload a new security certificate see Uploading or Editin...

Page 14: ...ly permit SSH access from authorized networks and users You can restrict Vidyo Customer Support SSH access by configuring your firewall or contact Vidyo Customer Support for other options Restrict access to your VidyoGateway Admin portal by performing one of the following Block HTTP HTTPS access from untrusted networks including the Internet Move the VidyoGateway Admin portal to the Management Int...

Page 15: ...prompt enter admin 4 At the current UNIX Password prompt enter password The password is case sensitive You ll be prompted to enter a new password and asked to enter it again 5 At the Password prompt type a new password When selecting a new password follow these guidelines The password should not be too similar to the old password The default setting is at least three characters should be different...

Page 16: ...tem Console Your Vidyo server default IP is 192 168 1 110 and should be changed to align with your local area network A network setup must be performed for each of your Vidyo servers To configure the network settings at the System Console 1 Log in to the System Console For more information see Logging in to the System Console of Your Server and Changing the Default Password The following illustrat...

Page 17: ... for PRODUCTION INTERFACE or 2 for MANAGEMENT INTERFACE depending on which one contains the IP you want to configure Note The Management Interface should not be used to transfer any media For more information see Configuring Your Vidyo Server s Management Interface and Port ...

Page 18: ...ic as the address format The VidyoGateway system supports IPv4 only or IPv6 only mode Dual stack mode is not supported 5 Enter the server IP address subnet mask default gateway MAC addresses hostname domain name and FQDN Press Enter after entering each setting ...

Page 19: ...the DNS servers a Enter two DNS server IP addresses If you have only one DNS server use the same one twice b Once you have entered the required information enter y and press Enter The System Console main menu appears 8 Enter the remaining network settings for the server as needed confirming by entering y and pressing Enter after entering each setting a Enter 3 to configure NTP Time Servers to set ...

Page 20: ...System Console Accounts System Console accounts can be used on the VidyoPortal the VidyoRouter and the VidyoGateway The System Console menu allows for the creation of up to ten System Console accounts These accounts are created from the System Console To create System Console accounts 1 Log in to the System Console For more information see Logging in to the System Console of Your Server and Changi...

Page 21: ...ult passwords each new System Console user must be present at the local console during account creation That user must log in and change their password and it must meet JITC password complexity requirements Understanding System Administrator Console Menu Options The following list includes steps taking you through configurations on System Admin Console menu options 1 Configure IP Address Enter 1 t...

Page 22: ...S Server for Host 192 168 1 11 3 Configure NTP Time Servers Enter 3 to set the Network Time Protocol NTP time server Change to synchronize the system with a different time server Examples Primary NTP Server pool ntp org 4 Configure Time Zone Enter 4 to specify the time zone of your server Change as necessary for accurate billing records Examples US Eastern 5 Configure Ethernet Options Enter 5 to s...

Page 23: ...ry NTP Time Servers Enter 8 to query NTP servers Note This command doesn t work if the domain name server is not defined 9 Display Kernel IP Routing Table Enter 9 to view how your server is configured for Ethernet routing 10 Display ARP Table Enter 10 to display router and MAC address information This information is display only 11 Ping Utility Enter 11 to ping network addresses Use Ctrl C to stop...

Page 24: ...ns For more information see Understanding the More Options System Administrator Console Menu 18 Exit System Administrator Console Enter x to close the SSH session This command also closes SSH clients if one is used Understanding the More Options System Administrator Console Menu The following list describes commands on the More Options menu 1 User Administration Enter 19 to perform user maintenanc...

Page 25: ...ostname Management menu options including functions to Add Remove or Remove All hostnames navigate hostnames using Next or Previous and Exit the Hostname Management menu and return to the Advanced Options menu For more information see Managing Hostnames 6 SSH Configuration Enter 6 for SSH Configuration menu options For more information see Configuring Your SSH Port 7 Pre shared Key Maintenance Ent...

Page 26: ... Confirm Password fields For more information see Configuring SIP Settings Managing Network Routes Static routes are used in deployments where Vidyo servers are in a DMZ between two segregated firewalls with no route for either internal or external traffic Network Routes are also used when the Management Interface is enabled and you want to route traffic across that network Note Vidyo recommends t...

Page 27: ...a range of IP addresses or subnet is not supported at this time To add a network route 1 Log in to the System Console For more information see Logging in to the System Console of Your Server and Changing the Default Password 2 Enter m for more options 3 Enter A for Advanced Options 4 Enter 2 for Network Route Management 5 Enter 1 to add a Network Route 6 Enter the following information Destination...

Page 28: ...o confirm the change and add your Network Route Your Network Route is then listed and numbered on the top of the Route Management screen 8 Enter X to return to the Advanced Options menu Removing a Network Route To remove a network route 1 Log in to the System Console For more information see Logging in to the System Console of Your Server and Changing the Default Password 2 Enter m for more option...

Page 29: ... for Advanced Options 4 Enter 2 for Network Route Management 5 Enter 2 to remove all of your Network Routes 6 Enter y to confirm removing all of your Network Routes 7 Enter X to return to the Advanced Options menu Navigating Your Network Routes To navigate your network routes 1 Log in to the System Console For more information see Logging in to the System Console of Your Server and Changing the De...

Page 30: ...This trap can be turned on and off by setting the notification from the System Console and specific threshold can be set from the SNMP manager The packet loss is measured in percentage and the default time setting is 0 This trap repeats every 10 seconds as long as the condition persists 3 vidyoGatewayControllerJoinedClusterAlert This trap provides an indication that a new VidyoGateway has joined t...

Page 31: ...dministrator guides If your VidyoGateway system uses the Hot Standby option and you are not using your management interface your SNMP notifications will source from the shared IP address Vidyo recommends configuring your VidyoGateways using a management interface so your SNMP notifications can be sourced from unique management interface IP addresses In this case your network management system NMS ...

Page 32: ...Advanced Options 4 Enter A for SNMP Administration 5 Enter B to configure SNMPv2 Community String Select from the menu based on the SNMPv2 Community String type desired Enter 1 to create a read only SNMPv2 community string Enter a read only community string The string must be at least eight characters and contain no spaces Enter y to confirm After the read only community string is created the Crea...

Page 33: ...unity string and then select y to confirm Note After the read write community string is deleted the Delete ReadWrite Community String option toggles and becomes the Create ReadWrite Community String option Select X to return to the SNMP Administration menu Configuring Local SNMPv3 User User based Security Model You can create two local SNMPv3 users on your system that can access your network manag...

Page 34: ... access Enter a user name for your local SNMPv3 user with read write access The user name must be at least eight characters and contain no spaces Enter and verify an authentication password of your choice This password uses SHA authentication and must be at least eight characters Note Vidyo does not currently support MD5 authentication Enter and verify a second authentication password of your choi...

Page 35: ...is deleted the Delete ReadWrite User option toggles and becomes the Create ReadWrite User option Enter X to return to the SNMP Administration menu Configuring an SNMP Notification You can configure notifications or traps that can be sent to your network management server via SNMP2 community strings or local SNMPv3 users Notifications are created as either SNMPv2 or SNMPv3 To create an SNMPv2 notif...

Page 36: ...ng an SNMPv2 Notification To delete an SNMPv2 notification 1 Log in to the System Console For more information see Logging in to the System Console of Your Server and Changing the Default Password 2 Enter m for more options 3 Enter A for Advanced Options 4 Enter 4 for SNMP Administration 5 Enter D to configure SNMP Notification The SNMP Notification menu displays 6 Enter 1 for SNMPv2 Notification ...

Page 37: ...haracters and contain no spaces 12 Enter and verify an authentication password of your choice This password uses SHA authentication and must be at least eight characters Note Vidyo does not currently support MD5 authentication 13 Enter and verify a second authentication password of your choice This password uses AES encryption and must be at least eight characters Note Vidyo does not currently sup...

Page 38: ... to map an IP addresses to a specific Hostname or FQDN Note Vidyo recommends this feature not replace adding proper records to your internal and external DNS servers It should only be used to support DMZ deployments where there is no DNS server access from the DMZ and allowing the different servers to properly locate each other The Cluster FQDN of the VidyoPortal can be added to the hostfile to av...

Page 39: ...to the System Console of Your Server and Changing the Default Password 2 Enter m for more options 3 Enter A for Advanced Options 4 Enter 5 for Hostname Management 5 Enter 1 to add a Hostname 6 Enter the following information Hostname FQDN Enter a Hostname or FQDN you want to map to a specific IP address IP Address Enter the IP address you want to map to the specific Hostname or FQDN Note If you wa...

Page 40: ...Advanced Options menu Removing a Hostname To remove a hostname 1 Log in to the System Console For more information see Logging in to the System Console of Your Server and Changing the Default Password 2 Enter m for more options 3 Enter A for Advanced Options 4 Enter 5 for Hostname Management 5 Enter 2 to remove a Hostname 6 Enter the corresponding number of the Hostname you want to remove ...

Page 41: ...mes 7 Enter X to return to the Advanced Options menu Navigating Your Hostnames To navigate your hostnames 1 Log in to the System Console For more information see Logging in to the System Console of Your Server and Changing the Default Password 2 Enter m for more options 3 Enter A for Advanced Options 4 Enter 5 for Hostname Management Enter N to navigate to the next Hostname Enter P to navigate to ...

Page 42: ...ey Pre shared keys are only used when configuring your VidyoGateways as a cluster For more information see Understanding VidyoGateway Clusters A pre shared key from Active Controller authenticates the cluster communication channel shared among Standby Controller and Cluster Nodes This communication channel remains among the specific cluster in your system Your system comes with a default pre share...

Page 43: ...on see Checking the Status of Your VidyoGateway Generating a Pre shared Key When initially setting up your system you must generate the pre shared key from your Active Controller when using a VidyoGateway cluster configuration For more information about clusters see Understanding VidyoGateway Clusters To generate a pre shared key 1 Log in to the System Console For more information see Logging in t...

Page 44: ...isplayed at the top of the menu Otherwise it displays as DEFAULT Exporting a Pre shared Key After generating the pre shared key on the Active Controller in your VidyoGateway cluster configuration you then export the key from the same server For more information about clusters see Understanding VidyoGateway Clusters To export a pre shared key 1 Log in to the System Console For more information see ...

Page 45: ...n the screen and copy it to your clipboard 8 Enter X to exit 9 Enter x to exit Advanced Options Importing a Pre shared Key After generating and exporting the pre shared key from the Active Controller in your VidyoGateway cluster configuration you then import the key to your Standby Controller and Cluster Nodes For more information about clusters see Understanding VidyoGateway Clusters To import a ...

Page 46: ...pt paste the key you wish to import 7 In the Passphrase prompt enter the passphrase 8 Enter X to exit 9 Enter x to exit Advanced Options Your system is now using the pre shared key you just imported Selecting the Default Pre shared Key The default key is automatically used on your system when configuring your VidyoGateways as a cluster Therefore you only need to select the pre shared key if you ha...

Page 47: ...encrypt the pre shared key 6 In the Enter New Key prompt paste the key you wish to import 7 In the Passphrase prompt enter the passphrase 8 Select X to exit 9 Select x to exit Advanced Options Logging in to the Admin Portal Now that you have connected your VidyoGateway server to the network you must log in to its Admin portal using the System Console account and configure your VidyoGateway so it c...

Page 48: ... Admin portal using your System Console account Note If you do not enter information on this page you will be logged out from inactivity Prior to logging in the Login History dialog box shows the last five login attempts made to the Admin portal ...

Page 49: ...ng the Language for the VidyoGateway Admin Pages The VidyoGateway Admin pages are available in these 15 languages English Korean Chinese Simplified Polish Chinese Traditional Portuguese Finnish Russian French Spanish German Thai Italian Turkish Japanese ...

Page 50: ...3 Configuring Your Server 44 To set your preferred language Select your desired language using the language drop down on the upper right corner of the VidyoGateway Admin Login page ...

Page 51: ...y when the Vidyo server has FIPS disabled If FIPS is enabled follow the procedures in this section to disable it If FIPS is already disabled then proceed to the Enabling RADIUS section To disable FIPS mode 1 Log in to the System Console 2 Enter m for more options 3 Enter A for Advanced Options 4 Enter 1 to disable FIPS mode Note This setting toggles between disable and enable states A message disp...

Page 52: ...urn to the Advanced Options menu Enabling RADIUS To enable RADIUS 1 Log in to the System Console 2 Enter 19 to access the User Maintenance menu 3 Enter D 4 Enter y for the change settings prompt 5 Enter y for the confirm enable radius prompt 6 Enter the IP or FQDN of the RADIUS server or leave blank to cancel ...

Page 53: ...using this prompt to display This prompt will only display if two or more RADIUS servers are being configured If you do not have additional RADIUS servers to configure leave blank to finish RADIUS is enabled 11 Press any key on your keyboard to return to the User Maintenance menu Viewing the Current RADIUS Configuration You should always review your RADIUS server configurations for accuracy To vie...

Page 54: ...ngs prompt if the configuration needs to be modified Note If you enter y for the change settings prompt then all RADIUS server configurations will need to be re entered 4 Re enter the IP or FQDN of the RADIUS server or leave blank to cancel 5 Re enter the preshared key for the RADIUS server 6 Re enter the IP or FQDN for additional RADIUS servers or leave blank to finish Note A maximum of10 RADIUS ...

Page 55: ...IUS servers to configure leave blank to finish RADIUS is enabled 9 Press any key on your keyboard to return to the User Maintenance menu Creating a RADIUS Enabled Account To create a RADIUS enabled account 1 Log in to the System Console 2 Enter A for Advanced Options 3 Enter a unique username The username must match your RADIUS User ID 4 Enter y for the confirm changes prompt 5 Enter y for the use...

Page 56: ...bled Account You should always review the new RADIUS enabled account for accuracy To view a RADIUS enabled account 1 Log in to the System Console 2 Enter 19 3 Enter C A list of current users in the system displays If the new user is set up incorrectly then proceed to the Removing a RADIUS Enabled Account section 4 Press any key on your keyboard to return to the User Maintenance menu ...

Page 57: ... Enter the username to be removed 4 Enter y for the confirm changes prompt Disabling RADIUS Authentication To disable RADIUS authentication 1 Log in to the System Console 2 Enter 19 3 Enter D Details about the RADIUS server display 4 Enter y for the change settings prompt 5 Enter n for the leave RADIUS enabled prompt RADIUS is disabled ...

Page 58: ...ique password that follows these password complexity requirements When selecting a new password follow these guidelines The password should not be based on the dictionary The password should not be too similar to the old password The default setting is at least three characters should be different from the old password The password should not be too simple or too short The algorithm here is a poin...

Page 59: ...f the passwords don t match you ll be prompted to try again If the passwords match the System Console menu opens immediately Note When you need to reset the password use 13 Set admin password However if you are logged in with a RADIUS enabled account and need to use this option then your account will be converted back to a local System Console account with the standard default password at the next...

Page 60: ...4 Configuring RADIUS 54 In addition when using the emergency user functionality with a RADIUS enabled account the account will be converted back to a local System Console account as well ...

Page 61: ...VidyoGateway The following sections cover these tabs in more detail Configuring the VidyoPortal Settings The VidyoPortal tab is used to connect your VidyoGateway to your VidyoPortal You must add your VidyoGateway server as a component on your VidyoPortal For more information see Understanding the VidyoGateway Configuration Procedure Values you provide in the fields on the VidyoPortal sub tab are a...

Page 62: ... your VidyoGateway listens Default port numbers for HTTP and HTTPS are 80 and 443 respectively You can change these values as necessary The port number in your VidyoGateway must match the value set in your VidyoPortal You can also configure these ports to match the firewall port range required by Legacy systems as necessary 5 Enter your user name in the Username field This is the username you crea...

Page 63: ...ay server Configuring SIP Settings Use the SIP tab to configure your VidyoGateway session initiation protocol SIP settings Note Values you provide in the fields on the SIP tab are automatically propagated to your Cluster Nodes Therefore the SIP tab does not display when accessed from your Cluster Node servers To make configurations on the tabs you must access them from your Active Controller To co...

Page 64: ... real time transport protocol SRTP When this checkbox is not selected calls without SRTP media encryption are permitted on the VidyoGateway 4 When using the TCP protocol provide the following information a Select the TCP checkbox to enable SIP over TCP support If TLS is not enabled then all outbound SIP calls will use TCP which is not encrypted b Enter a port value for TCP 5 When using the UDP pro...

Page 65: ...g calls Select Offer only TCP prefer TCP on answer to only offer the TCP protocol and prefer it when answering calls Note VidyoGateway can only act as a BFCP server 7 When using a Proxy Address provide the following information a Enter a Proxy Address b Select one of the following Select outbound only if you want to only route outbound calls through your proxy With outbound only selected all calls...

Page 66: ...standing VidyoGateway Clusters and Configuring Clusters Note Values you provide in the fields on the H 323 tab are automatically propagated to your Cluster Nodes Therefore the H 323 tab does not display when accessed from your Cluster Node servers To make configurations on the tabs you must access them from your Active Controller Configuring H 323 Settings When Using a Standalone VidyoGateway When...

Page 67: ...ck Save and Apply a dialog box informs you that the change drops all of the active conference calls on your VidyoGateway server Settings made while only clicking Save accrue and are applied when you subsequently click Save and Apply or reboot your VidyoGateway server Configuring H 323 Settings When Clustering Your VidyoGateways When you configure your VidyoGateway as a cluster the following settin...

Page 68: ...ires reconfiguration of your external H 323 gatekeeper to support neighboring For more information refer to your external gatekeeper documentation 6 Click Save or Save and Apply as desired When you click Save and Apply a dialog box informs you that the change drops all of the active conference calls on your VidyoGateway server Settings made while only clicking Save accrue and are applied when you ...

Page 69: ...wever Vidyo recommends that you do not change the AGC default level 5 Select the Participant Event Tone checkbox to sound a tone whenever conference participants join or leave conferences 6 Select the Recording Notification checkbox to sound an alert to Vidyo server for Microsoft Lync users whenever the conference is being recorded 7 Select the wav files as follows Click Upload WAV to select a cus...

Page 70: ...se IVR Settings The video loopback image is the on screen image that the Legacy user sees when connected to a VidyoRoom and no other participants have entered the VidyoConference For example if you call a VidyoRoom and no one else has joined the conference yet instead of seeing an image of yourself in the other tile you would see the loopback image The image must be a bmp file To configure the vid...

Page 71: ...type selected you can assign specific values to packets coming from your VidyoGateway to your VidyoRouter and your Legacy device for video audio content data and signaling services set on this screen With these specified values assigned to media types coming from your VidyoGateway you can then configure your network router or switch to prioritize the packets as desired Tip Look online for the most...

Page 72: ... the change drops all of the active conference calls on your VidyoGateway server Settings made while only clicking Save accrue and are applied when you subsequently click Save and Apply or reboot your VidyoGateway server Quality of Service Settings with DSCP Selected as the Type of Service To configure quality of service settings with DSCP selected as the type of service 1 Log in to the Admin port...

Page 73: ...dialog box informs you that the change drops all of the active conference calls on your VidyoGateway server Settings made while only clicking Save accrue and are applied when you subsequently click Save and Apply or reboot your VidyoGateway server Configuring the Waiting Room Prompts You can use the Prompts tab to configure a background screen image and a sound file which is presented to participa...

Page 74: ...wnload BMP and the waiting room image will display in your browser b Click Download WAV and your browser will play the wav file currently applied to your waiting room 5 Reset the bmp and or wav file already applied to your waiting room to their defaults as follows a Click Apply Default BMP A system notification displays indicating that the system has applied the default waiting room BMP b Click Ap...

Page 75: ...ced tab 3 In the Media Min UDP Port and Media Max UDP Port fields enter the UDP ports used for media transport between the VidyoGateway and the Legacy device and between the VidyoGateway and the VidyoRouter You must specify a minimum range of 1000 In the Media Min UDP Port field enter the lower limit of the port range The default and recommended value is 1024 In the Media Max UDP Port field enter ...

Page 76: ...ct Display Name E 164 or E 164 Display Name to determine the items you want included for identification purposes on your calls and added to the CDR data on your VidyoPortal 8 Select the Call Notification API checkbox if you want to enable VidyoGateway to convey to the external application the details of an incoming call including the extension dialed source IP address protocol and device informati...

Page 77: ...ers A VidyoGateway can be configured as a single Standalone VidyoGateway a single component acting as both Controller and VidyoGateway or as a cluster setup with an Active Controller Standby Controller and Cluster Node VidyoGateway This section explains various VidyoGateway cluster configurations used to support as many H 323 and SIP calls required prior to going through the Cluster tab in the Vid...

Page 78: ...ends calls to the first available VidyoGateway in your cluster To assign the VidyoGateway Standalone Controller 1 Controller 2 or Cluster Node you use VidyoGateway s Cluster tab For more information see Configuring Clusters Note The Active Controller automatically sends calls to the first available VidyoGateway in your cluster When deploying a cluster of VidyoGateways they all must reside on the s...

Page 79: ...VidyoGateway Clusters If you deploy large scale geographically diverse networks serving multiple tenants you can provision multiple VidyoGateway clusters in a single VidyoPortal In such cases you may want to dedicate scalable VidyoGateway clusters to certain locations or tenants as shown in the following illustration Vidyo Conference Room Ext 7001 VidyoGateway Active Cluster 1 Standby Cluster Node...

Page 80: ...ations in more detail Each VidyoGateway server in your cluster must align to the following requirements A public IP addresses must be used This means none of the VidyoGateway servers in your cluster can be NATed If they are behind a firewall it must permit Legacy ports for each VidyoGateway server in your Cluster This is usually configured as a set range of IP addresses in your firewall Each Vidyo...

Page 81: ...he machine s VidyoGateway cluster role A specific email address can be set on the Controller nodes to send an automatic failover notification for protective measures When the Active Controller is configured properly the following takes place in the event of a failure 1 Existing calls fail as the Standby Controller takes the IP address of the Active Controller that went down 2 The new Active Contro...

Page 82: ...lers to bear the correct Controller 1 and Controller 2 labeling however this is not required and the system is fully functional in this state Some people setup VidyoGateway systems with a single Standalone VidyoGateway a single component acting as both Controller and VidyoGateway Other clients designate Controller 1 Controller 2 and Cluster Node VidyoGateways You can think of the latter as a large...

Page 83: ...y server When you click Save and Reboot a dialog box informs you that the change drops all of the active conference calls on your VidyoGateway server Configuring Controller 1 Before configuring clusters be sure to review Understanding the Clustering Procedure To configure Controller 1 1 Log in to the Admin portal using your System Console account For more information see Logging in to the Admin Po...

Page 84: ... IP Address Enter a Shared Controller IP Address This is the address that will be dialed by incoming calls including Legacy callers Enter a notification email address Enter the email address you want to receive notifications in the event of a system failure 6 Click Save and Reboot Any modifications you make to your Clusters accrue until you click Save and Reboot when all of your Cluster changes ar...

Page 85: ...t on your Standby Controller and all of the Cluster Nodes To configure Controller 2 1 Log in to the Admin portal using your System Console account For more information see Logging in to the Admin Portal 2 Click the Cluster tab 3 Select Cluster from the Mode drop down 4 Select Controller 2 from the Role drop down 5 In the additional fields configure Controller 2 as follows Enter a Controller 1 Host...

Page 86: ...ure When using VidyoGateway version 3 2 and later your services and VidyoPortal SIP H 323 configurations automatically propagate from your Active Controller to the Cluster Nodes Therefore the Services tab as well as the VidyoPortal SIP H 323 tabs under General do not display when accessed from your Cluster Node servers To make configurations on the tabs you must access them from your Active Contro...

Page 87: ...from and to Legacy devices Note At least one service with From Legacy as the Direction must be set as the default in order to use IVR For more information about the Default service setting see Adding a Service VidyoGateway services specify the type of call the direction to and from and specific profile details Prefixes are used when creating a dialing plan if required or when isolating a call thro...

Page 88: ... about specific call types and services see Understanding Call Types and Service Examples Adding a Service To add a service 1 Log in to the Admin portal using your System Console account For more information see Logging in to the Admin Portal 2 Click the Services tab 3 Click Add Service The Add Service dialog box displays 4 Enter configuration settings for your new service Available choices includ...

Page 89: ...y from the Direction drop down you must select whether your prefix configuration supports H 323 or SIP from the Outbound Protocol drop down and then select either Conference or P2P from the Call Type drop down If you select SIP as the Outbound Protocol the Secured H 235 drop down disappears from the Add Service dialog box d Select the Support Data Sharing checkbox to add support for the BFCP and H...

Page 90: ...ore than two concurrent calls Not applicable for audio only calls When you select a Resolution value the Bandwidth is changed accordingly in the following manner CIF 384 kbps SD 768 kbps HD 720P 1600 kbps and FHD 1080P 3072 kbps If you select the Voice Only option as your Video Codec the Resolution is fixed at 64 kbps Although you must select a Resolution when you configure your service the system...

Page 91: ...e name for your configuration o Select the Send DTMF Signaling checkbox to send DTMF tones per RFC 4733 2833 for SIP and via signaling for H 323 If you do not select the Send DTMF Signaling checkbox DTMF tones will be sent via the media stream p Select the Enable Crop checkbox to show 16 9 video formatted for a 4 3 display full screen Do not select the checkbox to show 16 9 video letterboxed on a ...

Page 92: ...ate accrue until you click Apply Changes when all of your Service changes are applied to your VidyoGateway server When clicked a dialog box informs you that the change drops all of the active conference calls on your VidyoGateway server Activating and Deactivating Services You can also activate or deactivate a service by selecting or clearing the Active checkbox from its corresponding Add or Edit ...

Page 93: ...u edit delete activate and deactivate accrue until you click Apply Changes when all of your Service changes are applied to your VidyoGateway server When clicked a dialog box informs you that the change drops all of the active conference calls on your VidyoGateway server Deleting a Service If you permanently delete a service from your system it cannot be undone To delete a service 1 Log in to the A...

Page 94: ... you edit delete activate and deactivate accrue until you click Apply Changes when all of your service changes are applied to your VidyoGateway server When clicked a dialog box informs you that the change drops all of the active conference calls on your VidyoGateway server Editing a Service To edit a service 1 Log in to the Admin portal using your System Console account For more information see Lo...

Page 95: ...ou can also select the Delete Activate and Deactivate buttons 7 Click Apply Changes on the Services tab if desired Any services you Edit Delete Activate and Deactivate accrue until you click Apply Changes when all of your Service changes are applied to your VidyoGateway server When clicked a dialog box informs you that the change drops all of the active conference calls on your VidyoGateway server...

Page 96: ...ateway Outgoing service prefix H 323 endpoint extension Example 039001 An outgoing VidyoGateway call with a gatekeeper to an MCU bridge conference endpoint VidyoGateway Outgoing service prefix MCU conference ID Example 034001 An outgoing VidyoGateway call without a gatekeeper to a Legacy H 323 endpoint VidyoGateway Outgoing service prefix IP Address of H 323 system Example 03192 167 1 2 An outgoin...

Page 97: ...10 Note Some Tandberg Cisco endpoints such as the C series require h323 in front of dial string If the Tandberg Cisco does not accept the call with the h323 starting the dial string check your endpoint to ensure H 323 settings are enabled Use the Tandberg Cisco web UI to make settings as the handheld remote is rather cumbersome Example h323 VidyoGateway service prefix Vidyo extension VidyoGateway ...

Page 98: ...FQDN field to your examplecompany com FQDN in the Super portal as part of the tenant1 configuration For more information refer to the Managing Tenants as the Super Admin section in the VidyoConferencing Administrator Guide For more information about SIP URI configuration see Configuring the VidyoPortal Settings Dialing From a Legacy H 323 Endpoint into a Vidyo PIN Protected Room VidyoGateway IP Ad...

Page 99: ...ling formats without being registered to a gatekeeper Tandberg 2500 vB3 9 and Tandberg MCU 8 8 endpoints use Examples 192 168 1 110 035001 Codian MCI uses Example 192 168 1 110 035001 Configuring Integrated Voice Response IVR Settings IVR is not available if Video Loopback is enabled For more information see Configuring Video Loopback Settings When you dial into VidyoGateway from a Legacy device a...

Page 100: ...mation about clusters see Understanding VidyoGateway Clusters To enable your IVR settings 1 Log in to the Admin portal using your System Console account For more information see Logging in to the Admin Portal 2 Click the IVR tab 3 Click Enable IVR after making all your desired settings on the General Appearance Instructions and Prompts subtabs When clicked a system notification indicates the IVR i...

Page 101: ...nter Conference Extension notification displays For more information about the Enter Conference Extension notification see VidyoGateway IVR Screen Prompt Types Select direct call only to make only direct calls available from the first screen The Enter Direct Call Extension notification displays For more information about the Enter Direct Call Extension notification see VidyoGateway IVR Screen Prom...

Page 102: ...g from the VidyoGateway IVR Note The IVR is still shown or not shown based on this selection even if you bypass the IVR and call directly in to VidyoConferences from Legacy endpoints using an IP address Prefix if any and Extension 4 Click Save or Save and Apply as desired When you click Save and Apply a dialog box informs you that the change drops all of the active conference calls on your VidyoGa...

Page 103: ...pload BMP to select a custom image for use on your VidyoGateway IVR Your bmp file must be 704 x 576 and not exceed 10MB Click Apply Default to apply the default background image to your VidyoGateway IVR 5 Click the Language drop down and select the interface language for your IVR 6 Click the Font drop down and select the font you want to use for the text shown on your IVR interface ...

Page 104: ...rom the palate of swatch colors that displays Note You can enter a standard color name or hexadecimal value directly in the field Hexadecimal color values are shown as you mouse over swatches on the palate A swatch of the selected color is shown to the right of the field ...

Page 105: ...Gateway IVR screens 11 Enter a number value in pixels for the Text Prompt 2 Bottom Offset the space between the bottom and the start of your text in the second dialog box shown you want used for your VidyoGateway IVR screens 12 Enter a number value in pixels for the Text Input Bottom Offset the space between the bottom and the start of your text in the first input dialog box shown you want used fo...

Page 106: ... Settings made while only clicking Save accrue and are applied when you subsequently click Save and Apply or reboot your VidyoGateway server Configuring VidyoGateway IVR Screen Instruction Settings To configure your VidyoGateway IVR screen instruction settings 1 Log in to the Admin portal using your System Console account For more information see Logging in to the Admin Portal 2 Click the IVR tab ...

Page 107: ...ouncement used when participants dialing from a Legacy device join VidyoConferences Note Click Default at any time to restore the original system text for the corresponding instruction The following screenshot shows the entering instruction for the VidyoGateway IVR screen Welcome to Vidyo Please enter the room extension followed by the key Entering 12345_ To backspace please use the key ...

Page 108: ...ding instruction The following screenshot shows the backspace instruction for the VidyoGateway IVR screen 6 Enter custom text for the Cancel Call Instruction you want used for your VidyoGateway IVR screen The Cancel Call Instruction is what participants dialing from Legacy devices are told in order to immediately end their call Note Click Default at any time to restore the original system text for...

Page 109: ...conference calls on your VidyoGateway server Settings made while only clicking Save accrue and are applied when you subsequently click Save and Apply or reboot your VidyoGateway server Configuring VidyoGateway IVR Screen Prompt Settings To configure your VidyoGateway IVR screen prompt settings 1 Log in to the Admin portal using your System Console account For more information see Logging in to the...

Page 110: ...responding fields Enter custom prompt type text in the corresponding field Note Click and drag the lower right corner of the Prompt type field to adjust the space to the size desired Click Default Text to use the original system text for the corresponding VidyoGateway IVR screen prompt type Click Upload WAV to select a custom sound file for use on your VidyoGateway IVR screen prompt type You must ...

Page 111: ...only clicking Save accrue and are applied when you subsequently click Save and Apply or reboot your VidyoGateway server VidyoGateway IVR Screen Prompt Types VidyoGateway IVR screen prompt Types include the following The Select Call Type prompt type If configured as the First Screen Option selection as described on page Configuring Appearance IVR Settings you first dial in to VidyoGateway and recei...

Page 112: ...ect Call Extension prompt type If configured as the First Screen Option selection as described on page Configuring Appearance IVR Settings you first dial in to VidyoGateway and receive this prompt asking you to enter the extension followed by the key The Retry Direct Call Extension prompt type If you choose to make a direct call and enter an invalid extension this prompt tells you and asks you to ...

Page 113: ...eway IVR Media and Prompt Settings You can apply or restore IVR media and prompt settings that have been already saved by importing an existing tar gz file to your VidyoGateway server You can also save exported settings to a tar gz file for applying to a different VidyoGateway server or just keep it as a backup Note Imported and exported settings only apply to media files and prompts It does not i...

Page 114: ...s page allows you to capture logs of calls occurring on your VidyoGateway You can download and view logs for debugging analysis and view the statistics of a single call You can also view the data directly on the VidyoGateway if desired Specific user activity audit log files may also be downloaded from the Status page using the Download Audit Logs button For more information about downloading and v...

Page 115: ...P of Cluster In the Legacy Device filter you can filter results by IP of Legacy devices In the Conference filter you can filter by conference room names already set up in your system 3 Click Clear Filters to instantly remove any parameters you provided 4 Click Start Capture The Start Capture dialog box displays 5 Click Start Capture Note Logs of calls taking place on your VidyoGateway are recorded...

Page 116: ...ad Logs The Download Logs dialog box displays 10 Click Download Logs Your browser downloads a tar gz file containing your log file for debugging analysis Viewing Single Application Logs To view single application logs file for debugging purposes 1 Log in to the Admin portal using your System Console account For more information see Logging in to the Admin Portal 2 Click the Maintenance Status tab ...

Page 117: ...he results 4 The following information and functions are available from View Logs The Date column displays the time of the call log in yyyy mm dd hh mm format The Size column displays the size of the call log The Name column displays the name of the call log The Action column provides corresponding enabled buttons for call logs available for download The individual log file is downloaded in text f...

Page 118: ...or more information see Logging in to the Admin Portal 2 Click the Maintenance Status tab If the VidyoGateway is not currently processing calls no results display like the screenshot previously shown If your VidyoGateway is processing calls the main area of the screen is populated with call information such as Resolution Legacy Device Conference Number of Participants and Call Duration as follows ...

Page 119: ...h transmitting and receiving values in Kbps Audio jitter for both transmitting and receiving values in ms Audio packet loss for both transmitting and receiving values as a percent Video codec protocols for both transmitting and receiving values Video bitrate for both transmitting and receiving values in Kbps Video resolution dimensions for both transmitting and receiving values in pixels Frames pe...

Page 120: ... nodes if you want to dial in to your VidyoGateway using your FQDN Note Public IP address configuration is intended for use on a cluster VidyoGateway using the H 323 protocol The public IP address should be the address returned by your DNS when looking up the FQDN for your cluster Configuring your public IP address only works when the cluster has a private IP address NAT and is behind an H 323 awa...

Page 121: ...y server When you click Save and Reboot a dialog box informs you that the change drops all of the active conference calls on your VidyoGateway server Viewing Your VidyoGateway Network Settings Configure your network settings using the System Console For more information see 3 Configuring Your Server To view your VidyoGateway server network settings 1 Log in to the Admin portal using your System Co...

Page 122: ...r acquisition of SSL certificate s from a valid CA Certificate Authority You may implement HTTPS without enabling Vidyo s Encryption to implement secure browsing only Enabling HTTPS secure browsing establishes secure connections between browsers and VidyoGateway Admin Pages HTTPS uses standard SSL certification to provide secured browsing to these web pages protecting usernames and passwords and a...

Page 123: ...g an SSL Certificate Signing Request CSR 3 The Server Cert tab for Deploying Your Server Certificate 4 The Server CA Cert tab for Deploying Your Server Certification Authority CA Certificates 5 The Ports tab regarding Security for correctly configuring the HTTPS Port setting to 443 This tab is also used for Management Interface configurations For more information see Configuring Your Vidyo Server ...

Page 124: ...y import encrypted and password protected private keys that were exported from servers that also encrypted and password protected the private keys Changes made to an SSL Private Key require a CSR and SSL Server Certificate This includes importing existing keys editing existing keys exporting existing keys and regenerating new keys Private Keys are replaced if you choose to import from p7b pfx or v...

Page 125: ...mends carefully backing up your existing SSL Private Key in its entirety before starting SSL Private Key procedures Note Changes made to an SSL Private Key require a CSR and SSL Server Certificate This includes importing existing keys exporting existing keys and regenerating new keys To export an SSL private key 1 Log in to the Admin portal using your System Console account For more information se...

Page 126: ...y size you desire and click the Regenerate button to create your private key Note In order to regenerate an SSL Private Key you must first disable HTTPS Changes made to an SSL Private Key require a CSR and SSL Server Certificate This includes importing existing keys exporting existing keys and regenerating new keys To regenerate an SSL Private Key 1 Log in to the Admin portal using your System Con...

Page 127: ...equest CSR is a message sent to a certification authority CA to request a public key certificate for a person or web server The majority of public key certificates issued are SSL certificates which are used to secure communications with web sites The CA examines the CSR which it considers to be a wish list from the requesting entity If the request is in line with the CA s policy or it can be modif...

Page 128: ...xactly as you registered it with your domain registration provider You should consider all information on this screen mandatory before you click Generate Regenerate Note Click Cancel to reload any previously saved field information Your SSL CSR is generated based on the SSL Private Key you entered during Importing an SSL Private Key or Regenerating an SSL Private Key Viewing an SSL CSR To view an ...

Page 129: ...ertificate Signing Request dialog box displays 5 Click Done Certificates Received from Your Certificate Authority Most CAs instantly send certificates and returns at least a domain server certificate and may return a root and one or more intermediate certificates in separate files However some authorities ...

Page 130: ...lowing guidelines to identify certificate files from your CA The domain file normally contains your server s common name or FQDN Intermediate files often contain the character string inter somewhere in the file name Once you identify which ones are the intermediates you can then identify the root certificate file by process of elimination The remaining file is the CA s root certificate file The CA...

Page 131: ...ported only vidyo files can be exported from the Advanced tab For more information see Importing and Exporting Certificates Uploading or Editing Your Server Certificate Note Perform the steps in this procedure after you receive certificate files back from your certification authority An unsigned self issued certificate does not provide a guarantee of security to your users Your Vidyo server checks...

Page 132: ...curity tab 3 Click the Server Cert tab 4 Click Choose File to locate the private key file 5 Click Upload A Confirmation dialog box displays 6 Click Yes 7 If the upload completes a system notification is shown indicating the private key installed successfully ...

Page 133: ...SSL Server Certificate This includes uploading existing keys editing existing keys and regenerating new keys To edit a server certificate 1 Log in to the Admin portal using your System Console account For more information see Logging in to the Admin Portal 2 Click the Maintenance Security tab 3 Click the Server Cert tab ...

Page 134: ...ys indicating the change was successful Generating a Self Signed Certificate Note Changes made to an SSL Private Key require a CSR and SSL Server Certificate This includes uploading existing keys editing existing keys and regenerating new keys To generate a self signed certificate 1 Log in to the Admin portal using your System Console account For more information see Logging in to the Admin Portal...

Page 135: ...ays indicating the self signed certificate was created Deploying Your Server CA Certificates Intermediates In addition to issuing SSL Certificates a Trusted Root CA certificate can also be used to create another certificate which in turn can be used to issue SSL Certificates The majority of SSL certificates in use around the world are chained certificates of this type As the Intermediate ...

Page 136: ... files 1 Log in to the Admin portal using your System Console account For more information see Logging in to the Admin Portal 2 Click the Maintenance Security tab 3 Click the Server CA Cert tab 4 Click Choose File to locate the server cert file The server CA cert file may also be referred to as the intermediate certificate by your Certification Authority A single file may contain multiple intermed...

Page 137: ... Configuring Your Vidyo Server s Management Interface and Port If you set the HTTPS Port to anything other than 443 users have to manually add the port to their URL requests in their browsers To configure the HTTPS Port settings for your Admin pages 1 Log in to the Admin portal using your System Console account For more information see Logging in to the Admin Portal 2 Click the Maintenance Securit...

Page 138: ...and Root Certificates Note If your system requires trusting other secure systems such as VidyoPortals VidyoRouters and or an OCSP Responder their certificates must also be uploaded in this tab The Advanced tab is also used for OCSP For more information see Configuring OCSP Importing a Client CA Certificate Vidyo servers ship with a default trusted Certificate Authority CA list and is enabled by de...

Page 139: ...r System 133 3 Click the Advanced tab 4 Click Choose File to locate the client CA cert 5 Select your desired client CA cert action from the Action drop down 6 Click Import CA Cert File A Confirmation dialog box displays ...

Page 140: ...nt CA Certificates Vidyo servers ship with a default trusted CA list and is enabled by default This Advanced tab function allows you to enable or disable the use of this list To import a client CA cert 1 Log in to the Admin portal using your System Console account For more information see Logging in to the Admin Portal 2 Click the Maintenance Security tab 3 Click the Advanced tab ...

Page 141: ...en you click Apply If the changes are applied to your Vidyo server a system notification displays indicating the settings saved successfully Importing and Exporting Certificates You can also import or export certificate bundles using the Advanced tab Importing Certificates from a Certificate Bundle To import a bundle 1 Log in to the Admin portal using your System Console account For more informati...

Page 142: ...oose File to locate the bundle 5 If using the pfx format enter the password 6 Click Import Bundle A Confirmation dialog box displays 7 Click Yes If the changes are applied to your Vidyo server a system notification displays indicating the settings saved successfully ...

Page 143: ...in Portal 2 Click the Maintenance Security tab 3 Click the Advanced tab 4 Click Export All Your browser downloads a vidyo file containing your current security configuration Resetting Your Security Configuration to Factory Defaults To reset your security configuration to the factory defaults 1 Log in to the Admin portal using your System Console account For more information see Logging in to the A...

Page 144: ... 3 Click the Advanced tab 4 Click Reset All A Confirmation dialog box displays 5 Click Yes If the changes are applied to your Vidyo server a system notification displays indicating the security settings have been successfully reset ...

Page 145: ...d You can now browse your Vidyo server over HTTPS 5 Browse to the Admin pages to confirm that HTTPS is working properly and that the browser does not post any security errors Be sure to include the HTTPS header in the URL e g https FQDN Verify that HTTPS displays on the left side of the address bar and that a lock icon displays typically in the lower right corner Some browsers emphasize an HTTPS s...

Page 146: ... previous procedure the button changes to Disable HTTPS and includes a drop down on the right including HTTPS Only 3 Click HTTPS Only A Confirmation dialog displays 4 Click Yes If the changes are applied to your Vidyo server a system notification displays indicating that HTTPS Only is now enabled Recovering from an HTTPS Failure If HTTP is disabled and you can no longer browse to the Vidyo server ...

Page 147: ...al interface of the server and on the System Console and the VidyoGateway Admin Pages on the Maintenance Security Ports tab Physical Interface System Console and VidyoGateway Admin Page Ports Tab GB1 PRODUCTION GB2 MANAGEMENT Note If the Management Interface is enabled SNMP is only available on the Management Interface The Management Interface should not be used to transfer any media The following...

Page 148: ...move access to your VidyoGateway Admin Page to the Management Interface Note Unlike applications which you must explicitly move to the Management Interface SNMP will be automatically moved to the Management Interface as soon as the Management Interface is enabled on the VidyoPortal To move your VidyoGateway Admin Page to the Management Interface 1 Log in to your VidyoGateway using your system cons...

Page 149: ... is bound to port 443 7 Click Save and Apply Note After clicking Save and Apply your changes are applied immediately therefore if your VidyoGateway Admin Page is moved you are logged out and it is no longer accessible from the Production Interface PRODUCTION Configuring OCSP Enabling OCSP in the VidyoGateway To enable OCSP in the VidyoGateway 1 Log in to the VidyoGateway 2 Click Maintenance Securi...

Page 150: ...op down and enter the IP or FQDN address of the new responder in Default Responder 6 Click Save For VidyoRouter and VidyoGateway this will immediately require OCSP certificate verification for the vr2conf vp2conf and VidyoGateway Admin pages Note The server must have access to the OCSP Responders specified in the certificates or the overridden Responder Also be sure that the configured DNS server ...

Page 151: ...ows 3 OCSP Information allowing you to view configuration data To disable OCSP from the System Console Note Only when at least one application VidyoGateway VidyoPortal or VidyoRouter is enabled for OCSP are you then able to globally disable OCSP from the System Console 1 Log in to the System Console For more information see Logging in to the System Console of Your Server and Changing the Default P...

Page 152: ...grade is not possible For specific information about upgrading your VidyoGateway refer to the VidyoGateway Release Notes for your corresponding software release version For information about upgrading your entire VidyoConferencing system refer to the VidyoConferencing Administrator Guide To upgrade your VidyoGateway 1 Log in to the Admin portal using your System Console account For more informatio...

Page 153: ...e Maintenance Upgrade tab and confirm that the upgraded software version is the one currently being used by your system Shutting Down or Rebooting Your VidyoGateway You can either shutdown or reboot your VidyoGateway server manually using the Shutdown Reboot tab Shutting Down Your VidyoGateway Server To shut down your VidyoGateway server 1 Log in to the Admin portal using your System Console accou...

Page 154: ...rver as well 5 Click Shutdown to confirm Rebooting Your VidyoGateway Server To reboot your VidyoGateway server 1 Log in to the Admin portal using your System Console account For more information see Logging in to the Admin Portal 2 Click the Maintenance Shutdown Reboot tab 3 Enter your username and password 4 Click Reboot The Reboot dialog box informs you that the reboot drops all of the active co...

Page 155: ... of your VidyoGateway server using the Logout tab To log out of your VidyoGateway server 1 Log in to the Admin portal using your System Console account For more information see Logging in to the Admin Portal 2 Click the Logout tab You are immediately logged out of your VidyoGateway server ...

Page 156: ...dyoGateway 1 Log in to your VidyoGateway using your System Console account For more information see Logging in to the System Console of Your Server and Changing the Default Password 2 Click the Maintenance tab 3 Click Status 4 Click the Download Audit Logs button to download the file Note The Download Logs button downloads the single application logs file for debugging purposes whereas the Downloa...

Page 157: ...s Add Service Modify Service Delete Service Upgrade Gateway Upload and install Certificate Upload Restart Restart Shutdown Sample Audit Log Content This is how an Audit log for the VidyoRouter VidyoGateway and VidyoManager in txt format looks as viewed in a text editor after being decompressed From left to right the data logged are Timestamp User ID IP Address and Description ...

Page 158: ... used by VoIP systems and the SPEEX codec used on the Vidyo side The VidyoGateway supports H 323 and SIP signaling as well as Vidyo s signaling format which is based on SIP but enhanced to enable additional capabilities As calls are placed in either direction the VidyoGateway performs transcoding between codecs converts signaling and enables Vidyo endpoints and VoIP phones to participate in the sa...

Page 159: ...ing a soft phone or IP phone that supports the ability to place calls directly using a SIP dial string you can call into a VidyoConference directly without needing an IP PBX The SIP dial string must include three components The voice only service prefix of the VidyoGateway The extension of the endpoint or meeting room you are calling The address of the VidyoGateway VidyoGateway Firewall NAT IP PBX...

Page 160: ...ng VidyoConferences This number brings callers into an IVR interactive voice response system hosted on the IP PBX that prompts them for the Vidyo user extension Once the caller has entered the extension the IP PBX forwards the call out the SIP trunk to the VidyoGateway Ideally the extension entered at the IVR prompt matches the destination Vidyo extension and the IP PBX prepends the VidyoGateway v...

Page 161: ...when using the IVR functionality with a VoIP provider This first setup shows a configuration to your VidyoGateway using SIP invites coming directly from your VoIP provider This second setup shows a configuration to your VidyoGateway using a configured SIP trunk on your IP PBX Vidyo Conference Room Ext 7001 VidyoGateway SIP INVITE IVR ANSWERS VoIP Vidyo User Vidyo User Vidyo User Vidyo Conference R...

Page 162: ... under the guidelines such as sharing physical hosts with multiple virtual machines your virtual machines must adhere to the virtual machine configurations listed in this section To run VidyoGateway VE the following requirements must be met VMware vSphere ESXi Hypervisor software version 5 0 or later Must be compliant with the VMware qualified hardware list at http www vmware com resources compati...

Page 163: ...2 GHz and 2 GB of RAM idle for the Hypervisor Virtual Machine Provisioning Requirements VidyoGateway version 3 2 or later is available as a single Virtual Edition that dynamically enforces capacity limits based on the number of vCPU allocated The following configurations are the only supported configurations VidyoGateway Capacity VM Configuration Resource Reservation Physical Host vCPU RAM GB Stor...

Page 164: ...city Mid Size Configuration 2 Dell R420 dual Intel Xeon E5 2470 v2 2 40 GHz 10 Core 8 GB each with the following installations 1 VidyoPortal 1 000 user 1 VidyoRouter 100 port 1 VidyoGateway 6vCPU 2 HD 4 SD 20 voice 1 Dell R620 dual Intel Xeon E5 2667 v2 3 30 GHz 8 Core 16 GB with the following installations 2 VidyoGateways 4 HD 9 SD 50 voice VidyoPortals are configured with the Hot Standby softwar...

Page 165: ...red off before updating For more information see Upgrading Your VidyoGateway Advanced features such as vMotion high availability fault tolerance and distributed resource manager are not currently supported Installing VidyoGateway VE Note The virtual appliance s filename reflects the appliance type and the software version The following screenshots refer to the deployment of a VidyoGateway virtual ...

Page 166: ...9 Using VidyoGateway Virtual Edition VE 160 2 From the File menu select Deploy OVF Template The Source dialog box opens ...

Page 167: ...teway Virtual Edition VE 161 3 Click Browse and select the OVA file from your file system 4 Click Next The dialog box changes to OVF Template Details This screen is read only If you need to change anything click Back ...

Page 168: ...VidyoGateway Virtual Edition VE 162 5 Click Next The dialog box changes to Name and Location The name displayed is a copy of the ova filename as the vSphere default 6 Type in a more descriptive name if desired ...

Page 169: ...tion VE 163 7 Click Next The dialog box changes to Disk Format 8 Be sure to select Thin Provision 9 Click Next The dialog box changes to Network Mapping 10 Select the one network available for the VidyoGateway VE to use 11 Click Next ...

Page 170: ...ges to Ready to Complete 12 Select the Power on after deployment checkbox to start your VidyoGateway immediately after you take the next step 13 Click Finish The Deploying VidyoGatewayVE dialog box displays The Deployment Completed Successfully dialog box displays ...

Page 171: ...sing VidyoGateway Virtual Edition VE 165 14 Click Close The vSphere Client window displays 15 Click the sign to the left of the ESXi host name 16 Click VidyoGateway VE in the left side pane The tabs change ...

Page 172: ...og in as Admin If you haven t changed your password yet use the default password we have provided for you You can now configure your VidyoGateway VE network settings as described in Configuring Network Settings at the System Console and in the Adding VidyoGateways section in the VidyoConferencing Administrator Guide ...

Page 173: ...VidyoGateway is designated the Controller In addition to handling calls itself the Controller also controls a number of Standby VidyoGateways Controller A VidyoGateway that in addition to handling calls allocates capacity for a number of Standby VidyoGateways Firewall A system designed to prevent unauthorized access to or from a private network Gatekeeper A management tool for H 323 multimedia net...

Page 174: ...erencing products H 323 A standard that addresses call signaling and control multimedia transport and control and bandwidth control for point to point and multi point conferences The H 323 protocol provides audio visual communication sessions on any packet network SIP Session Initiation Protocol A signaling protocol used for controlling multimedia communication sessions such as voice and video cal...

Page 175: ...andberg MXP platform doesn t support TCS4 delimiters when dialing over IP To dial from a Tandberg MXP into a VidyoConference dial the VidyoGateway service prefix followed by the Vidyo user s extension then and the IP address of the VidyoGateway as shown in the Tandberg MXP Dialing String entry shown previously 2 As of release version TC4 1 2 it s now possible to dial using the format name domain o...

Page 176: ...0 037001 037001 192 168 1 110 Note Dial strings vary based on Legacy vendor requirements Calls made To Legacy from Vidyo Dial string 03192 168 1 200 Legacy Endpoint VidyoGateway VidyoPortal Router Vidyo User Vidyo User Vidyo User IP Address 192 168 1 200 IP Address 192 168 1 110 Service Prefix 03 Vidyo Conference Calls made From Legacy MCU to Vidyo MCU dial 192 168 1 110 037001 Calls made To Legac...

Page 177: ...cy dial string 192 168 1 110 037001 037001 192 168 1 110 Note Dial strings vary based on Legacy vendor requirements IP Address 192 168 1 110 Service Prefix 03 Vidyo User Vidyo User Vidyo User VidyoPortal Router VidyoGateway Legacy Endpoint Legacy Endpoint Legacy Endpoint Vidyo Conference Room Ext 7001 H 323 Gatekeeper Calling Gatekeeper Route Modes Full Signaling call control and media route throu...

Page 178: ...idyo Conference PTSN Internet SIP Vidyo SVC Number Dialed 555 123 4567 VidyoPortal Router VidyoGateway IP Phone IP Phone Number Dialed 7001 Vidyo User Vidyo User Vidyo User IP PBX A Route Pattern is created in the IP PBX and it route calls through a configured SIP Trunk This SIP Trunk is configured to send calls directly to the VidyoGateway SIP Trunk ...

Page 179: ...P Address For more information see Configuring a Public IP Address The following diagram illustrates the call flow from a Legacy endpoint calling Vidyo users when the VidyoGateway is behind a NAT firewall The following list explains each number in the Calling from Legacy to Vidyo illustration above 1 The Legacy device calls the VidyoGateway public facing IP address 2 The VidyoGateway sends command...

Page 180: ...gnaling 5061 configurable TLS SIP call signaling 1024 65535 Dynamic TCP H 323 Call control H 245 Note The H245 port range is configurable It should be set to at least four times the number of simultaneous H323 calls in the cluster Private Public Legacy Device VidyoGateway 192 168 1 110 private address 200 100 50 25 public address TCP 1720 Call setup H 323 UDP 5060 Call setup SIP TCP 1024 65535 H 2...

Page 181: ... Port The following diagram illustrates the call flow of Legacy and Vidyo desktop users when a VidyoGateway and VidyoPortal VidyoRouter are deployed in a DMZ environment These are the additional port requirements between the VidyoGateway and the VidyoPortal VidyoRouter Port s Type Description Direction 53 UDP DNS 80 TCP Local Web GUI access SOAP messaging between VidyoPortal Private Internet Legac...

Page 182: ...or information on specifying ports in the VidyoGateway see Configuring HTTPS Port Settings for Your VidyoGateway Admin Pages on page 126 The following diagram illustrates the port requirements between VidyoGateway cluster nodes Port requirements between the VidyoGateway cluster nodes Port s Type Description Direction 694 UDP Heartbeat between the cluster controllers Cluster Node Cluster Node Vidyo...

Page 183: ...ation 1720 TCP H 323 call setup 5060 UDP SIP call signaling for the VidyoGateway nodes 17190 UDP H 323 call signaling for the active controller 17200 TCP H 323 call signaling for the active controller 49999 TCP VidyoGateway inter cluster secure channel 50600 UDP SIP call signaling for the active controller ...

Page 184: ...OMISSIONS REGARDING SUCH INFORMATION OR DATA EVEN IF RECIPIENT INFORMS VIDYO WHETHER EXPRESSLY OR BY IMPLICATION OF ITS RECEIPT USE OR RELIANCE UPON SUCH INFORMATION AND EVEN IF SUCH LOSSES ARE DUE OR ALLEGED TO BE DUE IN WHOLE OR IN PART TO VIDYO S NEGLIGENCE CONCURRENT NEGLIGENCE OR OTHER FAULT BREACH OF CONTRACT OR WARRANTY VIOLATION OF DECEPTIVE TRADE PRACTICES LAWS OR STRICT LIABILITY WITHOUT...

Page 185: ...ry standard prediction methodologies suppliers may derive MTBF data from reliability demonstration testing life testing actual field failure rate or specification and datasheets Supplier data is provided as is to VIDYO and VIDYO generally does not verify the accuracy of Supplier data Subsystem MTBF Data Release Policy VIDYO does not release MTBF data below the system level The reasons for this pol...

Page 186: ...21 400 hours VidyoH20 for Google Hangouts DEV SRV H20 XL N3 0A 121 400 hours VidyoOne DEV SRV ONE N2 0B 29 900 hours VidyoPanorama 600 DEV SRV PAN600 N2 0A 109 186 hours VidyoPortal DEV SRV PT N2 0B 29 900 hours VidyoPortal XL DEV SRV PT XL N3 0A 116 700 hours VidyoReplay DEV SRV REP N3 0A 116 700 hours VidyoRouter DEV SRV RTR N2 0B 29 900 hours VidyoRouter XL DEV SRV RTR XL N3 0A 103 600 hours ...

Reviews: