background image

uSwitch and uSwitchPro Installation and Operating Manual 

Page 7 


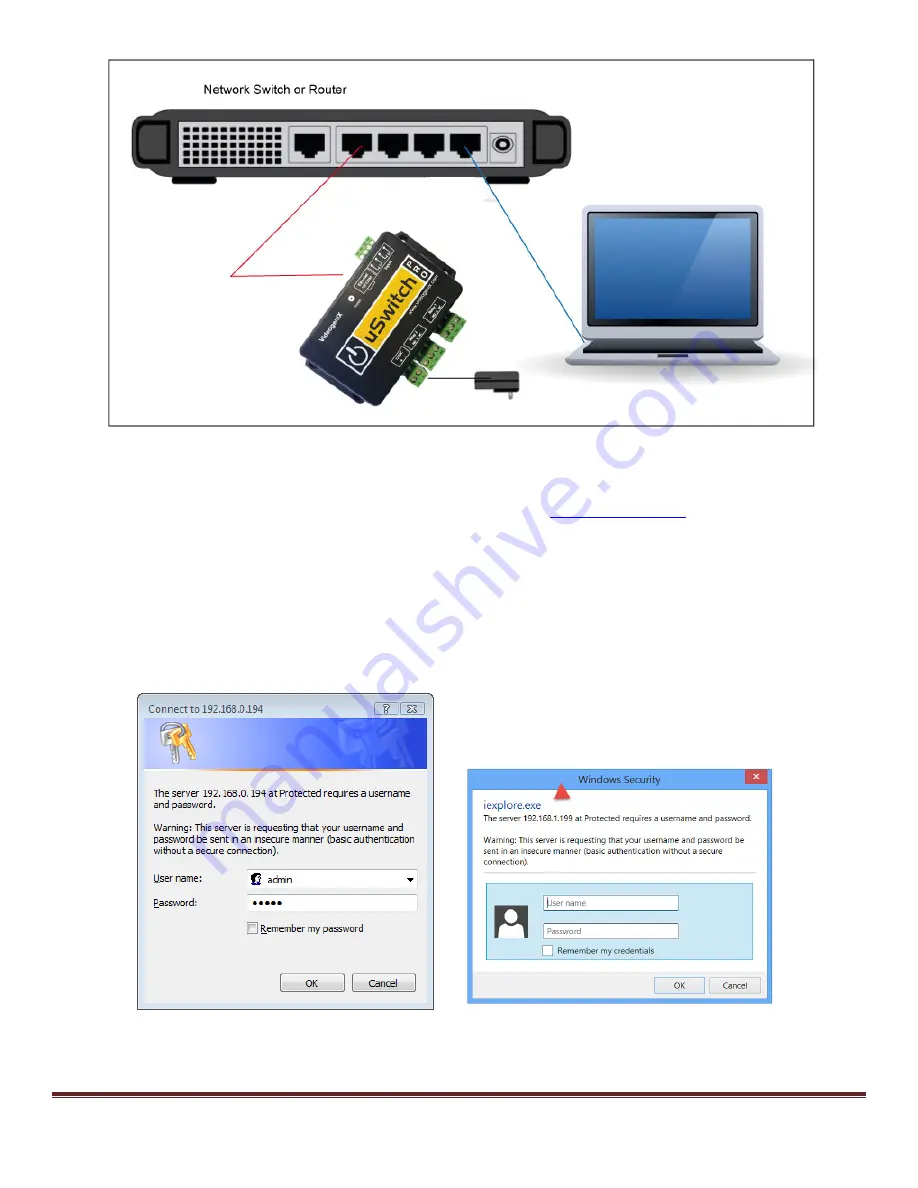
3.  Set up a computer on the same network/subnet as the uSwitch. To do this, set the IP address of the computer to 

192.168.1.x with subnet mask of  255.255.255.0 (x can be any unused address on that network 2-254) and 
should not be in a range designated for DHCP addresses by the router. 


4.  Connect to the uSwitch by entering its factory default IP address (

http://192.168.1.199)

 into the address bar on 

your computer’s browser.  If the uSwitch is on a LAN with a router that has reserved  the DHCP address of 
‘192.168.1.199’ a conflict can occur.  In this case either change the default address of the uSwitch upon 
connection or remove  ‘199’ from the DHCP reserved  address space of the router.  (Make sure the uSwitch’s 
address is not blocked by any firewall you may be using). 
 

5.  If this is the first time you are logging on to the uSwitch from your computer, a password dialog box will appear 

(see examples below).  Enter “admin”, for both the User name and Password fields (all lower case). Once logged 
on passwords and user names can be changed from the Authorization Configuration  Menu. For higher level 
menus ‘admin’ is also the default password. 


Windows  Vista                                                                            Windows  8                                   


6.  Press “OK” to accept the username and password. 


Summary of Contents for uSwitch

Page 1: ...uSwitch and uSwitchPro Installation and Operating Manual Page 1 uSwitch and uSwitchPro Installation and Operating Manual and the A Plug Adapter ...

Page 2: ...lay1 Watchdog Mode Ping Delay phase 15 15 Control Center Relay1 Watchdog Mode pinging phase 16 Control Center Relay1 Watchdog Mode auto reboot countdown phase 17 Control Center GPIO1 with counter enabled 18 Network Configuration Page 19 Relay Configuration Page 22 Force Watchdog Reboot 24 GPIO Configuration Page uSwitchPro only 26 Watchdog Configuration Page 27 Virtual Relay Configuration Page 29 ...

Page 3: ...ime consuming manual reboots uSwitch is the perfect solution for industrial security and personal applications Simple to use and with no programming required uSwitchautomatically builds a control web page provides multiple levels of password protected and can operate stand alone or user directed via the Internet or a local intranet uSwitchcomes with removable terminal connectors for the simplest w...

Page 4: ...cations can control uSwitchwith standard CGI interface Multiple levels of password protection Supports fixed IP DHCP and Dynamic IP with port forwarding and virtual port addressing SelectableTCP ports for proxy server and NAT applications 10 100 Ethernet connectivity Built in automatic watchdog mode on each relay with three independent user assignable ping able URL options Watchdog Cloak mode for ...

Page 5: ...uSwitch and uSwitchPro Installation and Operating Manual Page 5 Single Source Documentation available upon request ...

Page 6: ...ck Start Guide 1 uSwitch can be connected to a DC power source in the range of 12 16Vdc Connect an appropriate DC power supply to the and Terminals in Figure 1 regulated power supply is recommended The power supply should be rated to meet the operating current of the uSwitch see specifications for power requirements in appendix C As shown in the photo the positive terminal is the terminal closest ...

Page 7: ...hat has reserved the DHCP address of 192 168 1 199 a conflict can occur In this case either change the default address of the uSwitchupon connection or remove 199 from the DHCP reserved address space of the router Make sure the uSwitch s address is not blocked by any firewall you may be using 5 If this is the first time you are logging on to the uSwitchfrom your computer a password dialog box will...

Page 8: ...nd switchthe power on and off manually Another option is to connect uSwitchdirectly into a device s reset circuit In this configuration uSwitchdoes not power down the device and initiate a cold reboot it simply forces a warm restart All reboot methods have different requirements in physical connection and setup A fourth additional option is to wire a uSwitchoutput to an external relay to control a...

Page 9: ...regulated power supply recommended The power supply should be rated to meet the operating current of uSwitch specified in Appendix B Relay Connection When connecting to the relay contacts make sure any current or future load will not exceed the load ratings for the relays per spec in Appendix B Network Connection Connect the uSwitchEthernet port to a 10 Base T or 100 Base T switch router or cell m...

Page 10: ...uSwitch and uSwitchPro Installation and Operating Manual Page 10 ...

Page 11: ...f user operation The Control Center home screen is accessibleto anyone with the user name and password Configuration menus are only accessibleto privileged users with a senior level password default is admin Selectingthe red Click to Turn ON button on the Control Center page for a relay energizes the selected relay forcing a normally closed NC contact to open or a normally open NO contact to close...

Page 12: ...nter with relay one configured as a twenty 20 second momentary or pulsed relay a relay is configured into momentary mode from the Relay Configuration page In this case each time relay1 button is clicked the relay changes its state counts down to zero currently 5 and then changes back to its starting state To change the relays initial state temporarily disable momentary mode by setting the momentar...

Page 13: ...manual control is disabled when watchdog mode has been turned on Whenever a relay is in watchdog mode it cannot be manually controlled by a push button The screen below shows relay1 in Watchdog mode On the screen below thewatchdog feature has started the initial startup countdown specified by the startup delay entry before testing for connectivity currently 261 seconds remain before watchdog mode ...

Page 14: ...uSwitch and uSwitchPro Installation and Operating Manual Page 14 ...

Page 15: ...shows the Control Center with relay1 configured in Watchdog Mode during the Ping Delay phase This is the time interval between successive pings to the same URL A recommended time of 90 seconds for the ping delay setting is suggested Note During Watchdog Mode manual relay control is not allowed so the relay control button is grayed out ...

Page 16: ...age below shows the Control Center with Relay1 configured in Watchdog Mode In this instancethe uSwitchis attempting to ping the URL yahoo com assigned for relay1 to determine if relay1 needs to be cycled Alsonote this is the third consecutive attempt to communicate with the URL indicating the previous two attempts failed ...

Page 17: ...ses from the URLs specified in the WatchdogConfiguration page for Relay1 The screen shot below shows the reboot countdown time remaining and will turn power back on to device when the count reaches 0 The amount of time for the relay to be cycledis as specified in the Relay Cycle Time field on the Watchdog Configuration page After a reboot of the device the Watchdog will again initiate a startup de...

Page 18: ...IO1 configured with the Enable Counting field checked if counting is not enabled the running count field and counter reset are not present on this screen The value 119 in the Running Count field means sincethe counter starting counting or was last reset by the Clear Counter button directly below 119 full input statetransitions have occurred on GPIO1 Clickingthe Reset button clears the counter ...

Page 19: ...wer on the new uSwitchbefore the network settings will take effect You can use a proxy server to connect multiple uSwitch devices to an outside network or the internet by using a single static or dynamic IP resolved address This can be done using most consumer or industrial grade routers If a proxy server environment is to be set up each uSwitchwill not be accessiblefrom the internet until the pro...

Page 20: ...e on the local subnet In the subnet mask 255 255 255 0 the first three IP byte address fields are fixed and the last byte field may vary from 1 to 255 a value of 255 is equivalent to 11111111 in binary HTTP Port This specifies the HTTP port for typical WEB access used for outside communications to the uSwitch By default this port is set to 80 standard access port for HTTP devices A unique port is ...

Page 21: ...d to which uSwitchby executing either an arp a command from a windows computer or when running the uSwitchdiscovery utility To access a uSwitchremotely from an outside network WAN or the internet you will need to set up port forwarding also called NAT or Virtual Port addressing on your router or gateway You can set this up from your router s configuration page as follows 1 Assigna specific and uni...

Page 22: ... because the Watchdogis in control of the Relay By placing access to this option it prevents users without access to the Relay Configuration from bypassingWatchdog Control Relay Configuration Page for uSwitchPro Relay Configuration Page for uSwitch User Assigned Names These two configurable fields represent user assigned names for each relay Once modified all text identifying Relay1 or Relay2 from...

Page 23: ...n Ping Auto Reboot Mode the Power on State Must be Programmed to OFF Allows Master Control applies to uSwitch and uSwitchPro When Allows Master Control is checked the selectedrelay forfeits local control and only a remote uSwitch s GPIO or virtual input can control the relay When a remote uSwitchProis programmed to control this relay on remote uSwitchPro s GPIO Configuration page the state of the ...

Page 24: ...itial states they can both transition to the same state or opposite states If timer mode is specified along with linking both buttons use Relay1 s timing options Force Watchdog Reboot This Page is accessibleonly from the menu on the Relay Configuration page It enables a user to force a Relay in Ping Auto Reboot Mode to reboot Only users with privileges to access the Relay Configuration page will b...

Page 25: ...uSwitch and uSwitchPro Installation and Operating Manual Page 25 ...

Page 26: ...he GPIO when it is in the high state GPIO Low State Text This field specifies the text assigned to the GPIO when it is in the low state User Assigned Colors This field indicates the text displayed on the Control Center when the GPIO is in either high state or low state The choices from the selectionbox are ON OFF OPEN CLOSED LOCK UNLOCK START STOP Enable Counting When checked the internal logging ...

Page 27: ...ermines a communication problem exists between any or all of the specified devices the selectedrelay will automatically cycle switchingpower on and off to reboot a device or devices whose power has been wired across the relay The Watchdog feature has been successfullydeployed with IP cameras kiosks websigns cellular routers Servers DSL and cable modems RTUs control sensors a variety of Smart Grid ...

Page 28: ...oot Attempts After Max Reboot Attempts without a successful communicationthe uSwitch exits Auto Reboot normal mode and enters Fault mode During Fault mode the uSwitch stops cyclingthe relay to the attached device for the specified Fault Mode Time The Fault Mode cycleprevents continuous power cyclingon a device after detecting that a normal power cycleis not working to bring the device s back onlin...

Page 29: ...itch s Relays If Button1 is selected a virtual button is created on the Relay Control Center and this button controls all remote uSwitches as specified If Relay1 is selected than the stateof Relay1 on this uSwitchdrives all other uSwitches specified If GPIO is specified than the state of the GPIO specified will be used to drive the stateof all remote uSwitchRelays User Assigned Names These two con...

Page 30: ... relays are driven by the virtual relay Button GPIO or Relay specified in the Source of Control field on this page If the IP address specified is not routable from this uSwitch s network because of a firewall or addressing limitation this feature will not drive the relay specified in the Slave Relay Start IP field Consecutive Relays This box allows the entry of the single IP address in the Slave R...

Page 31: ...ssword provides access to all uSwitchconfiguration options and should be given out discriminately Security Notes uSwitchis an extremely secure networking control device It does not support terminal or file transfer programs TFTP FTP This means it is not possible for someone to break in to it and access other devices on your local network uSwitchdoes not support remote firmware updates so it is not...

Page 32: ...uSwitch and uSwitchPro Installation and Operating Manual Page 32 uSwitch uSwitchPro Board Schematic The GPIO contacts are only on the uSwitchPro ...

Page 33: ...ices a 60V p p diode is recommended Driving multiple uSwitch Relays from a single uSwitch GPIO or Virtual Button In addition to a physical push button driving the local relay on the same uSwitcheither that push button or the button generated on the Control Center page or a virtual button can be created to command a relay on a remote uSwitch Once setup pushing that button will drive all relays in i...

Page 34: ... such as motors transformers relays etc electricity will arc across the internal relay contacts each time the contacts open Over time this causes wear on the relay contacts whichcan shorten their life span When switchinga high inductive load it is recommended that simplerelay contact protection devices be used To be economically feasible uSwitchcannot provide relay protection for all possible load...

Page 35: ...dard Ethernet cabling connect uSwitch s Ethernet port to a 10 BaseT or 10 100 Base T Ethernet connection such as a network switch router or cellular mode To connect directly to a computer use a crossover Null Modem cable For connection to a router or switch a standard straight through cable is recommended ...

Page 36: ... bridge The wireless bridge in turn connects to the wireless network The wireless Ethernet Bridge or router must be properly set up for the wireless network first This information is contained in the End User documentation for the wireless networking device A variety of wireless repeaters is available and can be ordered either online or from VideogeniX Wired Network Connection Wireless Network Con...

Page 37: ...verting its two relay outputs into two 110VAC outlets There is no need for wiring or splicingwith A Plug The A Plugpowers the uSwitch and receives its power directly from any wall outlet to which it is plugged in Troubleshooting Before returning a device test the power input transformer to uSwitch This can easily be done by swapping out with a known working power transformer ...

Page 38: ...nfiguration User Assigned Name Relay1 Relay2 User Assigned Text On Off User Assigned Colors Red Green Power Up State Last sets relay to return to previous state after each uSwitch power cycle Momentary sec 0 non momentary Ping Auto Reboot unchecked Allows Master Control unchecked Sync to Local GPIO unchecked Sync Inverts GPIO unchecked Timed Reboot hours Off Link Buttons Together unchecked GPIO Co...

Page 39: ...ed load 10 000 000 ops Electrical life rated load 100 000 ops Networking Network 10 100 Base T IPv4 Network Setup static IP address assignment DHCP HTTP port selectable Network Connector 8 pin RJ 45 socket Connectors Power Input 2 position removable terminal strip 3 81mm terminal spacing Relays 3 position Normally Closed Normally Open Common removable terminal 3 81mm terminal spacing Ethernet 8 pi...

Page 40: ...uSwitch and uSwitchPro Installation and Operating Manual Page 40 ...

Page 41: ...MPERING MODIFICATION IMPROPER CONNECTION OPERATION OUTSIDE THE ENVIRONMENTALOR ELECTRICAL SPECIFICATIONS ABUSE OR NEGLECT SELLER MAKES NO EXPRESS WARRANTIES OTHER THAN THE WARRANTY EXPRESSLY SETFORTH HEREIN EXCEPT TO THE EXTENT PROHIBITED BY LAW ALLIMPLIED WARRANTIES INCLUDING ALL WARRANTIES OF MERCHANT ABILITY OR FITNESS FOR ANY PURPOSE ARE LIMITED TO THE WARRANTY PERIOD SET FORTH ABOVE AND THIS ...

Page 42: ...art of this manual may be reproduced or transmitted in any form or by any means electronic or mechanical including photocopying scanning for any purpose other than the personal use by the purchaser of this product VideogeiX Inc assumes no responsibility for any mistakes or errors in this document VideogeniX Inc is not liable for any damages or losses including direct indirect special incidental or...

Page 43: ...VideogeniX 1423 Beacon Street Brookline MA 02446 Copyright 2015 VideogeniX Inc 617 731 5550 www videogenix com ...

Reviews: