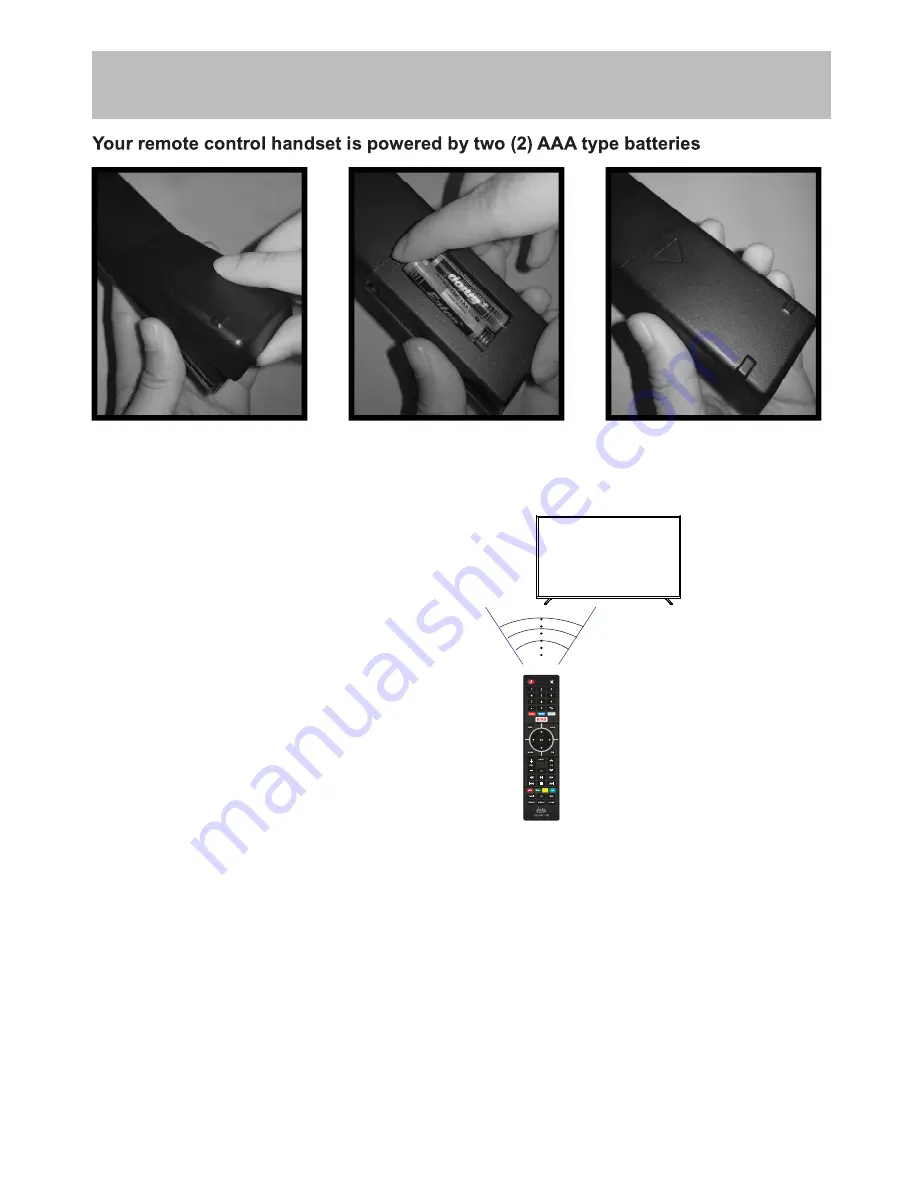
Vidao 75VNET4 User Manual Download Page 10

Battery Install

Remote Control  

• 

Effective remote range is approximately 16 feet at an 
angle of no greater than 30° to the left  / right or 20° up / 
down to the IR sensor.

• 

To avoid possible damage from battery chemical       
leakage, remove the batteries if you do not plan to use 
the remote for an extended period of time. Do not mix 
batteries of different age and / or type. Always discard 
used batteries safely.

• 

Do not expose the remote control to liquids, direct sun-
light or sources of excessive heat.

• 

The IR receiver on the TV will not work properly if the set 
is in direct sunlight.

NOTE: Improper use of batteries can result in a chemical 
leakage or explosion.

• Turn the remote over and remove 
battery cover.

• Place two (2) “AAA” batteries into 
the battery compartment with the “+” 
and “-“ ends facing as indicated.

• Replace the cover

30

30

IR Receiver

75VNET4-8

Summary of Contents for 75VNET4

Page 1: ...USER S MANUAL 75 4K ULTRA HD TELEVISION 75VNET4 Ver 1 0 For technical assistance or troubleshooting please call 1 855 998 4326 or visit www sibrandssupport com...

Page 2: ......

Page 3: ...g this apparatus during lightning storms or when unused for long periods of time damaged in any way such as power supply cord or plug is damaged liquid has been spilled or objects have fallen into the...

Page 4: ...e type of power supply to your home consult your electronics retailer or local power company 6 Power Cord Polarization This TV is equipped with a three wire grounding type plug a plug with a third gro...

Page 5: ...re should be taken to keep from touching such power lines or circuits as contact with them might be fatal 11 Overloading 12 Object and Liquid Entry Never push objects of any kind into this TV through...

Page 6: ...V technician for assistance authority to operate the equipment guarantee that interference will not occur in a particular installation If this television does cause interference to other When replacem...

Page 7: ...ctions 1 Table of Contents 5 Introduction 6 Installing the Base 7 Remote Control Battery Install 8 Overview 9 TV Overview Front Panel 10 Rear Panel 12 11 Connecting External Devices 13 Customizing TV...

Page 8: ...v a h u o y r e v e n e h w e d i u g s i h t o t r e f e r e s a e l P you up and running with the best possible connection type for your devices Enjoy This TV uses a 600x300 VESA mounting bracket a...

Page 9: ...own on a soft cloth or cushion Position base as shown through the holes in the back of the base into the post holes and tighten securely Do not over tighten Installing the Base 1 75VNET4 7 Insert 4 sc...

Page 10: ...mix batteries of different age and or type Always discard used batteries safely Do not expose the remote control to liquids direct sun light or sources of excessive heat The IR receiver on the TV will...

Page 11: ...io settings standard wide wide zoom zoom Just Scan HDMI Dot by Dot VGA Adjust the volume Select the channel Into the TV channel Start playback or pause Reverse playback rapidly Advance playback rapidl...

Page 12: ...e VOL Press the buttons to adjust the volume up or down Front Rear Panel 1 POWER Press the button to turn the TV ON OFF power The screen image will appear within a few seconds and the LED will turn on...

Page 13: ...or high quality digital audio 8 EARPHONE Connect a stereo headphone for private listening 3 RJ45 RJ45 plug for connecting to external modem or network access equipment 5 VGA For PC display 6 PC AUDIO...

Page 14: ...Connecting External Devices 75VNET4 12...

Page 15: ...the power cord to the power socket after you have completed all the physical connections At this stage the TV will enter Standby Mode and the red LED indicator will illuminate In Standby Mode press t...

Page 16: ...your remote control or TV keypad to select the network scan type Connecting your TV to the Internet will let you use great services like Netflix stream TV shows and movies etc Customizing TV Settings...

Page 17: ...control repeatedly to select the channel Press the buttons on the remote control to select the channel directly Press 4 and then press button to select channel 4 Press 4 and 5 and then press button to...

Page 18: ...Or press the hotkey on the remote control to enter the desired APP directly Customizing TV Settings Facebook is an American online social media and social networking service company based in Menlo Par...

Page 19: ...ght the option and press then it will jump to the inserted drive press to enter After entering use the buttons to select the picture and press to enter Press button to display the main interface then...

Page 20: ...ttons to select the desire video then press the to display When the video is playing the video function bar will be displayed Use the buttons to select the desired function available on the bar Use th...

Page 21: ...r on the remote control to display the main interface Then use the buttons to highlight and press to enter Then use the buttons to cycle among the following options and select the desired one to enter...

Page 22: ...n Select zoom mode Wide Wide Zoom Zoom Standard Just Scan at HDMI mode Dot by Dot at VGA mode Note With a different input source the zoom mode options may differ Adjust advanced option s setting H POS...

Page 23: ...lt settings Software Update In the case of a USB device Choose I have read the user agreement to select Accept or Decline Software Update In the case of a NETWORK device Check Module Software Version...

Page 24: ...green levels Cycle among color temperatures Normal Warm COOL Set the following options Noise Reduction Reduce the noise level of the connected device OFF WEAK MEDIUM STRONG White Balance To set the d...

Page 25: ...sh French Spanish Press to display the main interface then use the buttons to highlight and press to Use the buttons to cycle among different options and select to enter and adjust each option setting...

Page 26: ...annel Show Hide the selected channel Display the current channel number Display the current channel label Press to display the main interface then use the buttons to highlight Use the buttons to cycle...

Page 27: ...period of time after which the TV automatically switches to standby mode Off 5 10 180 240 min Alternative You may press the SLEEP button repeatedly to select the number of minutes directly Set the OSD...

Page 28: ...rn On Off system lock The following options USA Canada RRT Setting and Reset RRT will only be accessible when you turn the system lock on TV TV RATING Press button to lock or unlock TV rating MPAA Sel...

Page 29: ...nter and adjust each option setting Deactivate and clear the account information Deactivate Vudu and clear the account information Quit Netflix Electronic Serial Number Show Version Terminate Netflix...

Page 30: ...udience Considered suitable for all audience children may watch unattended Parental Guidance Suggested Suggested unsuitable for younger children may contain suggestive language bad language sex and vi...

Page 31: ...onal 16 9 480p 720p 1080i 1080p 2160p 3840x2160 200 6000 1 178 178 16 7M 300 W 2 x 8W Composite Video Y Pb Pr HDMI 3 2 CABLE ANTENNA Optical Earphone RJ45 VGA PC AUDIO USB 66 3 W x 38 1 H x 3 1 D 62 1...

Page 32: ...ee page 20 Cannot use certain functions If the item chosen in a menu is shown in gray text that item cannot be selected in the current input No sound Check that connected audio cables are completely i...

Page 33: ...inal place of purchase For technical support visit our website www sibrandssupport com or call the VIDAO Technical Support Center for technical assistance or troubleshooting at 1 855 998 4326 Monday t...

Page 34: ......

Page 35: ......

Page 36: ......

Reviews: