Vidao 22A60 User Manual Download Page 10

wei

vr

ev

O

V

T

le

na

Pr

ae

R

la

vo

me

Rl

ats

ed

e

P

&

22A60-10

Wall Mounting

It is recommended that you call your local TV

dealer or a licensed contractor to secure the

television to the wall using a suitable VESA 

75 x 75 wall mount hardware.

Removal of TV Pedestal

for Wall Mounting

To remove the pedestal base from the

television, unscrew the (5) Philips head

screws and remove the entire assembly.
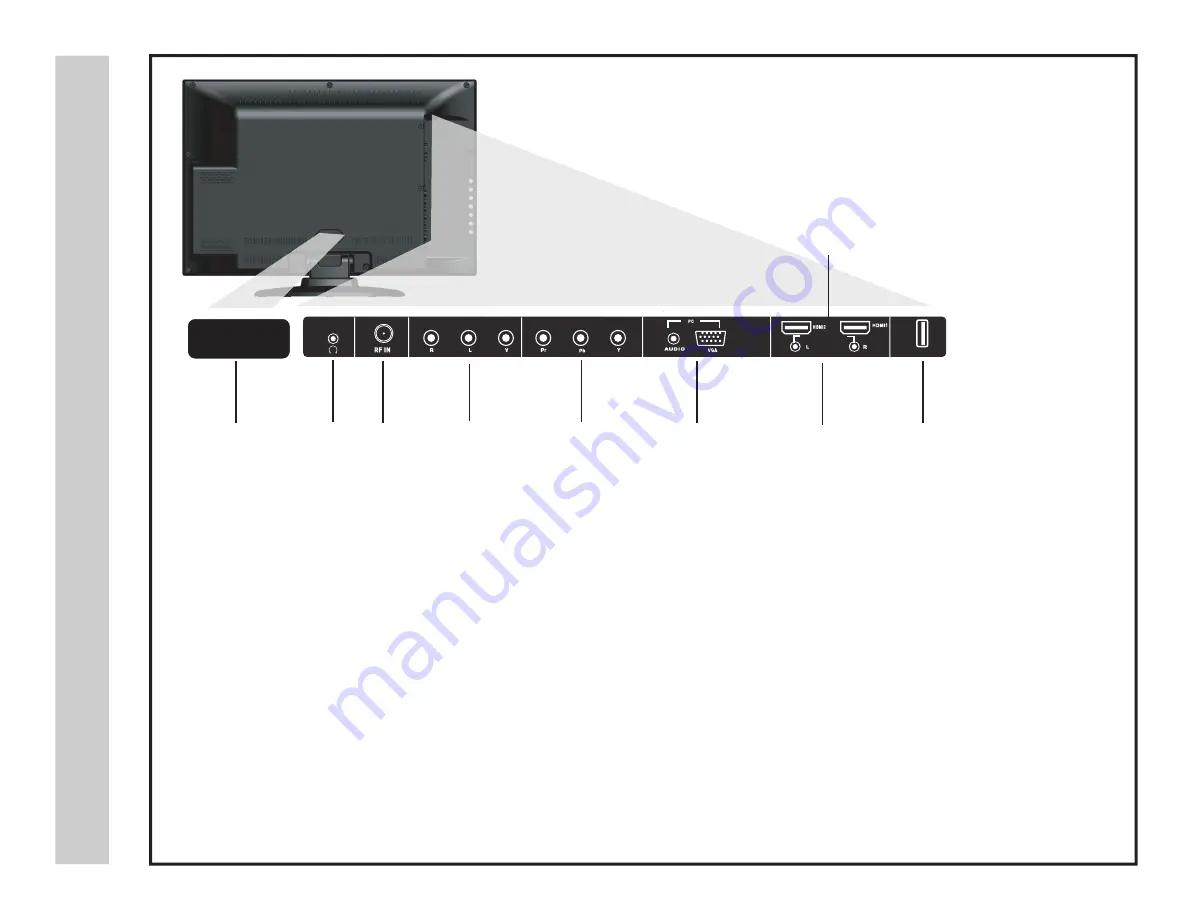
9. AC Power Plug –

 Insert power plug during initial setup.

8. USB Input Port -

Connect to portable USB device such as USB

flash / hard drive (max storage capacity 400GB), supports MP3 and JPEG.

7. HDMI Inputs (2) -

Connects to digital AV equipment that feature HDMI 

video and 

connectivity. HDMI supports enhanced high definition 

up to 7.1 - channel digital audio all from one cable. Recommended 

for best performance. HDMI cable not included.

5. PC IN - VGA Input -

Connect an optional VGA cable (not included)

from your personal computer .

PC Audio Input (3.5mm) -

3.5mm audio cable (not included)

for sound.

1. Headphone Jack -

Connect a stereo headphone (3.5mm – not included)

 for private listening.

4. Component Y Pb Pr Input -

Connect to an AV device that

features component (Y Pb Pr) video and audio output jacks.

3. AV Input -

Connect an external device to the composite VIDEO

(Y) and AUDIO (L / R) output jacks found on most video equipment.

2. RF Input -

Connect an antenna or cable connection

for television reception.

Note: Use an outdoor antenna, cable or satellite for best reception.

6. L / R Audio Out -

Connect to audio receiver.

AUDIO OUT

USB

1

2

3

4

5

6

7

8

9

AC IN

Summary of Contents for 22A60

Page 1: ...ER S MANUAL For technical assistance or troubleshooting please call 1 800 936 1168 or email service etecusa com The Technical Support Center is available 24 hours a day 22 LCD TELEVISION 22A60 1 7 day...

Page 2: ...uant to Part 15 of the FCC Rules These limits are designed to provide reasonable protection against harmful interference in a residential installation This television generates uses and can radiate ra...

Page 3: ...three wire grounding type plug a plug with a third grounding pin As a safety feature this plug will only fit into a grounded power ourlet If you are unable to insert the plug into the outlet contact y...

Page 4: ...s n o i t c u r t s n I y t e f a S 22A60 4 qualified service technician technician...

Page 5: ...tial TV Setup Initial Setup Wizard TV Channel Setup Channel Auto Scan Picture Settings Contrast Brightness Color Tint Sharpness Color Temperature Troubleshooting Specifications Index Audio Settings Ba...

Page 6: ...offer today s high definition television experience With a display resolution of 1366x768 you are assured of one of the finest quality televisions available today Your television provides both analog...

Page 7: ...Do not mix batteries of different age and or type Always discard used batteries safely Do not expose the remote control to liquids direct sunlight or sources of excessive heat The IR receiver on the T...

Page 8: ...revious menu SLEEP 17 Press to activate the Sleep function The TV will automatically turn off after 5 10 15 30 45 60 90 120 180 240 minutes OFF MENU 18 Press to display the Main menu ASPECT 19 Select...

Page 9: ...ess the MENU button to d isplay Press VOL to select from the 6 menu options available Press the CH CH buttons to select a feature from the selected menu then press the VOL VOL buttons to adjust the vo...

Page 10: ...video and connectivity HDMI supports enhanced high definition up to 7 1 channel digital audio all from one cable Recommended for best performance HDMI cable not included 5 PC IN VGA Input Connect an o...

Page 11: ...11 Connect the RF coaxial 75 ohm cable from your existing roof top indoor antenna or wall outlet Finger tighten the Coaxial RF Cable end to the TV input on the rear panel See pages 17 18 for TV setup...

Page 12: ...ENTER Connecting to an HD Set Top Box or Blu Ray DVD Player Using HDMI Digital set top box gaming console or Blu ray HDMI interface Optional HDMI cable not included s t u p n I I M D H o t n o i t c e...

Page 13: ...console or DVD player When connecting external equipment to your television match the colors of the connecting jacks Video Blue Green Red Audio White Red Connect the optional component video cables bl...

Page 14: ...ctions are recommended for the best performance When connecting external equipment to your television match the colors of the connecting jacks Video Yellow Audio White Red Connect the yellow video cab...

Page 15: ...from your PC to the VGA input on the TV s rear panel Connect an optional 3 5mm audio cable from the computer s mini audio output jack to the audio input on the TV s rear panel How to Use Press the IN...

Page 16: ...joy realistic sound from your home theater system through a stereo receiver amplifier or Prologic sound system when connected to your AV equipment Example The diagram illustrates the connection of aud...

Page 17: ...oadcast channels in the TV tuner memory How to Navigate Menu Language Cable or AIR Press the button to highlight Menu Language and then press the buttons to select an on screen display OSD language Pr...

Page 18: ...uto Channel Scan Auto Channel Scan may take several minutes to complete the process Use the button to highlight CABLE Press the button to select AUTO SCAN Press the ENTER button and CABLE SYSTEM will...

Page 19: ...nnel To make more critical adjustments based on your own preferences in PERSONAL Contrast Press the button to highlight Contrast Use the buttons to increase or decrease contrast intensity Brightness P...

Page 20: ...e buttons to increase or decrease low frequency Bass intensity Treble Press the button to highlight Treble Use the buttons to increase or decrease high frequency Treble intensity Balance Press the but...

Page 21: ...lect TIME Press the button to highlight the Sleep Timer Then press the button to select the amount of time to view before the television timer turns the set off 5 Min 10 Min 15 Min 30 Min 45 Min 60 Mi...

Page 22: ...button to select the menu choice Languages Other languages include Spanish and French Navigate using the buttons to select a different menu language Transparency Navigate using the buttons to turn OF...

Page 23: ...ss the arrow button to highlight Closed Caption Press the arrow button to highlight Advanced Selection Navigate using the buttons to select Service 1 6 Press the button to highlight Option Press the b...

Page 24: ...gate After connecting to a PC press the VGA button on your remote control Press the MENU button on the remote control and navigate using The buttons to select SETUP Access the position adjustment opti...

Page 25: ...ntrols for television programming or DVD movies press the buttons to highlight US United States Navigate using the buttons to highlight the TV MPAA menu To change the password press the button to disp...

Page 26: ...page 24 for information on how to change your password Navigate using the button to highlight CANADA ENGLISH then press the button repeatedly to select your ratings preference E C C8 G PG 14 18 Approp...

Page 27: ...ing the buttons to select channels to be added or deleted from your favorites list Press the ENTER button to add or delete a channel A checkmark indicates a channel has been added You may also display...

Page 28: ...en Press the ASPECT button to cycle through the following widescreen settings Press ASPECT to cycle through the following widescreen settings The Normal aspect is recommended for viewing native widesc...

Page 29: ...Select Move Repeat 1 Press the INPUT button on the remote control to display the Input menu Use the buttons to select USB 2 Use the buttons to highlight an individual USB option Press the buttons to s...

Page 30: ...grees Maximum Colors millions Power Consumption Audio Power Dimension without Pedestal Installed Weight without Pedestal Input Connections Composite Video Y Pb Pr HDMI RF PC VGA PC Audio IN 3 5mm Head...

Page 31: ...ted See page 27 Check parental control settings See pages 25 26 Restore default settings See page 22 Readjust the antenna Keep the TV away from electronic noise sources such as neon lights and microwa...

Page 32: ...Audio Display Display Modes for PC DLC E F Exit 8 Favorite Channels 8 27 G H Guide 8 HDMI Inputs Headphone Home Theater 12 10 16 I IR Receiver Input 7 9 8 9 12 15 L Languages Last LED light 20 22 8 9...

Page 33: ...hours a day 7 days a week for technical assistance or troubleshooting at 1 800 936 1168 This warranty does not cover any product which has been subject to damage due to an act of nature misuse neglect...

Reviews: