background image

15

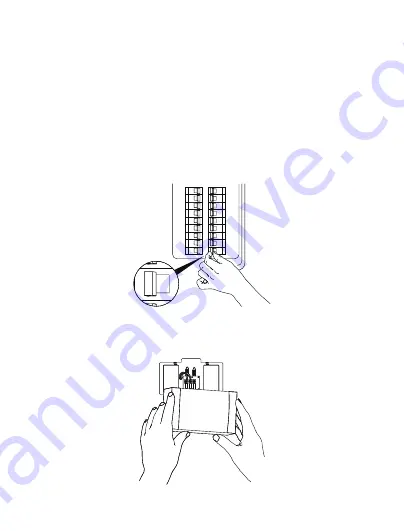
1. Turn off the circuit breaker for your internal doorbell. 
Wiring your doorbell to an internal doorbell is optional. If you do so, 
make sure your existing doorbell wires are working, then shut off power 
at the breaker before connecting your existing doorbell wires to the 
small wire terminals inside the mounting bracket. Ring your doorbell 
again to confirm it is now off.

2. Remove the cover from your internal doorbell.

Wiring the Chime Kit

ON

OFF

ON

OFF

ON

OFF

ON

OFF

ON

OFF

ON

OFF

ON

OFF

ON

OFF

ON

OFF

ON

OFF

ON

OFF

ON

OFF

ON

OFF

ON

OFF

ON

OFF

ON

OFF

ON

OFF

ON

OFF

ON

OFF

ON

OFF

ON

OFF

Summary of Contents for VD300

Page 1: ...Video Doorbell with hardwired installation kit VD300 User Manual...

Page 2: ......

Page 3: ...vd support govicture com to extend the warranty to 24 months Lifetime professional tech support is provided by Victure Visit our YouTube Channel Victure Video Doorbell for the instructional videos You...

Page 4: ...In app Setup Hardwired Installation How it works Wiring the Chime Kit Mark the install location Install the mounting bracket Using your Doorbell Troubleshooting Need Help FCC Certification Informatio...

Page 5: ...0 Doorbell Mounting Bracket Hardwired Installation Kit USB Cable Batteries Double sided Tape Reset Pin Security Screw Screws Screwdriver User Manual Hardwired Installation Kit Video Doorbell with hard...

Page 6: ...Details for Hardwired Installation Kit 5 Wire Nut 2 Metal Parts and 2 Screws Chime Kit Wire Extensions Double sided Tape...

Page 7: ...the Doorbell 6 Camera PIR motion Sensor Speakers Status Indicator Doorbell Button Microphone Charging Indicator Micro USB Port Reset Hole Hard wired Power Port SD Card Slot Battery Compartment 11 12 1...

Page 8: ...d to the SD card slot Tip Doorbell supports class 10 micro SD card from 8G to 128G Please format the SD card with FAT32 format before use Insert the SD card without powering the camera Preparation Ins...

Page 9: ...the battery compartment with correct polarity and tighten the lid of the battery compartment securely with screws Tip Please make sure the lid of the battery compartment is tightened with screws so t...

Page 10: ...will glow blue once fully charged If you can t wait to play with your doorbell go ahead and set it up But we recommend fully charging it for about 8 10 hours before installation Tip The battery life...

Page 11: ...the app by scanning the QR code to download the app Set up your VD300 near your router Tip 1 Doorbell currently supports 2 4 GHz Wi Fi network only 5G is not supported 2 Wi Fi password does not includ...

Page 12: ...th your email address or log in with an existing account Tip You will need the verification code for your email address during the account registration process If you could not find the code in your e...

Page 13: ...dicator turns to be flash red when the reset is done Tear off the protective film from the doorbell s shell and follow the in app instruc tion to pair the doorbell with the app 4 Doorbell status indic...

Page 14: ...indoors you may need to move your router closer to your door or invest in a Wi Fi extender Email our warranty team to learn more about it Try it out After setup push the button on the front of your Vi...

Page 15: ...llow the in app instruction for your Victure s video doorbell about pairing the doorbell with the app Note Please choose No in the app for the mechanical doorbell option if you do NOT connect the door...

Page 16: ...off power at the breaker before connecting your existing doorbell wires to the small wire terminals inside the mounting bracket Ring your doorbell again to confirm it is now off 2 Remove the cover fro...

Page 17: ...nsformer usually labeled as TRANS T AC or 0 terminal screws on your internal doorbell Connect one wire from the Chime Kit to the Front terminal and the other wire to the Transformer terminal leaving t...

Page 18: ...17 5 Replace the cover on your internal doorbell...

Page 19: ...the outline of the supplied template then cut a rectangular hole in your wall to make room for the mounting bracket Note Please turn OFF the circuitbreaker for your internal doorbell 4 feet 120 cm Tip...

Page 20: ...ng the doorbell from its back 2 Mark the place to install the screws 3 Insert anchors optional Tip If you re installing on the hard surface such as stucco brick or concrete mark the drill holes Use th...

Page 21: ...cture doorbell Either wire can connect to either screw The order doesn t matter 5 Attach the Wire Extensions optional If you have trouble connecting the wires coming out of your wall to the back of yo...

Page 22: ...screws into the anchors or directly into the wall until they re flush with the mounting bracket and the bracket is flat against the wall 7 Attach the doorbell and secure with the security screw Tip I...

Page 23: ...hey have to say Body Detection enable to actively detect the movement with PIR sensor Screenshot Record Take a live Screenshot or Video when you would like to catch the moment History where you could...

Page 24: ...tor Please turn off this function for higher volume Device Name Live Stream of the visitor s sound Automatic Power Saving Mode when the doorbell does not detect anything for a long time You could re a...

Page 25: ...f you are busy and refuse to answer the call Cloud Storage Service an extra subscription fee will be charged if you would like to store the recordings in the cloud SD Card format the SD card before us...

Page 26: ...volume you could mute the microphone function Night Vision view the crisp images no matter day or night The external light source will be recommended for better night vision quality Wireless Chime pai...

Page 27: ...crypted open network 2 Wi Fi password does not include special characters such as and 3 Move your Wi Fi router closer to the door or invest in a Wi Fi extend er for a stronger Wi Fi signal 4 Test your...

Page 28: ...27 Need Help For questions support or warranty claims contact us at the address below or visit govicture com Please include your Amazon order number and product model number vd support govicture com...

Page 29: ...nt to part 15 of the FCC Rules These limits are designed to provide reasonable protection against harmful interference in a residential installation This equipment generates uses and can radiate radio...

Page 30: ...o which the receiver is connected Consult the dealer or an experienced radio TV technician for help RF exposure compliance statement This device has been evaluated to meet the general RF exposure requ...

Page 31: ......

Page 32: ...1...

Reviews: