


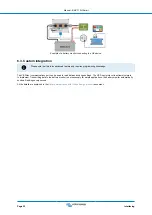


This option can be used to manually synchronise the battery monitor.
When navigating to this setting on the head unit , press the SELECT button to synchronize the battery monitor to 100%.
In the VictronConnect app press the ”Synchronise” button to synchronise the battery monitor to 100%.
See the
paragraph for more information on this setting.
7.2.13. Zero current calibration
Setting 09
This option can be used to calibrate the zero reading if the battery monitor reads a non-zero current even when there is no load
and the battery is not being charged.
A zero current calibration is (almost) never needed. Only perform this procedure in case the battery monitor shows a current while
you are absolutely sure that there is no actual current flowing. The only way to be sure is to physically disconnect all wires and
cables connected to the LOAD side of the shunt. Do this by unscrewing the shunt bolt and removing all cables and wires from
that side of the shunt. The alternative, switching loads or chargers off, is NOT accurate enough as this does not eliminate small
standby currents.
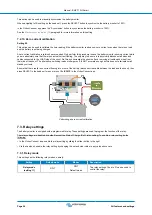
Ensure that there really is no current flowing into or out of the battery (disconnect the cable between the load and the shunt), then
press SELECT in the head unit menu or press CALIBRATE in the VictronConnect app.
Performing a zero current calibration.
7.3. Relay settings
The battery monitor is equipped with a programmable relay. These settings are used to program the function of the relay.
The relay settings are disabled by default (except the State of Charge (SoC) relay setting). To enable, a relay setting do the
following:
• In the VictronConnect app, enable the relay setting by sliding the slider button to the right.
• Via the head unit, enable the relay setting by changing the set and clear value to any value above zero.
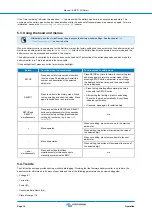
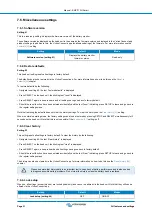
7.3.1. Relay mode
This setting has the following relay modes, namely:
Setting
Default mode
Modes
Description
Relay mode
(setting 11)
DFLT
DFLT
Default mode.
The relay settings 16 up to 31 can be used to
control the relay.
Manual - BMV-710H Smart
Page 26
All features and settings