background image

Page 19

One Year Parts Warranty:

For one year from the date of original purchase, your local reseller will provide free of charge, non-consumable replace

-

ment parts or components that failed due to manufacturing defects. Subject to the conditions and limitations set forth 

below, your local reseller will, at its option, either repair or replace any part of its products that prove defective by reason 

of improper workmanship or materials. Repaired parts or replacement products will be provided by your local reseller 

on an exchange basis, and will be either new or refurbished to be functionally equivalent to new. The consumer is re

-

sponsible for all shipping costs. Consumable parts not covered by this warranty include but not limited to: Light bulbs, 

metal, aluminum and charcoal filters.

Who is Covered:

This warranty is extended to the original purchaser for products purchased for ordinary home use.

This Warranty Will Be Voided When:

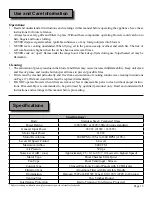
Product damaged through negligence, improper installation, accident, abuse, misuse, natural disaster, insufficient or 

excessive electrical supply, abnormal mechanical or environmental conditions, or any unauthorized disassembly, repair, 

modification, or failure to follow installation instructions. When product is used commercially or other than its intended 

purpose. Damaged because of improper connection with equipment of other manufacturers. Repaired or modified by 

anyone other than your local reseller’s authorized agents. This limited warranty also does not apply to any product on 

which the original identification information has been altered, obliterated or removed, has not been handled or packaged 

correctly or has been sold as second-hand.

What is Not Covered:

Consumable parts such as light bulbs, metal and charcoal filters. The natural wear of finish, and wear due to improper 

maintenance, use of corrosive and abrasive cleaning products, pads, and oven cleaner products. Chips, dents or cracks 

due to abuse, misuse, freight damage, or improper installation. Damage of product caused by accident, fire, floods or 

act of God. The manufacturer and/or distributor/reseller is not liable for, and does not cover under warranty, any loss of 

properties or any costs associated with removing, servicing, installing, or determining the source of problems with this 

product.

This warranty is valid in the country of the original purchase at retail. It is non-transferable and applies only to the original 

purchaser and does not extend to subsequent owners of this product. Any applicable implied warranties, including the war

-

ranty of merchantability, are limited in duration to a period of express warranty as provided herein beginning with the date 

of original purchase at retail and, no warranties, whether express or implied, shall apply to this product thereafter. 
To obtain warranty service, you may contact your local reseller from which you purchased this product. Please confirm the 

terms of your local reseller’s policies prior to contacting. Typically, you must include product identification information, 

including model number and serial number with a detailed description of the problem you are experiencing. You must also 

include proof of the date of original retail purchase as evidence that the product is within the applicable warranty period.

The  information  in  this  document  is  subject  to  change  without  notice,  please  contact  your  local  reseller  for  updated  details.

Warranty

Summary of Contents for 218B2-30

Page 1: ...Hood NOTICE Installer Leave this guide with the homeowner Homeowner Keep this guide for future reference IMPORTANT Read and save these instructions Rev 1024u 4a VICTORY 218 Series Wall Mounted Range H...

Page 2: ......

Page 3: ...authorities Before servicing or cleaning unit switch power OFF at service panel and lock service panel to pre vent power from being switched ON accidentally Clean grease laden surfaces frequently To...

Page 4: ...o out immediately EVACUATE AND CALL THE FIRE DEPARTMENT or dial your local emergency service immediately DO NOT USE WATER including wet dishcloths or towels a violent steam explosion will result Use a...

Page 5: ...tion 9 Installation 10 11 Installation overview 11 USE AND CARE Range hood operations 12 13 Troubleshooting 14 Use and care information 15 Specifications 15 Wiring diagram 16 MAINTENANCE Cleaning repl...

Page 6: ...en ordered together with range hood Parts supplied Hex Key Qty 1 PCS Optional with glass canopy Glass Canopy Screw Qty 4 PCS Optional with glass canopy Qty 6 PCS For sheet rock only A Qty 6 PCS B Qty...

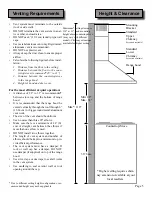
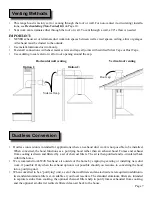
Page 7: ...of the vent should be uniform Use no more than three 90 elbows Make sure there is a minimum of 24 61 cm of straight vent between the elbows if more than one elbow is used DO NOT install two elbows tog...

Page 8: ...elbows transitions and caps ALWAYS when possible reduce the number or transitions and turns If long duct run is required increase duct size from 6 to 7 or 8 If a reducer is used install a long reduce...

Page 9: ...esellers The standard aluminum filters are intended to capture residue from cooking the optional charcoal filters help to purify fumes exhausted from cooking and the optional air diverter redirects fi...

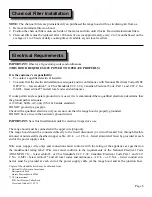
Page 10: ...0 Hz AC only USA Canada standard DO NOT ground to a gas pipe Check with a qualified electrician if you are not sure that the range hood is properly grounded DO NOT have a fuse in the neutral or ground...

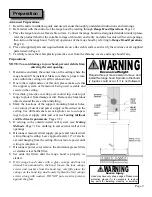
Page 11: ...the 1 range hood will be installed Make sure there is proper clear ance within the ceiling or wall for exhaust vent Due to the weight and size of this unit please make sure that 2 the support system o...

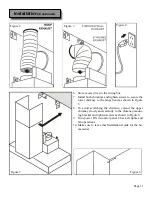
Page 12: ...he venting duct between the hood and the ex 4 haust opening either on the ceiling or wall Use alumi num tape to make all joints secure and air tight Connect the range hood to a designated standard out...

Page 13: ...To avoid scratching the chimney extend the upper 8 chimney slowly and carefully to the chimney mount ing bracket and tighten screws as shown in Figure 6 Turn power ON in control panel Check all light...

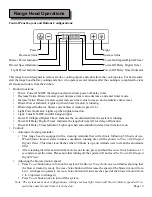
Page 14: ...tem is running Power Off Delay Digital Timer Indicates the length of time left for delay off function Power Off Delay Timer Indicator Lights up when auto shutdown delay timer function is on Controls A...

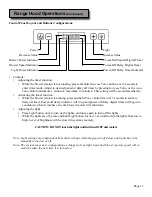
Page 15: ...will shut down Adjusting the light Press Light button once to turn on the lights and once again to turn off the lights While the lights are off press and hold Light button for over 3 seconds to dim th...

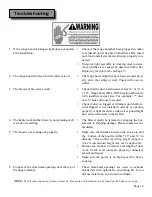
Page 16: ...t installed correctly or opening properly A tight mesh on a side wall cap unit might also cause restriction to the air flow The lights work but the blower is not spinning at all 4 is stuck or is rattl...

Page 17: ...s operating blowers could catch on to hair fingers and loose clothing NEVER dispose cigarette ashes ignitable substances or any foreign objects into blowers NEVER leave cooking unattended When frying...

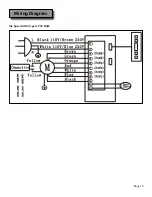
Page 18: ...Page 16 Wiring Diagram Six Speed with Type GU10 Bulb...

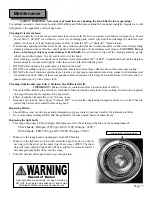
Page 19: ...steel wool or steel brushes Small bits of steel may adhere to the surface and cause rusting DO NOT allow salt solutions disinfectants bleaches or cleaning compounds to remain in contact with stainless...

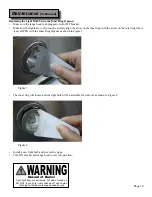
Page 20: ...s unplugged or turn OFF breaker Make sure the lights are cool to touch carefully align the arrow on the inner ring with the arrow on the outer ring where it says OPEN with the Inner Ring Opener as sho...

Page 21: ...sumable parts such as light bulbs metal and charcoal filters The natural wear of finish and wear due to improper maintenance use of corrosive and abrasive cleaning products pads and oven cleaner produ...

Page 22: ...ng fee of 15 will be charged for all approved return s Exchanges or returns may not be accepted if any packaging is missing Make sure to inspect the hood for damages and defects before installation Ap...

Page 23: ...Your Notes Page 21...

Page 24: ...7272 Buller Ave Burnaby BC V5J4S3 Canada VICTORY range hoods...

Reviews: