background image

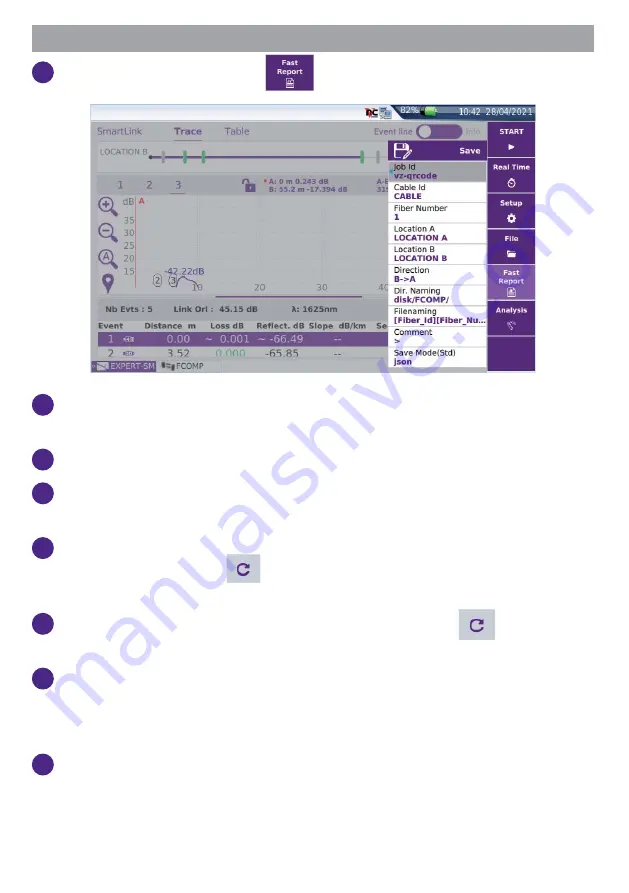
SAVING THE OTDR RESULTS IN EXPERT MODE

1

In the Results screen, press 

.

2

Press on the relevant section to edit the Job ID, Cable Id and Fiber 
Number.

3

Enter the location name for each fi ber extremity.

4

Select the test direction. For bi-directional OTDR tests, don’t forget to 
change the direction.

5

Press 

Dir. naming

 and enter the directory path where the results will be 

saved in, or tap on key 

 to revert to the current directory previously 

selected in the fi le explorer.

6

Press 

Filenaming

 and enter a fi le name, or tap on key 

 to apply the 

default auto fi lenaming.

7

In the 

Save Mode

 parameter, set 

Yes

 to desired format: 

txt fi le

pdf fi le


(for report) and 

json fi le

 (report(s) saved in addition to the .sor fi le).

If all parameters are set to 

No

, only the .sor (or .msor) fi le will be saved.

8

Once all paramaters are confi gured, press 

Save

.

Summary of Contents for SmartOTDR

Page 1: ...possible to attach the required warning labels to them In line with the provisions of Article 5 1 of the EN 60825 1 standard the laser class identification labels are shown below Ref stan dard EN 60825 1 Edition 1 2 2001 08 FDA21CFR 1040 10 Class 2 LASER RADIATION DO NOT STARE INTO BEAM CLASS 2 LASER PRODUCT CAUTION LASER RADIATION DO NOT STARE INTO BEAM CLASS II LASER PRODUCT The user must take t...

Page 2: ...ector quality Follow this simple INSPECT BEFORE YOU CONNECT process 2 Use appropriate cleaning material e g IBC cleaner cotton swab etc and re inspect to confirm 3 Carefully align the connector and test port prior to mating both Never force the connector ferrule or insert it with an angle into the test port adapter Mechanical stress may permanently damage the ceramic sleeve of the adapter or the e...

Page 3: ... adjust the focus 4 Press SETUP and configure the test of the connector Configure file storage Display information about the micro scope current test result displayed 5 Press RESULTS to return to Results page and press or press on the Quick Capture button on the probe to launch the test of the connector A summary of test results is displayed Zones A Core B Cladding C Epoxy D Ferrule ...

Page 4: ...tion validation keys 2 Charge indicator 12 Results 3 On indicator 13 Buzzer 4 File 14 AC DC Input 5 Setup 15 Mini USB port 6 Start Stop 16 VFL connector 7 Testing indicator 17 USB ports 2 8 On Off 18 OTDR port continuous light source power meter 9 Home 19 OTDR live port 10 Cancel 20 WIFI Bluetooth options ...

Page 5: ... TEST IN SMART TEST MODE 1 On the Home page select Smart TEST icon 2 Select the configuration file corresponding to your application and press LOAD key 3 If necessary modify some parameters before starting the measurement ...

Page 6: ...t the Smart Link view is displayed with a pop up window indicating global test results loss length at each wavelength and alarm status The pop up window displays the icon if no alarm thresholds are defined the icon if no event exceeds the alarm thresholds the icon if at least one event exceeds the alarm thresholds Touch the popup window to close it and get access to the detailed Smart Link map vie...

Page 7: ... Start press to perform a new measurement 2 Real Time press to perform a new measurement in Real Time 3 Assistant press to return to Setup Information page see Configuring a test in Smart Test Mode page 5 4 File press to open the File Explorer 5 Save press to save the results sor and pdf formats ...

Page 8: ... press to configure the OTDR parameters 3 To create a configuration when all parameters are configured according to your test needs press to save the current configuration 4 Type a file name in the edition keypad and press to validate 5 Press to access the configuration file Summary of configuration parameters into the file ...

Page 9: ...yed 1 2 3 4 5 6 1 Start press to perform a new measurement in Expert mode 2 Real Time press to perform a new measurement in Real Time 3 Setup press to return to OTDR parameters see Configuring a Test Creating a Smart config in Expert MODE page 8 4 File press to open the File Explorer 5 Fast Report Press to save the results sor txt json and pdf formats 6 Analysis press to access to manual measureme...

Page 10: ...ng and enter the directory path where the results will be saved in or tap on key to revert to the current directory previously selected in the file explorer 6 Press Filenaming and enter a file name or tap on key to apply the default auto filenaming 7 In the Save Mode parameter set Yes to desired format txt file pdf file for report and json file report s saved in addition to the sor file If all par...

Page 11: ...Press on the directory to open the edition keyboard and enter a new directory path 10 Press to display the file Explorer All the files and reports are saved and available in the defined directory TECHNICAL ASSISTANCE If you require technical assistance call 1 844 GO VIAVI For the latest TAC information go to http www viavisolutions com en services and support sup port technical assistance ...

Reviews: