Viavi SCU-1800 User Manual Download Page 27

27

© 2020 Viavi Solutions Inc.

www.viavisolutions.com

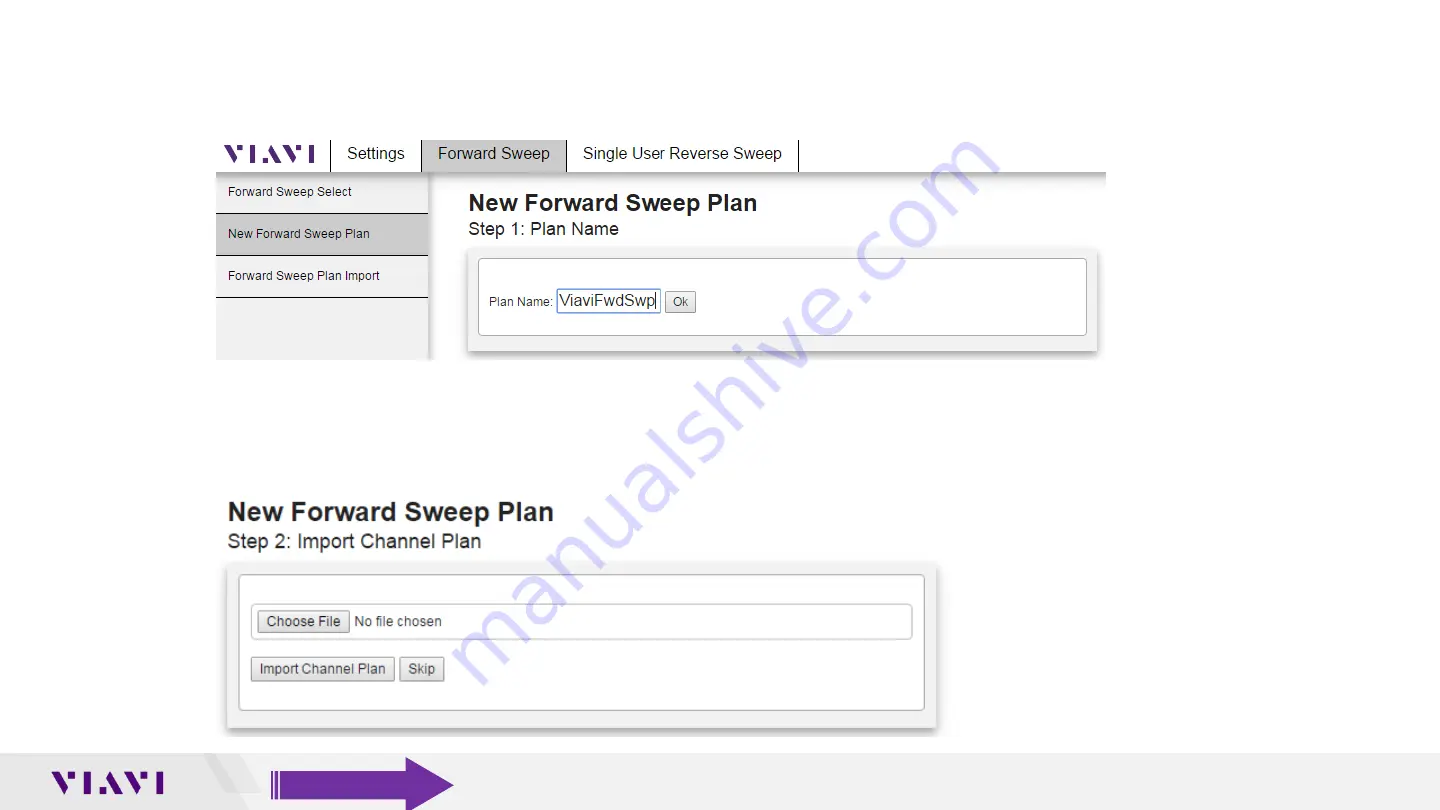
Label Sweep Plan and Import Active Channel Plan

Next label the new forward sweep plan and press OK

Since this is a manual entry of the active channel plans we will not be importing any channel 
plan, so press the “Skip” button

Table of Contents

Summary of Contents for SCU-1800

Page 1: ...Updated Last December 2020 SCU 1800 User Guide and Overview ...

Page 2: ...on Firmware Options Changing Username and Password About Overview of Forward and Reverse Sweep Menus Forward Sweep Menu Overview Forward Sweep Menu Buttons Reverse Sweep Menu Overview Reverse Sweep Menu Buttons Setup a Forward Sweep Plan Completely Manual Forward Sweep Setup Use ONX to Build Forward Sweep Channels Creating a Reverse Sweep Plan New Reverse Sweep Plan Activating a Sweep Plan Selecti...

Page 3: ...3 2020 Viavi Solutions Inc www viavisolutions com 3 www viavisolutions com SCU 1800 Introduction Table of Contents ...

Page 4: ...gured remotely via Ethernet HTTP or HTTPS supported Forward channel plans can be learned on the ONX and uploaded to the SCU Recommended if using any active channels as sweep points Backward compatible with DSAM 6300 Optional to use all 16 reverse input ports Minimize additional RF combining SCU sweep points are spurious free with a narrow bandwidth Provides 50dBc adjacent channel specs Table of Co...

Page 5: ...ction Diagram Optical Transmitters Optical Transmitters Optical Transmitters Optical Receivers Optical Receivers Optical Receivers SCU 1800 RF Out RF Inputs Note that the forward carriers are not fed back into the SCU1800 Nodes Forward Combiners and splitters Table of Contents ...

Page 6: ...ing required Improved noise performance The headend hub SCU 1800 Sweep Control Unit provides non interfering downstream sweep to 1 218 GHz and upstream sweep to 204 MHz on up to 16 ports The sweep is remotely configurable via Ethernet and browser and a sweep plan can be built from imported OneExpert CATV channel plan SDA 5510 REV combiner Table of Contents ...

Page 7: ...7 2020 Viavi Solutions Inc www viavisolutions com 7 www viavisolutions com SCU 1800 Configuration Overview Table of Contents ...

Page 8: ...ess the Checkmark button to enter the IP edit mode on the font panel Using the directional arrows will allow users to configure the proper Static IP address for this device Up Down Changes the digit value 0 9 Left Right Moves the curser to the next digit Press the Checkmark button to set the IP address Press the down arrow to enter the network s Netmask and Gateway addresses Table of Content Table...

Page 9: ... into the SCU 1800 Using a web browser navigate to the IP address on the front of the SCU 1800 that will be configured When prompted enter the SCU 1800 user name and password Default Username is scuadmin and the default password is scuadmin Table of Contents ...

Page 10: ...TPS and Mode Selection Test Point Compensation Configure reverse test point compensation per port Firmware View and update firmware versions Options View and install software options Login Settings Change login username and password About Serial number and calibration information The SCU Configurations are accessible via the Settings menu from the top row of buttons Table of Contents ...

Page 11: ...iplex rolloff then the transmit level may need to be increased to overcome the attenuation of the system diplexers Reverse Telemetry Frequency Sets the upstream telemetry signal frequency this will be communicated to the field sweep unit ONX or DSAM in the forward telemetry to enable bi directional communication Rapid Reverse Sweep Capable If enabled will instruct capable ONXs to use the Rapid Rev...

Page 12: ...ault device name is SCU 1800 this can be changed to better identify specific SCUs HTTPS Enabled If enabled the web interface to the SCU 1800 will utilize secure sockets to communicate to further enhance network security Demo Mode Not available on all SCU 1800 models Allows the SCU operation to be changed between Forward Sweep or Multi User Reverse Sweep modes Table of Contents ...

Page 13: ...ws all 16 ports to be independently compensated Apply TPC to Reverse Telemetry Level If checked the SCU will apply the port specific test point compensation value to the reverse telemetry signal and reverse sweep points before sending that information back to the field instrument If the box is not checked then only the reverse sweep points received at the SCU will have reverse TPC applied and the ...

Page 14: ...Firmware The Current firmware version installed is shown under the Firmware Package Version To update firmware on the SCU press the Choose File button find the desired SCU firmware upgrade package then press the Upgrade Firmware button Table of Contents ...

Page 15: ...ww viavisolutions com Options See what current options are installed into the SCU 1800 To add an option on the SCU press the Choose File button find the desired SCU option upgrade file then press the Deploy button Table of Contents ...

Page 16: ...assword can be reset on the SCU 1800 to a customized field 2 Usernames and Passwords must be 6 characters or longer of any combination of letters numbers and special characters 3 If the new login information is lost or forgotten users can reset the SCU s default login using the LCD panel 1 2 3 Table of Contents ...

Page 17: ...17 2020 Viavi Solutions Inc www viavisolutions com About Shows the Model Number Serial Number SCU Receiver Calibration Date and SCU Transmitter Calibration Date Table of Contents ...

Page 18: ...18 2020 Viavi Solutions Inc www viavisolutions com 18 www viavisolutions com Overview of Forward and Reverse Sweep Menus Table of Contents ...

Page 19: ...press the Forward Sweep Tab The big window shows all previously configured forward sweep plans Currently active plan will have a check mark next to it under the Active column Plans in the list can be searched by Name or number of Sweep Points Columns are sortable by clicking on them Table of Contents ...

Page 20: ...plan and add copy to the end of the original plan s name Edit Allows editing the plan name as well as the sweep points of the highlighted plan Delete Will delete the highlighted plan from the SCU s list of plans Import Allows sweep plans to be imported from previously exported SCU sweep plans Activate Forward Plan Will change the highlighted plan to the active forward sweep plan that the SCU will ...

Page 21: ... Reverse sweep this SCU is currently using Either type will reveal a window like the one shown The big window shows all previously configured reverse sweep plans Currently active reverse sweep plan will be checked under the Active column Plans in the list can be searched by Name or number of Sweep Points and columns can be sorted by clicking them OR Enable Reverse Sweep Check if reverse sweep is d...

Page 22: ...ate the highlighted plan and add copy to the end of the original plan s name Edit Allows editing the plan name as well as the sweep points of the highlighted plan Delete Will delete the highlighted plan from the SCU s list of plans Import Allows sweep plans to be imported from previously exported SCU sweep plans Activate Reverse Plan Will change the highlighted plan to the active reverse sweep pla...

Page 23: ...23 2020 Viavi Solutions Inc www viavisolutions com 23 www viavisolutions com Setup a Forward Sweep Plan Table of Contents ...

Page 24: ...ive Channels as Sweep Points To setup the SCU 1800 for forward sweep using live active carriers as sweep points can be done either by manually entering in the active channel plan information for each channel Or by using the ONX to identify channels and import this information into the SCU 1800 To insert sweep points into the channel guard band This configuration is done completely on the SCU 1800 ...

Page 25: ...25 2020 Viavi Solutions Inc www viavisolutions com 25 www viavisolutions com Completely Manual Forward Sweep Setup Manually Creating Each Channel in the SCU 1800 Table of Contents ...

Page 26: ...nstream Sweep Plan Once in the SCU 1800 press the Forward Sweep button This will show all the previously configured forward sweep plans and allow the user to create or edit forward sweep plans To create a new Forward Sweep plan press the New Button Table of Contents ...

Page 27: ...s com Label Sweep Plan and Import Active Channel Plan Next label the new forward sweep plan and press OK Since this is a manual entry of the active channel plans we will not be importing any channel plan so press the Skip button Table of Contents ...

Page 28: ...ually to the sweep plan in the Define Active Carriers in system which will be used as sweep points section Manual entry of the channel type center frequency channel bandwidth and Level are required Press the Add Channel to add the configured channel to the Sweep Points List Level is the power level of the channel at the RF Combiner and is used by the field unit to estimate point to point attenuati...

Page 29: ...tandalone Sweep Points to the Sweep Plan Additional sweep points can be added to the sweep plan when vacant spectrum is desired to be used while performing sweep tests Either as a contiguous range of sweep points OR as individual sweep points Table of Contents ...

Page 30: ...30 2020 Viavi Solutions Inc www viavisolutions com Save the new sweep plan by pressing the Back button Table of Contents ...

Page 31: ...an 1 To activate the newly created Forward Sweep plan find and select the name used during the plan setup then press the Activate Forward Plan button 2 The active sweep plan and current status is also shown at the bottom of the display under Forward Plan 2 1 1 Table of Contents ...

Page 32: ...32 2020 Viavi Solutions Inc www viavisolutions com 32 www viavisolutions com Use ONX to Build Forward Sweep Channels Using an ONX CATV detected channel line up and levels Table of Contents ...

Page 33: ...ssary to operate the ONX in order to get the channel plan Make sure the ONX CATV is connected to a live CATV network with all the channels present Recommend building the channel lineup at the RF Combining network prior to the forward optical laser This will allow the field sweep unit to more accurately determine attenuation from the headend to the field Connect the live RF feed to Port 1 of the ON...

Page 34: ...utions com Using an ONX to build the active channel plan Create a new Work Order ID Should be descriptive as you will need to find and copy that file later Press the Start button to beginning testing the live channel lineup Table of Contents ...

Page 35: ...35 2020 Viavi Solutions Inc www viavisolutions com Saving the Channel plan on ONX CATV Once the test has reached 100 Press the Stop button then the Back button Table of Contents ...

Page 36: ... www viavisolutions com Save the channel plan When at the Work Order ID and Test Location display press the Save Channel Plan button at the bottom Now the channel plan has been saved to the ONX CATV in a folder Table of Contents ...

Page 37: ...iavi Solutions Inc www viavisolutions com Insert USB Thumb Drive and Enter File Browser Now insert a USB thumb drive into either of the ONX CATV s USB ports Find and Enter the File Browser mode Table of Contents ...

Page 38: ...t Channel Plan to USB Once in the File Browser enter the channelplan folder Find the Channel Plan labeled the same as the prior Work Order ID Open the File Options and Copy the file to USB The channel plan is now successfully exported onto the USB drive Table of Contents ...

Page 39: ...800 On a computer with a USB drive using a web browser navigate to the IP address on the front of the SCU 1800 that will be configured When prompted enter the SCU 1800 user name and password Default Username is scuadmin and the default password is scuadmin Table of Contents ...

Page 40: ...ep button at the top This will show all the previously configured forward sweep plans and allow the user to create or edit forward sweep plans To create a new sweep plan press the New Button Note Forward Sweep Plans can not exceed 500 total sweep points Combination of all Sweep Points and Channels configured Table of Contents ...

Page 41: ... Channel Plan Now label the new forward sweep plan and press OK Take the USB drive out of the ONX and put it into the computer Press the Choose File button Navigate to the location of the ONX created Channel Plan and select the file Press the Import Channel Plan button Table of Contents ...

Page 42: ...an be deleted but can not be modified Enabling the Use level from channel plan build will send the Level per each channel to the field device so it can determine an approximate signal loss calculation between the headend and current field location If not enabled an unreferenced test will appear to have very large loss attenuation when viewed in the Referenced tab on the ONX Additional active carri...

Page 43: ...the Sweep Plan Additional sweep points can be added to the sweep plan when vacant spectrum is desired to be used while performing sweep tests Either as a contiguous range of sweep points OR as individual sweep points Press the Back button when complete to save the plan Table of Contents ...

Page 44: ...reated Forward Sweep plan find and select the name used during the plan setup then press the Activate Forward Plan button currently active plan will have a check under Active 2 The active sweep plan and current status is also shown at the bottom of the display under Forward Plan 1 2 1 1 Table of Contents ...

Page 45: ...45 2020 Viavi Solutions Inc www viavisolutions com 45 www viavisolutions com Creating a Reverse Sweep Plan Table of Contents ...

Page 46: ...ions Inc www viavisolutions com New Reverse Sweep Plan Press the New button from the Reverse Sweep Plan menu A New Reverse Sweep Plan will appear Create a new name for the reverse sweep plan and press OK Table of Contents ...

Page 47: ... section labeled Add Multiple Sweep Injection Points 2 Individual sweep points can be added using the Add Individual Sweep Injection Points section NOTE The number of sweep points can not exceed 300 points so the start and stop frequencies and the step size must be a combination that is less than 300 total reverse sweep points 3 Press the Back button when done and the SCU will save the plan 1 2 3 ...

Page 48: ...48 2020 Viavi Solutions Inc www viavisolutions com 48 www viavisolutions com Activating a Sweep Plan Table of Contents ...

Page 49: ...com Selecting a Forward Sweep Plan Under the Forward Sweep menu Find the desired sweep plan highlight it by selecting it then press the Activate Forward Plan When successful the forward sweep plan will have a Check Mark next to it Table of Contents ...

Page 50: ...Reverse Sweep Plan Under the Single User Reverse Sweep or Multi User Reverse Sweep menu Find the desired sweep plan select it then press the Activate Reverse Plan When successful the desired reverse sweep plan will have a Check Mark next to it OR Table of Contents ...

Page 51: ...ed sweep plans are selected they will be shown at the bottom of the display Press the GREEN Start Sweep button to activate the sweep functionality of the SCU 1800 To stop the SCU 1800 from Sweeping press the RED Stop Sweep and the SCU will halt transmitting and receiving sweep pulses Table of Contents ...

Page 52: ...www viavisolutions com Table of Contents ...

Reviews: