background image


 VIEGA 

 VIEGA 

 VIEGA 

 VIEGA User Manual

User Manual

User Manual

User Manual    


18 


1.9.


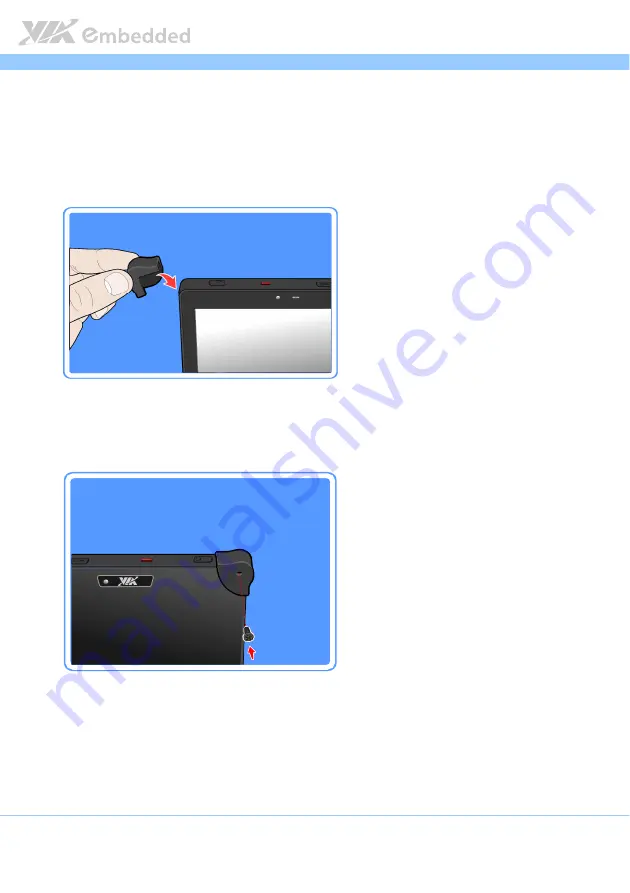
Installing the rubber ribs 

Use the rubber ribs to protect the tablet from vibration and shock.  

1. Insert the rubber ribs to the 4 corners of the tablet.  


Figure 

Figure 

Figure 

Figure 11

11

11

11: Insert the rubber ribs

: Insert the rubber ribs

: Insert the rubber ribs

: Insert the rubber ribs


2. Secure the rubber ribs in place with 4 mounting screws (screw type: M4*8).  


Figure 

Figure 

Figure 

Figure 12

12

12

12: Secure the rubber ribs

: Secure the rubber ribs

: Secure the rubber ribs

: Secure the rubber ribs


Summary of Contents for VIEGA-Tablet

Page 1: ...1 06 12042014 180500 USER MANUAL VIEGA Tablet Semi ruggedized embedded Android tablet...

Page 2: ...ies implied or otherwise in regard to this document and to the products described in this document The information provided in this document is believed to be accurate and reliable as of the publicati...

Page 3: ...s damaged Liquid has penetrated into the equipment The equipment has not worked well or you cannot get it work according to User s Manual The equipment has dropped and damaged The equipment has obviou...

Page 4: ...t to the docking station 19 2 2 2 2 Basics Basics Basics Basics 20 20 20 20 2 1 Switching the power on or off 20 2 2 Unlocking the screen 20 2 3 Sleep Mode 20 2 4 Home Screen 21 2 4 1 Removing an app...

Page 5: ...29 29 29 8 8 8 8 Email Email Email Email 30 30 30 30 8 1 Setting up an e mail account 30 8 2 Adding a new e mail account 30 9 9 9 9 Location Location Location Location 31 31 31 31 9 1 Location Settin...

Page 6: ...tion 35 12 12 12 12 Bluetooth Bluetooth Bluetooth Bluetooth 36 36 36 36 13 13 13 13 Security Security Security Security 37 37 37 37 13 1 Screen lock 37 14 14 14 14 Settings Settings Settings Settings...

Page 7: ...g to an HDMI display 12 Figure 5 Installing the Micro SIM card 13 Figure 6 Installing the Micro SD card 14 Figure 7 Connecting to Micro USB port 15 Figure 8 Plug to Micro USB charger cable 16 Figure 9...

Page 8: ...VIEGA VIEGA VIEGA VIEGA User Manual User Manual User Manual User Manual viii Lists of Tables Table 1 Onscreen keyboard table 25 Table 2 Screen lock table 37 Table 3 System Settings table 38...

Page 9: ...1 Hardware Setup Hardware Setup Hardware Setup Hardware Setup 1 1 Box Contents VIEGA Tablet X 1 Rubber ribs X 4 and screws X 4 Micro HDMI to HDMI adapter X 1 Micro USB to USB cable X 1 Power Adapter...

Page 10: ...p and Right panel of the VIEGA tablet Top and Right panel of the VIEGA tablet Top and Right panel of the VIEGA tablet Top and Right panel of the VIEGA tablet 1 3 Left panel Figure Figure Figure Figure...

Page 11: ...nual User Manual User Manual User Manual 11 1 4 Bottom panel F F F Figure igure igure igure 3 3 3 3 Bottom panel of the VIEGA tablet Bottom panel of the VIEGA tablet Bottom panel of the VIEGA tablet B...

Page 12: ...HDMI display 1 Plug the HDMI adapter to the micro HDMI port of your VIEGA tablet 2 Connect the HDMI cable to the HDMI adapter 3 Plug the other end of HDMI cable to the HDMI port of your HDMI monitor F...

Page 13: ...nsert the Micro SIM card remove the 2 screws from the cover Insert the Micro SIM card into the Micro SIM card slot Figure Figure Figure Figure 5 5 5 5 Installing the Micro SIM card Installing the Micr...

Page 14: ...6 6 6 Installing the Micro SD card Installing the Micro SD card Installing the Micro SD card Installing the Micro SD card Note Note Note Note 1 Ensure the angled corner of the SD card is placed in th...

Page 15: ...sories 1 Power adapter 2 Dock head 3 Micro USB charger cable 1 Lift the cover from the Micro USB port 2 Take the Micro USB charger cable and plug Micro USB connector to the Micro USB port of the table...

Page 16: ...r adapter Figure Figure Figure Figure 8 8 8 8 Plug to Micro USB charger cable Plug to Micro USB charger cable Plug to Micro USB charger cable Plug to Micro USB charger cable 4 Insert the dock head to...

Page 17: ...a power outlet to start charging the battery Note Note Note Note 1 For the first time of using the VIEGA tablet charge the tablet for four hours before using it 2 Only use the power adapter provided i...

Page 18: ...he rubber ribs to the 4 corners of the tablet Figure Figure Figure Figure 11 11 11 11 Insert the rubber ribs Insert the rubber ribs Insert the rubber ribs Insert the rubber ribs 2 Secure the rubber ri...

Page 19: ...tablet into the docking station Insert the tablet into the docking station Insert the tablet into the docking station 2 Secure the docking station to the tablet from the back by fastening the 4 mounti...

Page 20: ...itching the power on or off Press the power button to turn on off the VIEGA tablet 2 2 Unlocking the screen On the lock screen tap and drag the ring from lock to unlock 2 3 Sleep Mode Slightly press t...

Page 21: ...e Figure Figure 15 15 15 15 Home screen Home screen Home screen Home screen 1 Google Search 2 Back 3 Home 4 Recently opened Apps 5 Apps 2 4 1 Removing an app from Home screen To remove an app from you...

Page 22: ...and Press and hold hold hold hold To open the available options for an item press and hold the item Swipe or Swipe or Swipe or Swipe or slide slide slide slide Drag your finger vertically or horizonta...

Page 23: ...ings You can also access to the VIEGA tablet setting through a shortcut in quick setting Tap the status bar on the lower right side of the screen and tap to open the Quick Settings 2 8 Switching betwe...

Page 24: ...ows data exchange or contactless transactions when the tablet touches another NFC enabled device 1 From the Home screen tap Settings Settings Settings Settings 2 In Wireless Networks section tap More...

Page 25: ...twice to turn on caps lock Tap to change to the number symbol keyboard Next Done key Tap to create a new line or to confirm text input Backspace key Tap to delete the previous letter number Go to next...

Page 26: ...e Home screen and tap Camera Camera Camera Camera 4 1 Taking a photo To take a photo tap 4 2 Recording videos To record videos tap Tap to start recording 4 3 Capturing panoramas To capture panoramas t...

Page 27: ...screen Select the appropriate task 5 2 Sharing the photo 1 Tap the photo to be shared from the album 2 The tool bar on upper right side of the screen allows you to share your photo 5 3 Editing the ph...

Page 28: ...ts are apps that enable you to easily access to Apps on your tablet s Home screen 1 From the Home screen tap Widgets Widgets Widgets Widgets on top of the screen 2 In the Widgets screen select a widge...

Page 29: ...File Browse File Browse File Browse File Browse allows you to find and manage your data To access the file storage 1 From the Home screen tap and go to the All Apps screen 2 Tap File Browse File Brows...

Page 30: ...our e mail address and password then tap Next Next Next Next 4 Configure the Account settings Account settings Account settings Account settings Next Next Next Next 5 Enter the account name that will...

Page 31: ...cess Location access Location access Location access on the left panel 3 Select from the following options GPS satellites GPS satellites GPS satellites GPS satellites Let apps use GPS on your tablet t...

Page 32: ...ing setting 1 Tap from the Home screen 2 Tap Search settings 3 In the Searchable items select the items to be searched 10 2 Start Searching 1 Tap from the Home screen 2 Input the text you intend to se...

Page 33: ...ormal browser tabs Incognito tabs allow you to surf with more privacy Pages you view in incognito tab won t appear in your browser history Open your browser and tap New incognito tab New incognito tab...

Page 34: ...t Visited Most Visited tab select the page you want to view and tap it 10 10 Clearing the browser cache and history Open a webpage tap Settings Settings Settings Settings Privacy security Privacy secu...

Page 35: ...ireless Networks Wireless Networks Wireless Networks Wireless Networks slide the Wi Fi switch to ON ON ON ON The system will scan for all available Wi Fi networks 3 Tap a network to be connected For s...

Page 36: ...Wireless Networks Wireless Networks Wireless Networks Wireless Networks slide the Bluetooth switch to ON ON ON ON 3 To Pair the Bluetooth device to be connected with your VIEGA tablet tap Bluetooth B...

Page 37: ...y Screen Security Screen Security Screen Security Screen Security Screen lock Screen lock Screen lock Screen lock None None None None Disable the lock screen Slide Slide Slide Slide Slide the screen t...

Page 38: ...on Location Location Location Location Access Access Access Access Configure location access setting Security Security Security Security Configure security settings such as screen lock encryption pass...

Page 39: ...a while about 7 seconds to force shut down and press the power button again to turn it on 15 2 Resetting You can reset the system to factory default settings 1 From the Home screen tap Settings Setti...

Page 40: ...generates uses and can radiate radio frequency energy and if not installed and used in accordance with the instructions may cause harmful interference to radio communications However there is no guar...

Page 41: ...rference received including interference that may cause undesired operation Notice Notice Notice Notice This equipment complies with FCC RF radiation exposure limits set forth for an uncontrolled envi...

Page 42: ......

Reviews: