background image

BIOS Setup

3-31

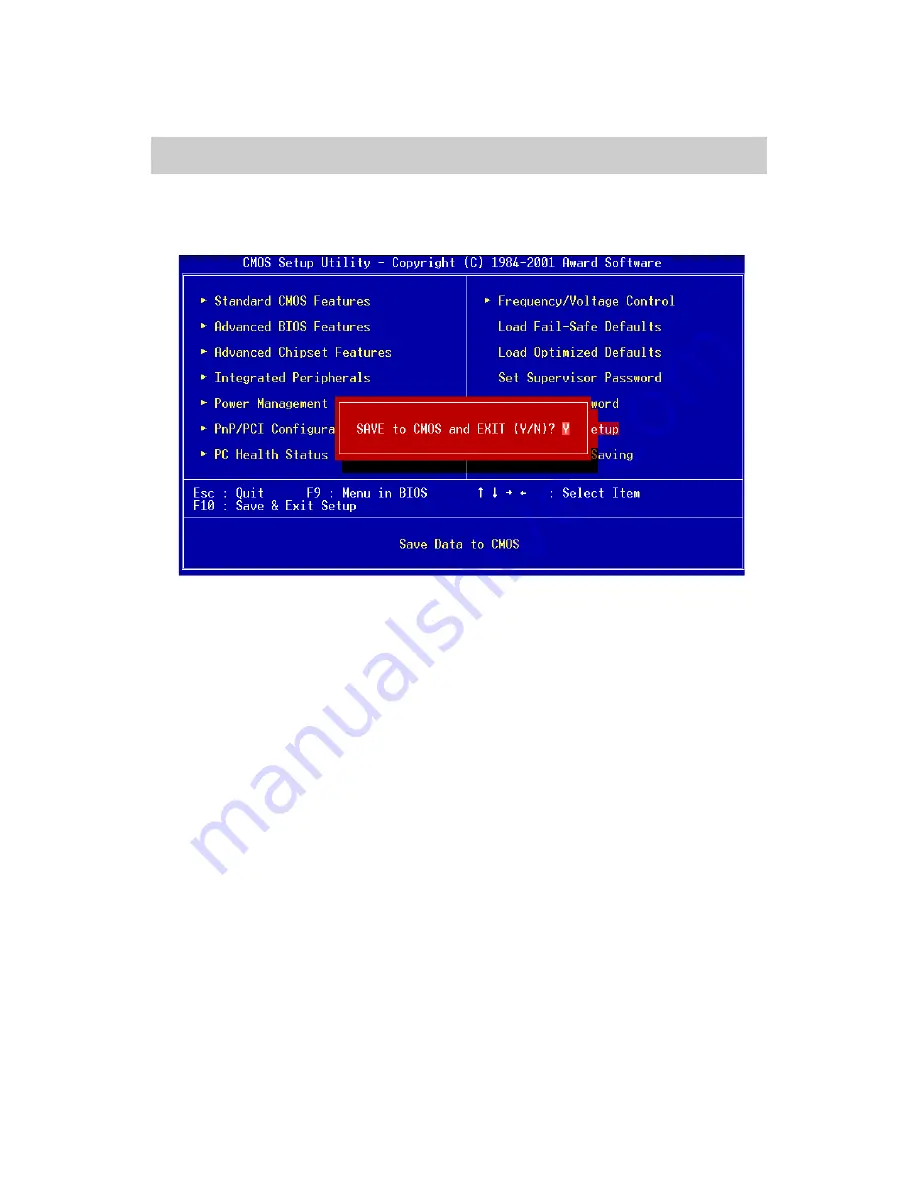
When you want to quit the Setup menu, you can select this option to save the
changes and quit. A message as below will appear on the screen:

Typing “Y” will allow you to quit the Setup Utility and save the user setup
changes to RTC CMOS.

Typing “N” will return to the Setup Utility.

Save & Exit Setup

Summary of Contents for EPIA-M

Page 1: ...i Version 1 3 January 23 2003 VIA User s Manual VIA EPIA M Mini ITX Mainboard...

Page 2: ...cy of the content of this manual However it is possible that it may contain technical inaccuracies or typographical or other errors VIA will assume no liability for any inaccuracy found in this public...

Page 3: ...manual may cause harmful interference to radio communications Operation of this equipment in a residential area is likely to cause harmful interference in which case the user will be required to corre...

Page 4: ...nd we reserve the right to make changes without notice Trademarks All trademarks used in this manual are the property of their respective owners PS 2 and OS 2 are registered trademarks of IBM Corporat...

Page 5: ...le 9 All cautions and warnings on the equipment should be noted 10 Never pour any liquid into the opening Liquid can cause damage or electrical shock 11 If any of the following situations arises get t...

Page 6: ...e should contain the follow ing items 1 x VIA EPIA M Mini ITX Mainboard 1 x User s manual 1 x ATA 33 66 100 Hard drive ribbon cable 1 x Floppy ribbon cable 1 x Combo Module 2 port USB 2 0 and 2 port I...

Page 7: ...n Power Connector ATXPWR 2 6 Back Panel 2 7 Mouse Connector JMS1 2 7 Keyboard Connector JKB1 2 7 USB Port Connectors 2 8 RJ 45 NIC Port 2 8 Parallel Port Connector LPT1 2 8 Serial Port Connector COM 1...

Page 8: ...19 PCI Slots 2 19 PCI Interrupt Request Routing 2 19 BIOS Setup 3 1 Entering Setup 3 2 Control Keys 3 2 Getting Help 3 3 The Main Menu 3 4 Standard CMOS Features 3 6 Advanced BIOS Features 3 8 Advance...

Page 9: ...viii Software Setup 4 1 Driver Utilities CD Content 4 2 Getting Started 4 2 Running the Driver Utilities CD 4 2 CD Content 4 2 Appendix 5 1 Smart 5 1 Intelligent 6 Channel Audio 5 2...

Page 10: ...ainboard enables the creation of an exciting new generation of small ergonomic innovative and affordable embedded systems Through high level of integration mini ITX only occupy 66 of the size of FlexA...

Page 11: ...cs with MPEG 2 decoder Audio VT1616 six channel AC 97 Codec 3 Audio jacks Line in Line out and Mic in switched to 6 channel output during 6 channel operations with Smart 5 1 See Appendix 5 1 MainMemor...

Page 12: ...U Sys Fan FAN3 System intrusion connector 1 I2 C connector 1 Connector for LVDS module Optional Serial port connector for second com port Back Panel I O Ports 1 PS2 mouse port 1 PS2 keyboard port 1 Pa...

Page 13: ...1394_2 FAN3 F_PANEL DIMM IDE1 IDE2 ATXPWR IR I2 C COM2 USB3 4 F_Audio CD_IN Top Mouse Bottom Keyboard Top RJ45 Bottom USB ports CRT VGA SYSFAN FDD COM1 Top Parallel port Bottom S Video Composite Top...

Page 14: ...Video See p 2 9 S PDIF_SEL Connect to RCA video or S PDIF See p 2 9 VGAOut Connect to CRT monitor See p 2 9 IDE1 IDE2 Connecting IDE devices See p 2 10 F_Panel Front panel connectors See p 2 11 IR FIR...

Page 15: ...procedures Some components can be damaged if installed incorrectly If possible use a grounded wrist strap before handling computer components The components can be damaged by static electricity This...

Page 16: ...i ITX Mainboard includes an embedded VIA Eden Proc essor or VIA C3 E Series Processor The CPUFAN CPU fan and SYSFAN system fan run on 12V and maintain system cooling When connecting the wire to the co...

Page 17: ...Eden Processor features a fanless design The VIA Eden Processor requires only a heatsink as shown below Overclocking This motherboard is not designed to support overclocking Any attempt to operate bey...

Page 18: ...nding notches on the DIMM slot The modules will only fit if placed in the correct position 3 With both hands press the DDR SDRAM module down into the DIMM slot so that the white retaining latches rota...

Page 19: ...et Memory Module Total Memory DIMM 64MB 128MB 256MB 512MB 1GB 64MB 1GB Maximum System Memory Supported 1GB Available DDR SDRAM Configurations Refer to the table below for available DDR SDRAM configura...

Page 20: ...e connector The VIA EPIA M Mini ITX Mainboard requires an ATX power supply to be connected Before inserting the power supply connector always make sure that all components are installed correctly to e...

Page 21: ...nnector JMS1 The mainboard provides a standard PS 2 mouse connector for attaching a PS 2 mouse You can plug a PS 2 mouse directly into this connector The connector location and pin as signments are as...

Page 22: ...A4 Data4 7 DATA5 Data5 8 DATA6 Data6 9 DATA7 Data7 10 ACK Acknowledge 11 BUSY Busy 12 PE Paper End 13 SELECT Select 14 AUTO FEED Automatic Feed 15 ERR Error 16 INIT Initialize Printer 17 SLIN Select I...

Page 23: ...el applications are used all three connectors become output connectors Line Out becomes Front L R Line In becomes Rear L R Mic In becomes Center Sub Note Win98SE supports only 4 CH output See appendix...

Page 24: ...es These connectors utilize the provided IDE hard disk cable IDE1 Primary IDE Connector The first hard drive should always be connected to IDE1 IDE1 can connect a Master and a Slave drive You must con...

Page 25: ...is used to reboot the system rather than turning the power ON OFF Avoid rebooting while the HDD is working You can connect the Reset Switch from the system case to this pin Power LED PW_LED The LED i...

Page 26: ...Module Connector IR This connector allows you to connect an IrDA Infrared module You must configure the setting through the BIOS setup to activate the IR function IR PIN SIGNAL 1 VCC 2 IRRX 1 3 IRRX...

Page 27: ...odule onto this pin header Wake On LAN Connector WOL This connector allows you to connect a network card with the Wake On LAN function The connector will power up the system when a signal is received...

Page 28: ...PA0 3 GND 4 GNF 5 TPB0 6 TPB0 7 1394_VDD 8 1394_VDD 9 GND 1 1 2 2 9 9 COM2 The Second Serial Port COM2 is a pin header for second serial port 1 2 9 Pin Definition PIN SIGNAL DESCRIPTION 1 DCD Data Car...

Page 29: ...requires a chassis intrusion sensor or on a chassis If any chassis component is moved the sensor triggers and sends a high level signal to this connector to record a chassis intrusion event Floppy Di...

Page 30: ...16 CD In Connector CD_IN This connector is for the CD ROM audio connector CD_IN CD_GND CD_R CD_L I2 C Connector I2 C This is for connecting a I2 C device 1 6 PIN SIGNAL 1 3 3V 2 3 3V 3 EL ON 4 SMBCK 5...

Page 31: ...AUD_MIC_BIAS 4 5V 5 LINE_OUT_R 6 NEXT_R 7 NC 8 Key Pin 9 LINE_OUT_L 10 NEXT_L 1 2 9 10 F_AUDIO LVDS Module Connector LVDS Optional This connector allows you to connect to a LVDS module PIN SIGNAL 2 GF...

Page 32: ...at least 5 years If you want to clear the system configuration data from the CMOS RAM use the CLEAR_CMOS Clear CMOS jumper Follow the instructions below to clear the data The mainboard provides jumpe...

Page 33: ...I bus INT A INT D pins as follows Order 1 Order 2 Order 3 Order 4 PCI Slot 1 INT B INTC INTD INT A IEEE1394 INT B PCI Slot The PCI slot allows you to insert PCI expansion card When adding or re moving...

Page 34: ...3 3 The Main Menu 3 4 Standard CMOS Features 3 6 Advanced BIOS Features 3 8 Advanced Chipset Features 3 11 Integrated Peripherals 3 13 Power Management Setup 3 17 PNP PCI Configurations 3 22 PC Health...

Page 35: ...e right hand Enter Select the item Esc Jumps to the Exit menu or returns to the main menu from a submenu PU Increase the numeric value or make changes PD Decrease the numeric value or make changes F1...

Page 36: ...etup program provides a General Help screen You can call up this screen from any menu sub menu by pressing F1 The help screen displays the keys for use and navigate the BIOS setup Press Esc to exit th...

Page 37: ...chipset specific features and optimize system performance IntegratedPeripherals Use this menu to set onboard peripherals features PowerManagementSetup Use this menu to set onboard power management fu...

Page 38: ...ault settings for minimal and stable system operations LoadOptimizedDefaults Use this menu to load BIOS default settings for optimal and high performance system operations Set Supervisor Password Use...

Page 39: ...ptions are None 360K 5 25 in 1 2M 5 25 in 720K 3 5 in 1 44M 3 5 in 2 88M 3 5 in Floppy 3 Mode Support If enabled Drive A B is define to 3 Mode Floppy 3 Mode supports older Japanese Floppy Settings Dis...

Page 40: ...drive table The hard disk will not work properly if you enter improper information for this category Select Auto whenever possible If you select Manual make sure the informa tion provided is from your...

Page 41: ...el 2 cache Facilitates error detection correction when data passes through Level 2 cache Settings Ena bled and Disabled Quick Power On Self Test Shorten Power On Self Test POST cycle and enable shorte...

Page 42: ...to boot from the First Second Third boot device Settings Enabled and Disabled SwapFloppyDrive If the system has two floppy drives choose enable to assign physical drive B to logical drive A and vice...

Page 43: ...below Display Full Screen logo Show full screen logo during BIOS bootup process Settings Enabled and Disabled Show Summary Information Show summary information during BIOS bootup process Settings Ena...

Page 44: ...to graphics memory address space Host cycles that hit the aperture range are forwarded to the AGP without any translation Settings 4MB 8MB 16MB 32MB 64MB 128MB and 256MB AGP Mode Internal Decides the...

Page 45: ...eady to receive more data Settings Enabled and Disabled Select Display Device Set the device you want to use for displaying Settings CRT and TV TVType Set the TV type you would like to use Settings NT...

Page 46: ...rd disk controller to use the fast block mode to trans fer data to and from the hard disk drive Block mode is also called block transfer multiple commands or multiple sector read write Enabled ena ble...

Page 47: ...f a mo dem is used the onboard VIA MC 97 Modem Codec 97 controller will be enabled if not it is disabled Disable the controller if you want to use other controller cards to connect to a modem Settings...

Page 48: ...correct base I O port address Settings Disabled 3F8 IRQ4 2F8 IRQ3 3E8 IRQ4 2E8 IRQ3 and Auto Onboard Parallel Port This specifies the I O port address and IRQ of the onboard parallel port Settings 37...

Page 49: ...ort ECP EPP Extended Capability Port Enhanced Parallel Port EPP Mode Select Select the Enhance Parallel Port mode Settings EPP1 9 and EPP1 7 ECPModeUseDMA ECP utilises a DMA channel This field is only...

Page 50: ...dType Set the power saving mode for ACPI function Settings are S1 POS S1 Power On Suspend POS is a low power state In this state no system context CPU or chipset is lost and hardware maintains all sys...

Page 51: ...screen is turned off when system enters power saving mode Power Off by PWRBTN This field configures the power button function Settings are Delay 4 Sec The system is turned off if power button is press...

Page 52: ...ld monitor parallel port LPT and serial port COM activities Settings None LPT COM and LPT COM HDD FDDEvent Decide whether or not the power management unit should monitor hard disks and floppy drives a...

Page 53: ...not a PCI card can power up the system or resume it from suspend state Such PCI cards include LAN onboard USB ports etc Settings Disabled and Enabled ModemRingResume Decide whether or not Ring In sign...

Page 54: ...line If set to Enabled the activity of the specified IRQ line will prevent the system from entering power saving modes or awaken it from power saving modes Settings Disabled and Enabled Note IRQ Inte...

Page 55: ...initialize all the PnP cards Set to Yes the operating system is Plug Play capable The settings No and Yes Reset Configuration Data Normally you leave this field Disabled Select Enabled to reset Extend...

Page 56: ...ems IRQ Resources list IRQ 3 4 5 7 9 10 11 12 14 15 for users to set each IRQ a type depending on the type of device using the IRQ Settings PCI Device For Plug Play compatible devices designed for PCI...

Page 57: ...f your CPU fan warning for overall system status Current CPU Temp CPU Fan Speed System Fan Speed 12V 5V 3 3V CPU Vcore These items display the current status of all of the monitored hardware devices c...

Page 58: ...by BIOS according to the configurations on the SPD Settings Manual and By SPD SDRAMCASLatency Set the time between SDRAM read command and when the data actually be comes available Settings 2 and 2 5 B...

Page 59: ...ting allows you to set the appropriate DRAM voltage Setting options 2 5V 2 6V 2 7V and 2 8V Spread Spectrum When the motherboard s clock generator pulses the extreme values spikes of the pulses create...

Page 60: ...default Fail Safe values These values are set by the mainboard manufac turer to provide the most stable system When you select Load Fail Safe Defaults a message as below appears Pressing Y loads the d...

Page 61: ...ized Defaults are the default values also set by the mainboard manufacturer for both optimized and stable perform ance of the mainboard When you select Load Optimized Defaults a message as below appea...

Page 62: ...is disabled the system will boot and you can enter Setup without entering any password When a password has been set you will be prompted to enter it every time you try to enter Setup This prevents an...

Page 63: ...30 About Supervisor Password User Password Supervisor password Can enter and change the settings of the setup menus User password Can only enter but do not have the right to change the settings of the...

Page 64: ...you can select this option to save the changes and quit A message as below will appear on the screen Typing Y will allow you to quit the Setup Utility and save the user setup changes to RTC CMOS Typin...

Page 65: ...to quit the Setup menu you can select this option to abandon the changes A message as below will appear on the screen Typing Y will allow you to quit the Setup Utility without saving any changes to RT...

Page 66: ...cations It consists of the following topic Note You must install VIA chipset drivers first before installing other drivers such as audio or VGA drivers Theapplicationswillonlyfunctioncorrectlyifthenec...

Page 67: ...test updated driver utilities and software Running the Driver Utilities CD To start using the CD just simply insert the CD into your local CD ROM or DVD ROM drive The CD should run automatically when...

Page 68: ...your VGA driver and interface directly to hardware providing fast graphical access IRQ Routing Miniport Driver sets the system s PCI IRQ routing sequence and VIA INF Driver enables the VIA Power Manag...

Page 69: ...Appendix 5 1 This chapter gives you brief descriptions of how Smart 5 1 is enabled It consists of the following topics Smart 5 1 Intelligent 6 Channel Audio 5 2 Appendix 5 5 5 5 5...

Page 70: ...rk properly both the OS and the software applica tion used need to support 6 channel audio Win98 supports 4 channel only Please follow the example A and B to enable the Smart 5 1 funtion and the examp...

Page 71: ...Appendix 5 3 3 Choose 5 1 surround sound speakers to support the 6 channel function...

Page 72: ...nds and Audio Devices icon in Control Panel and then select Audio tab on the panel as shown below Press Volume button in the Sound playback column 2 Front Speaker panel appears and then select Options...

Page 73: ...Appendix 5 5 3 Then Front Speaker panel displays Advanced button and press it 4 Check the item Smart5 1 Enable in the panel below...

Page 74: ...ication and click on the right arrow icon shown as the pic ture below Then select Audio Effect Following the system setup users need to install software for playing DVD Currently the two main DVD play...

Page 75: ...elow 3 The Setup panel appears and select Audio tab Then choose the item 6 Channel 5 1 Home Theater in the column of Audio Speaker Configuration Finally users can click Test button to verify the chann...

Page 76: ...ration icon shown as the picture below 2 The panel of Configuration appears and select Audio tab Then choose 6 Speaker in the column of Audio Output and click Ok Through the system operation and softw...

Reviews: