background image

User’s Guide

Clock Radio for iPod

®

with Two Alarms

Mi4002

Before operating this product,

please read these instructions completely.

Summary of Contents for Mi4002

Page 1: ...User s Guide Clock Radio for iPod with Two Alarms Mi4002 Before operating this product please read these instructions completely ...

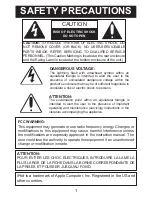
Page 2: ...ctric shock to persons ATTENTION The exclamation point within an equilateral triangle is intended to alert the user to the presence of important operating and maintenance servicing instructions in the literature accompanying the appliance FCC WARNING This equipment may generate or use radio frequency energy Changes or modifications to this equipment may cause harmful interference unless the modifi...

Page 3: ...rrect the interference by one or more of the following measures Reorient or relocate the receiving antenna Increase the separation between the equipment and receiver Connect the equipment into an outlet on a circuit different from that to which the receiver is connected Consult the dealer or an experienced radio TV technician for help 2 SAFETY PRECAUTIONS WARNING TO PREVENT FIRE OR SHOCK HAZARD DO...

Page 4: ...on 5 POWER Button 6 MEMORY CLK SET Clock Set Button 7 VOLUME Up Down Buttons 8 SNOOZE SLEEP Button 9 Display 10 Left Speaker 11 MEM DN Memory Down Button 12 RADIO AUX IN Function Button 13 BAND Button 14 PLAY PAUSE M UP Memory Up Button 15 iPod Button 16 TUNE Up Down Skip n o Buttons 17 EQ Button 18 Right Speaker FRONT TOP ...

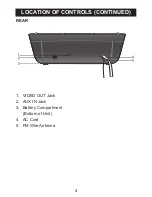
Page 5: ...4 LOCATION OF CONTROLS CONTINUED 1 VIDEO OUT Jack 2 AUX IN Jack 3 Battery Compartment Bottom of Unit 4 AC Cord 5 FM Wire Antenna REAR ...

Page 6: ...larized AC outlet do not file or cut the wide blade It is the user s responsibility to have an electrician replace the obsolete outlet BACKLIGHT When the unit is operating on AC power the LCD backlight will always be on AC Plug AC Outlet BATTERY INSTALLATION BATTERY PRECAUTIONS Follow these precautions when using batteries in this device 1 Use only the size and type of batteries specified 2 Be sur...

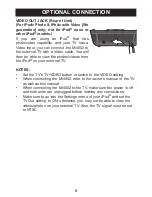
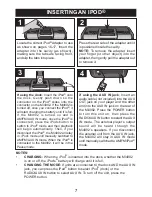
Page 7: ...photos videos from the iPod on your external TV NOTES Set the TV s TV VIDEO button or switch to the VIDEO setting When connecting the Mi4002 refer to the owner s manual of the TV as well as this manual When connecting the Mi4002 to the TV make sure the power is off and both units are unplugged before making any connections Make sure to go into the Settings menu of your iPod and set the TV Out sett...

Page 8: ...n if you disconnect the iPod the Mi4002 will stay in iPod mode until manually switched to AM FM AUX IN mode When the iPod is connected to the Mi4002 it will be in the Pause mode 1 3 If using the AUX IN jack Insert an audio cable not included into the AUX OUT jack on your player and the other end into the AUX IN jack on the rear of the Mi4002 Press the POWER button to turn this unit on then press t...

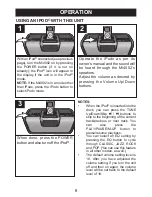
Page 9: ... 2 When done press the POWER button and also turn off the iPod 1 1 3 USING AN IPOD WITH THIS UNIT NOTES When the iPod is inserted into the dock you can press the TUNE Up Down Skip n o buttons to skip to the beginning of the current track previous or next track You can also press the PLAY PAUSE M UP button to pause resume playback You can select an EQ setting by pressing the EQ button to cycle thro...

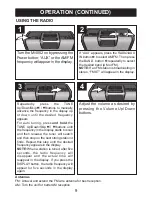
Page 10: ...auto tuning press and hold the TUNE Up Down Skip n o buttons until the frequency in the display starts to scan and then release the tuner will search and then stop on the next strong station it finds Repeat this step until the desired frequency appears in the display NOTE When a station is tuned after five seconds the radio frequency will disappear and the actual time will reappear in the display ...

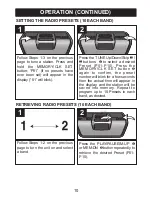
Page 11: ...RY CLK SET button 2 again to confirm the preset number will blink for a few seconds then the actual time will appear in the display and the station will be saved into memory Repeat to program up to 10 Presets in each band as desired 1 2 2 SETTING THE RADIO PRESETS 10 EACH BAND Follow Steps 1 2 on the previous page to turn the unit on and select a band 1 Press the PLAY PAUSE M UP 1 or MEM DN 2 butt...

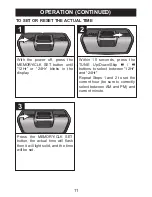
Page 12: ...Y CLK SET button the actual time will flash then it will light solid and the time will be set 1 1 3 TO SET OR RESET THE ACTUAL TIME Within 15 seconds press the TUNE Up Down Skip n o buttons to select between 12Hr and 24Hr Repeat Steps 1 and 2 to set the current hour be sure to correctly select between AM and PM and current minute 1 1 2 ...

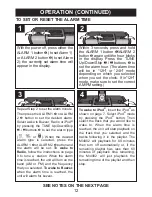
Page 13: ...t will alarm for buzzer 2 1 3 3 To wake to iPod insert the iPod as shown on page 7 Select iPod mode by pressing the iPod button Then select the track that you would like to wake to When the alarm time is reached the unit will start playback on the track that you selected and the tracks following it in the playlist The Mi4002 will playback for 60 minutes then turn off automatically or if the remain...

Page 14: ...s of playback time remaining the unit will just playback the remaining time of the playlist and then stop and the alarm indicator will blink for the remaining time If an iPod isn t inserted into the unit when the alarm time is reached it will wake to Radio even though wake to iPod was selected TO SHUT OFF THE ALARM see TO SHUT THE ALARM OFF section on the next page If both alarms are set while the...

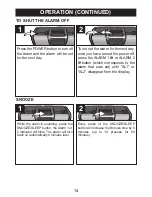
Page 15: ...ndicator will blink The alarm will turn back on automatically 6 minutes later 1 1 1 SNOOZE To not set the alarm for the next day once you have turned the power off press the ALARM 1 1 or ALARM 2 2 button which corresponds to the alarm that was set until AL1 or AL2 disappear from the display 2 1 2 Every press of the SNOOZE SLEEP button will increase the Snooze time by 6 minutes up to 10 presses for...

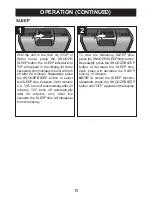
Page 16: ...i e 20 turns off automatically after 20 minutes 30 turns off automatically after 30 minutes etc After five seconds the SLEEP time will disappear from the display 1 1 1 To view the remaining SLEEP time press the SNOOZE SLEEP button once Repeatedly press the SNOOZE SLEEP button to decrease the SLEEP time each press will decrease the SLEEP time by 10 minutes NOTE To cancel the SLEEP function repeated...

Page 17: ...ront of the Adapters as shown on the next page to match with your iPod Insert the corresponding Adapter and your iPod into the unit as described on page 7 iPod Type Memory Adapter No 20GB U2 Special Edition 20GB 40GB Fourth Generation iPod 20GB 30 GB U2 Special Edition 40 to 60GB No 4 No 5 iPod Photo iPod with color display No 6 No 7 4 to 6GB iPod mini No 3 ...

Page 18: ...dapter No is engraved at the front of the adapters Please refer to the illustration below for the location of the Adapter No No 8 No 9 No 10 NOTES For the Second Generation iPod nano 2 to 8GB please use the Universal Dock included with your iPod The eight adapters provided with this unit are for use with this unit only they are not Universal Docks ...

Page 19: ...ot tuned Retune the AM or FM properly broadcast station FM Wire Extend FM wire antenna is not antenna extended AM Unit is not pos Rotate unit until best itioned correctly reception is obtained iPod mode no sound Incorrectly connected Check the connection Not in iPod mode Press iPod button Time reset to 12 00 Batteries connected Check the batteries improperly not con nected or dead Clock not set Se...

Page 20: ...te RADIO SECTION Frequency Range FM 87 5 108 MHz Frequency Range AM 530 1710 KHz Specifications are subject to change without notice FOR ADDITIONAL SET UP OR OPERATING ASSISTANCE PLEASE CONTACT CUSTOMER SERVICE AT 954 660 7100 PLEASE KEEP ALL PACKAGING MATERIAL FOR AT LEAST 90 DAYS IN CASE YOU NEED TO RETURN THIS PRODUCT TO YOUR PLACE OF PURCHASE FOR PARTS AND ACCESSORIES CONTACT FOX INTERNATIONAL...

Page 21: ...Hopper Inc Weston FL Printed in Hong Kong ...

Reviews: