Rev. 3/7/2022
VST-4-Y, MANUAL
Copyright 2021 Vestil Manufacturing Corp. Page 5 of 10
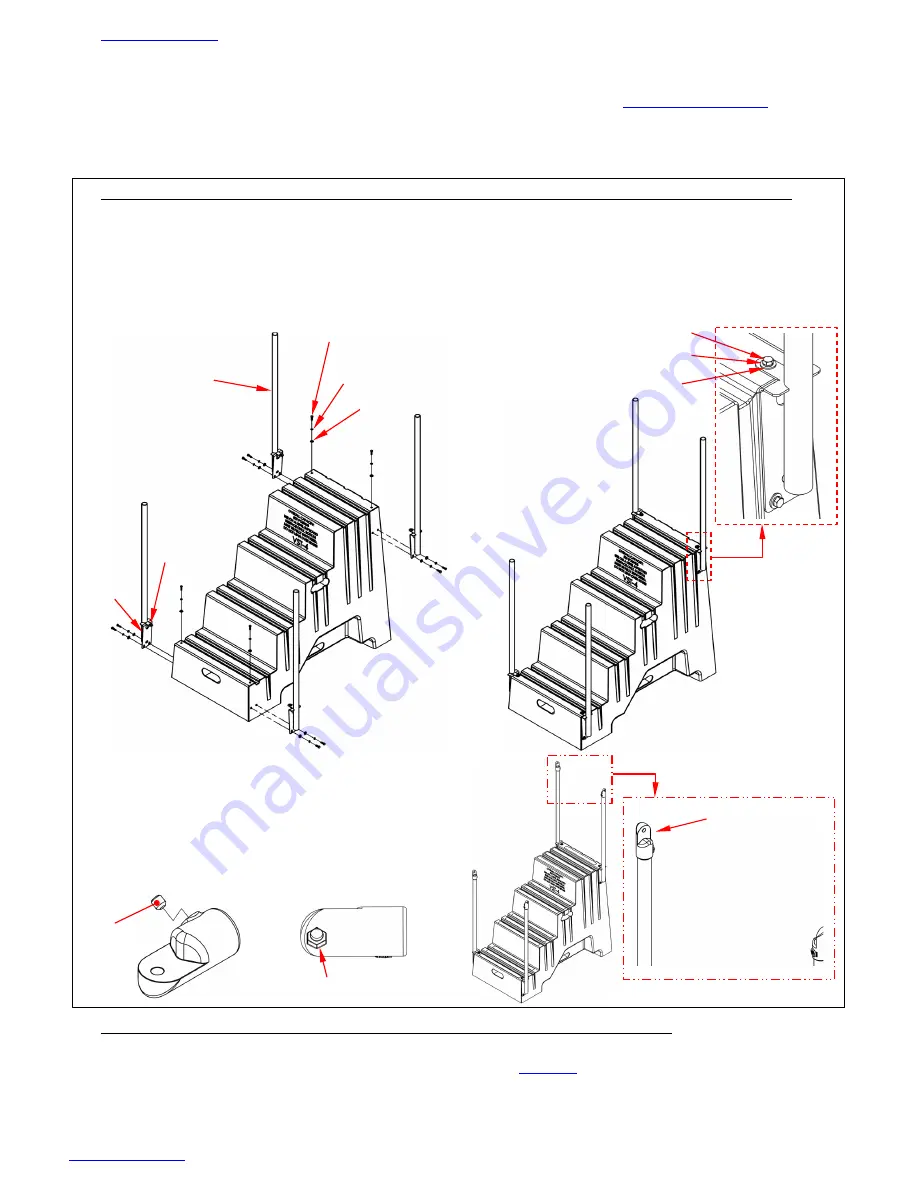
ASSEMBLING THE STEPS
NOTE: Numbers in parentheses () correspond to part numbers in the
Install the handrails, casters (16-132-197), and molded feet (14-145-179) before putting the
steps into service. Use a torque wrench to install hardware according to the torque
specifications provided in the following instructions.
1.
Attach the handrail posts (14-524-018) to the steps (14-147-035) with 5/16”-18 hardware
a.
Put a 5/16” lock washer (33620) and then a 1/4” flat washer (33004) onto each of 12 bolts
(11057). Bolts are 5/16”-18 x 1.25”.
b.
Insert the bolts through the post brackets and top brackets. Wind the bolts into the
expanding insert nuts (99-145-197).
NOTE: Expanding insert nuts are installed in the pilot holes in the steps at the factory.
Tighten all bolts to 8.8
lb∙
ft with your torque wrench.
c.
Slide a pipe end (44-516-016) onto the top
of each post. Orient the pipe ends to face
the steps. Use a 3/16” Allen wrench to
tighten set screws. Leave set screws
somewhat loose at this point to allow
adjustments to be made as handrail
segments are fastened together in step 2.
2.
Fasten the handrail tubes (14-024-042) to the handrail posts (14-524-018)
a.
Attach a pipe end to each end of both handrail tubes. Make sure that the pipe ends
face away from the steps. See diagram following
b.
Put 3/8”-16 lock nuts (37024) in the fastener recesses of the pipe ends connected to the
handrail tubes.
Bolt (11057)
Lock washer
(33620)
Flat washer (33006)
Top
bracket
Post
bracket
Bolt (11057)
Lock washer (33620)
Flat washer (33006)
Handrail
post
Pipe end
facing steps
Set
screw
Pipe
end
Fastener recess


